Fix: Apple Mail and BT Internet “Won’t Send Emails”
Emails get stuck in the Outbox with a “Cannot Send Mail” alert when using BT Internet on Apple Mail, even though your internet connection is fine and you can receive emails. This happens because Apple Mail can’t connect or properly log in to BT’s SMTP server, which is needed to send emails.

The main cause is either missing or incorrect login details—especially your username and password for the outgoing mail server. Other possible reasons include using the wrong SMTP port number or problems with the Mail app settings after an iOS or macOS update.
Now that you know the causes, let’s discuss the solutions.
1. Set a Custom DNS on Your Mac
This method should fix the issue as long as you don’t change your Mac’s network settings later, and as long as BT doesn’t deactivate the DNS servers you add.
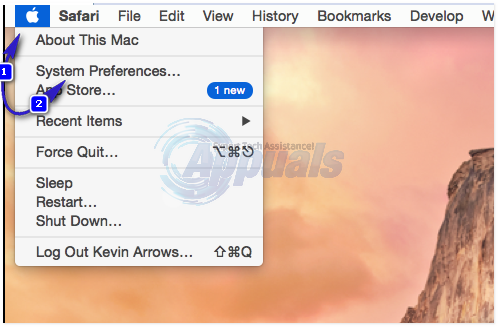
- Click the Apple icon in the top left corner of your screen, then open System Preferences.
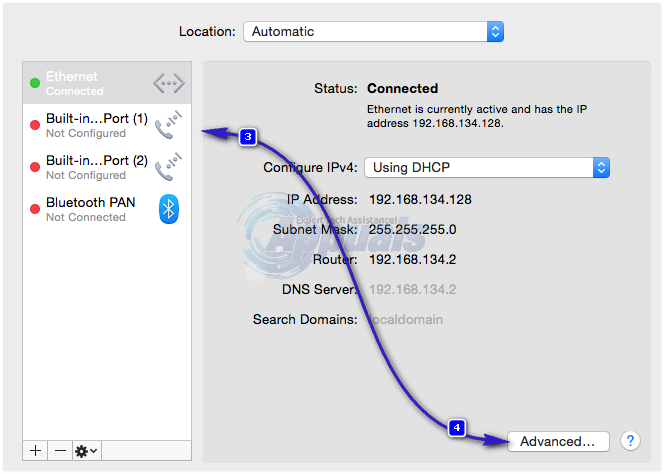
- Open Network, select your connection type (Wi-Fi or Ethernet), and click Advanced.
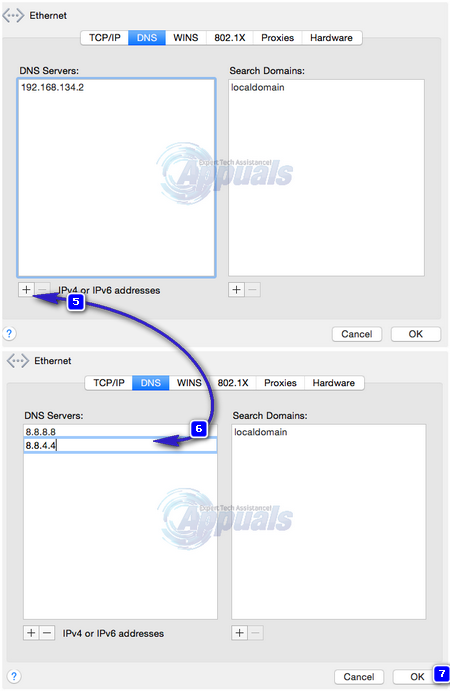
- Go to the DNS tab and click the plus (+) button to add new DNS servers.
- Add two servers, such as 8.8.8.8 and 8.8.4.4.
2. Change the Hostname on Your Router
This is another possible fix. This will work for your Mac on this specific router. If you connect to a different BT Hub, you’ll need to repeat this process.
- Open Safari (or another browser) and enter your router’s IP address (usually 192.168.1.254) in the address bar.
- Go to Settings, enter your router password, and navigate to Advanced settings -> Business Network or Home Network.
- You’ll see a list of devices that have connected to this router. If you can’t identify your Mac, temporarily disconnect all other devices and look for the active one. It may appear as “unknown-xx:xx-etc”.
- Select your Mac and rename it using only simple characters—no spaces or punctuation. For example, name it Homemac or something similar.
3. Change the Name of Your Mac
Since this issue often comes from the Mac’s hostname, using a name with no spaces or symbols can help you connect anywhere.
- Open Terminal. You’ll find it in Finder -> Applications -> Utilities.

- In Terminal, type this command: scutil –set HostName NEWHOSTNAME where NEWHOSTNAME is the new name for your Mac. Start with a letter, use only letters and numbers, and keep it under 64 characters if possible.

- Click the Apple icon, open System Preferences, and go to Sharing. If you don’t see it, click the Show All button at the top to find it.
- Click Edit in the Sharing window. Set the Local Hostname to match the name you chose in Terminal.

- Finally, restart your Mac and check if your email is working.