How to Fix “Failed to Download Attachment from Multimedia Message” Error?
The message “Failed to download attachment from multimedia message. Try again later.” often pops up again and again, even when you don’t see any MMS waiting to be downloaded. This error means your phone couldn’t download a picture, audio, or video that someone sent you in a text.

Usually, this happens because your mobile data is turned off or isn’t working well. Other common reasons include the wrong APN settings, not enough storage space, or data-saving apps blocking the download.
In this article, we will discuss different ways to solve this error.
1. Change the Network / Network Mode
Your phone needs mobile data to download MMS messages, and using the wrong network mode might prevent it from connecting to mobile data properly. By toggling between Automatic, LTE, or other network settings, you let your device reconnect in a way that often fixes network issues and allows MMS to download smoothly.
These steps will help you re-establish a proper connection with your carrier’s network, making sure that data can flow and MMS messages can be downloaded:
- Unlock your phone and swipe down from the top of the screen to open the notification panel.
- Tap the Wi-Fi icon to turn it off.
- Tap the Mobile data icon to enable it.
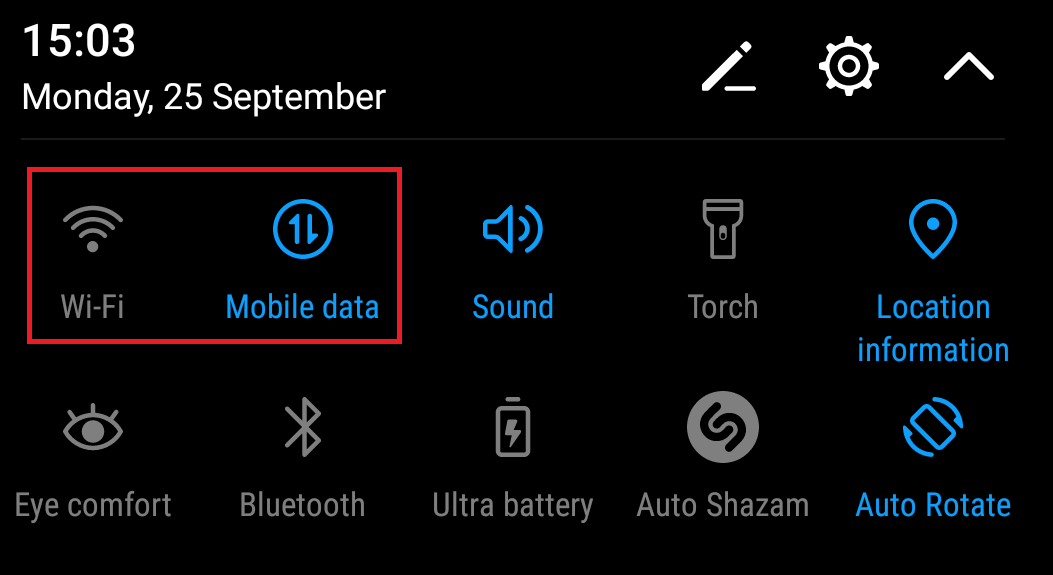
Disable Wi-Fi and Enable Mobile Data - Try to download the message again to see if the error is fixed.
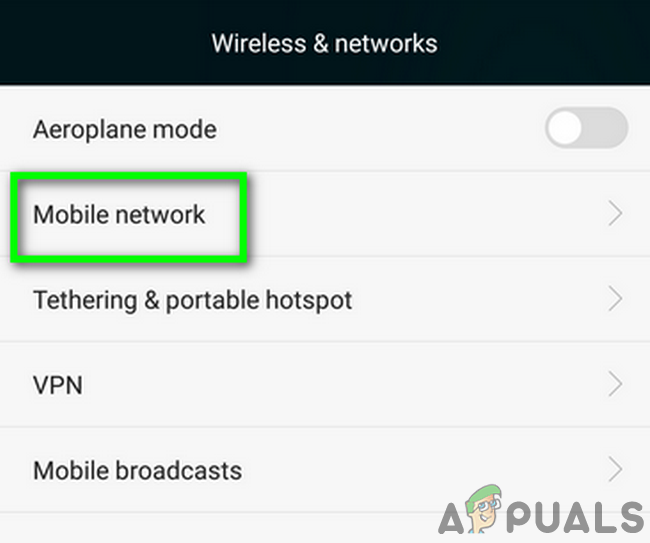
- If it’s not resolved, open your phone’s Settings and tap More.
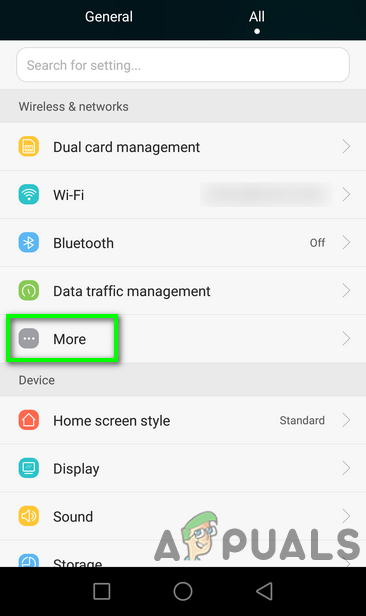
Open More in Settings - Go to Mobile Network.
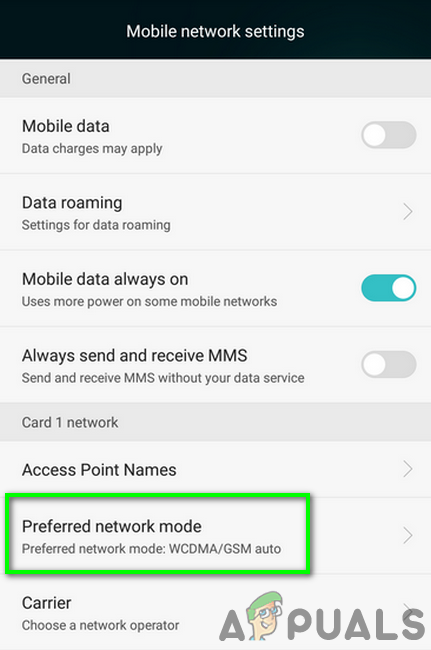
Open Mobile Network Settings - Tap Preferred Network Mode.
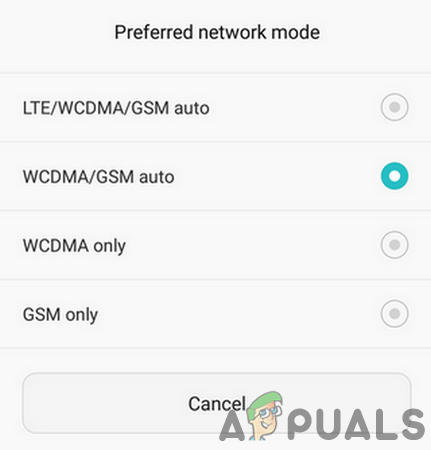
Open Preferred Network Mode Settings - Try different network modes, such as Automatic or LTE, and check if the MMS downloads correctly.
Change Preferred Network Mode
2. Enable / Disable Auto-Retrieve MMS Setting
When the auto-retrieve feature is on, the phone automatically downloads multimedia messages as soon as they come in. Sometimes, though, this can glitch and stop downloads. Toggling this setting off and then back on gives the messaging service a chance to reset itself and clear up any temporary problems with MMS.
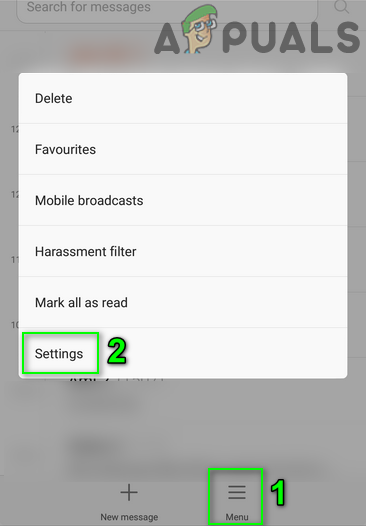
- Open your Messaging app and tap Menu.
- Select Settings.
Open Messaging Settings - Toggle the Auto Retrieve option on or off, then restart your phone.
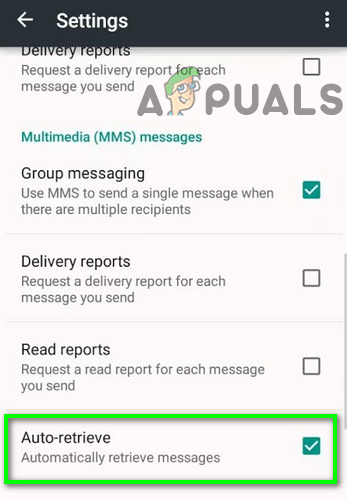
Disable Auto Retrieve MMS Setting - After restarting, try to download the MMS again and see if it works.
3. Disable the Package Disabler
On Android, a Package Disabler is often used to turn off apps you don’t want to use. However, it can sometimes disable important services—such as the MMS service—by mistake. If important services are turned off, MMS downloads might fail. By disabling the Package Disabler, all services are re-enabled, which can often resolve downloading issues related to service restrictions.
- Tap the Package Disabler widget. The color should change from red to blue, showing it is now disabled.
Disable Package Disabler - Check if you can now download MMS messages successfully.
4. Enable Download Booster
Download Booster, mainly available on Samsung devices, combines Wi-Fi and mobile data to speed up large file downloads. Turning on this feature can help if you’re having network-related issues. With both Wi-Fi and mobile data working together, downloading larger MMS files can succeed where it failed before.
- Make sure both Wi-Fi and mobile data are enabled.
- Open your phone’s Settings and tap Connections.
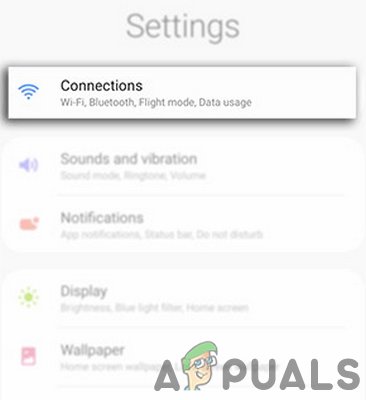
Open Connection Settings - Tap More Connection Settings.
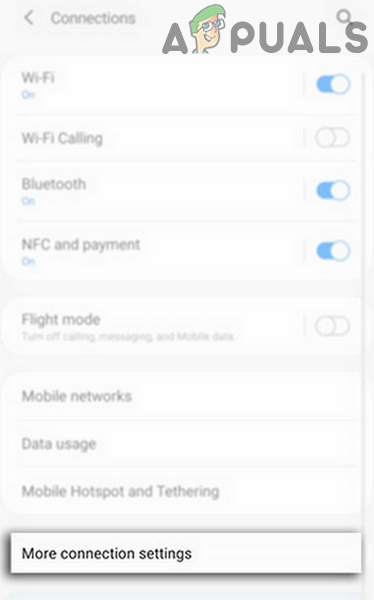
Open More Connection Settings - Select Download Booster and turn it on.
- Restart your device.
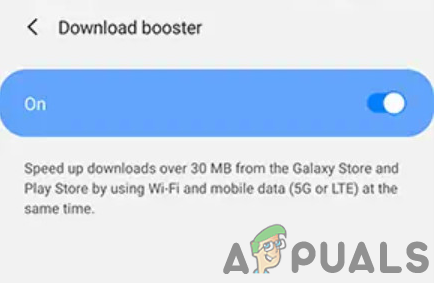
Enable Download Booster - After rebooting, try to download your MMS to check if the issue is fixed.
5. Clear Cache and Data for MMS Service
The MMS service stores data in its cache to work faster. If this data becomes corrupted, clearing it can resolve the issue. By wiping the cache and data specifically for the MMS service, you let it start fresh. This removes any temporary files or saved bits that could stop it from working correctly.
- Go to Settings on your phone and tap Apps.
- Tap the More option (usually at the top right or bottom) and select Show System.
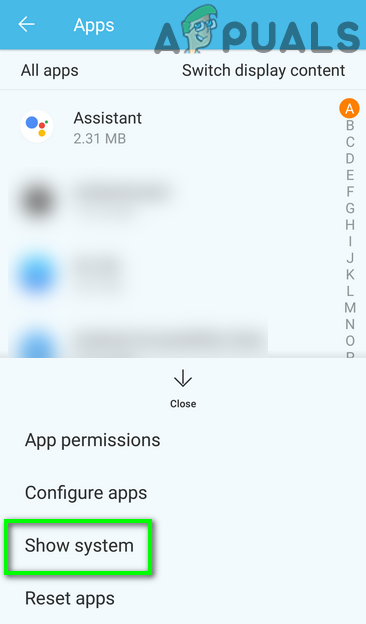
Show System in Apps Settings - Find and select the MmsService app, then tap Storage.

Tap on MMS Service - Tap Clear Cache and Clear Data, then confirm in the dialog box.
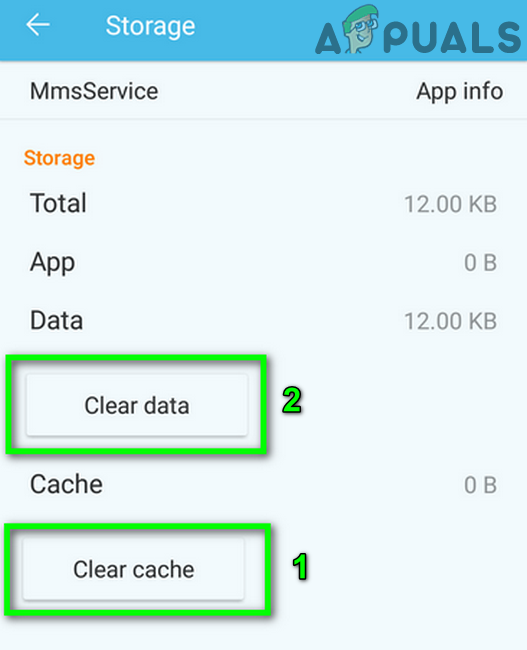
Clear Cache and Data of MMS Service - Restart your phone.
- After restarting, try to download the message to see if the issue is gone.
6. Clear the Cache Partition
Over time, your phone stores temporary data in a special area called the cache partition. If this data gets corrupted, it can cause system errors—including problems with MMS downloads. Clearing the cache partition will erase these temporary files (without affecting your personal data), letting your phone rebuild everything cleanly and often fixing persistent issues like this.
- Clear the cache partition.
- Restart your phone and see if the MMS problem is fixed.
7. Disable IPV6 Protocol
IPv6 is a new internet protocol, but not every network supports it smoothly. Disabling IPv6 on your router forces your device to use the older, more compatible IPv4 protocol. This can help resolve conflicts or connectivity issues—including problems downloading MMS—by making the network connection simpler and more compatible.
- Disable the IPV6 protocol on your router. You can do this through the router’s settings, which you often access using the IP address shown on the router.
- Once IPv6 is disabled, check if you can download MMS messages.
8. Change Messaging Application
The problem may be caused by the messaging app you are using. The default app or a third-party app could each potentially be at fault. For T-Mobile users, you might want to try the T-Mobile Digits app.
If you’re using the stock messaging app, consider installing a different one (such as Messages by Google, Hangouts, or Textra), and make it your default messaging app.
If you use a third-party app, switch back to your default messaging app.
- Open Settings and go to Application Manager.
- Tap More and select Configure Apps.
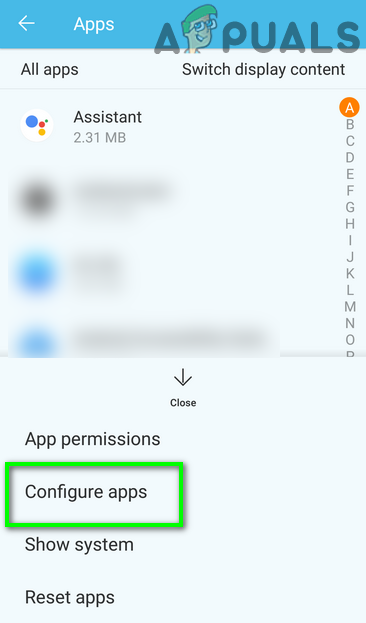
Open Configure Apps Menu - Tap on SMS App.
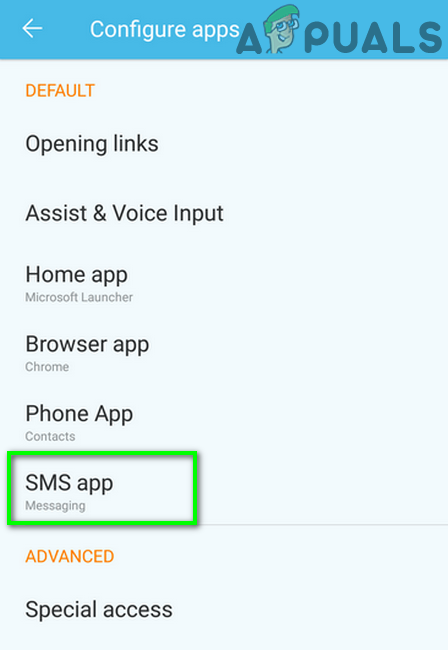
Tap on SMS App - Select the messaging app you want to use as default.
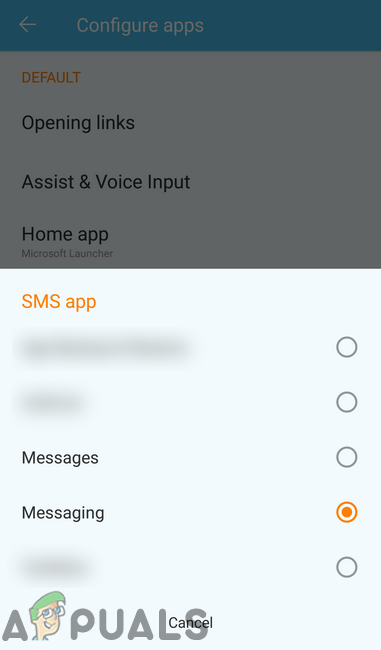
Select the Default SMS App - Once set, check if your MMS issues are resolved.
9. Reinstall / Reset the Carrier or APN Settings
The APN settings let your phone communicate with the network for MMS and data. If these settings are incorrect, MMS won’t download. Resetting them to your carrier’s defaults removes any possible mistakes and restores proper network access.
Make sure you have your carrier’s APN details handy (your carrier’s website or customer service can provide them), so you can reconfigure anything if needed after the reset.
- Open Settings and tap More.
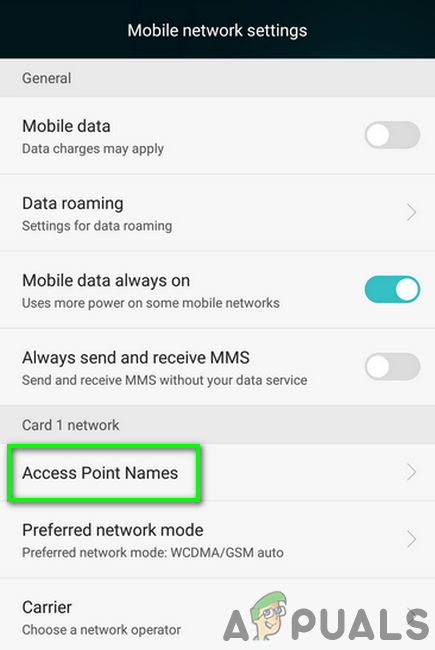
Open More in Settings - Tap Mobile Network and then Access Point Names.
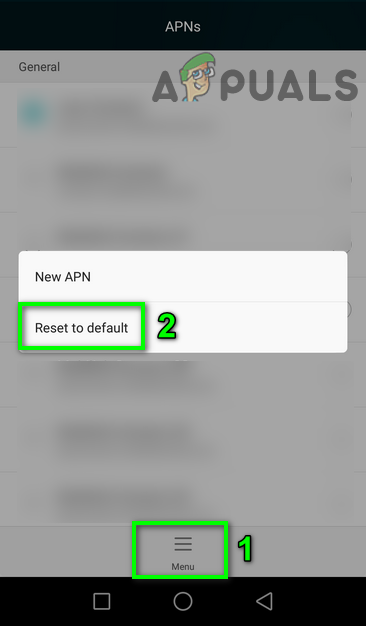
Open Access Point Names - Press the Menu button and select Reset to Default.
Reset APN Settings to Default - If the problem remains, go back to the Access Point Names and delete any unnecessary APNs.
- Add a new APN (your carrier can provide the required info), or use saved MMS configuration messages you might have received previously.
- After resetting or updating your APN settings, check if the MMS problem is fixed.
10. Update Profile and PRL
A corrupted data profile or Preferred Roaming List (PRL) can also keep MMS from downloading. Updating your profile reconnects your phone to your service provider’s network and updates any old or incorrect settings that might be blocking MMS.
PRL updates make sure your device uses the best available networks for messaging. Together, these updates help restore all your network services, including MMS.
- Go to Settings and tap About phone.
- Select System updates, then tap Update Profile.
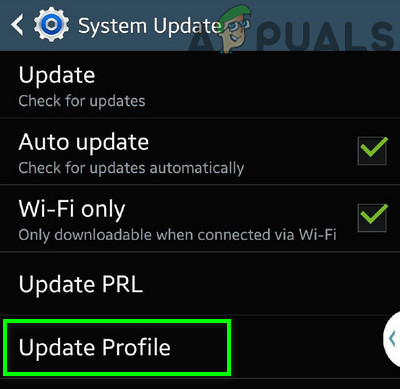
Update Profile - Next, tap on Update PRL and then restart your phone.
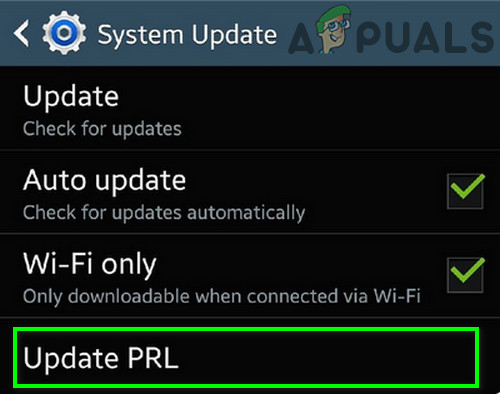
Update PRL - After the restart, check if MMS is working properly again.
If the issue still isn’t resolved, you might consider reporting your phone as lost via your carrier’s online portal, wait 15 minutes, then report it as found. Some users have reported this fixes the issue. Please use caution—this process might be complicated with some carriers, and your phone could be temporarily locked. It’s best to contact your carrier for guidance before choosing this option.