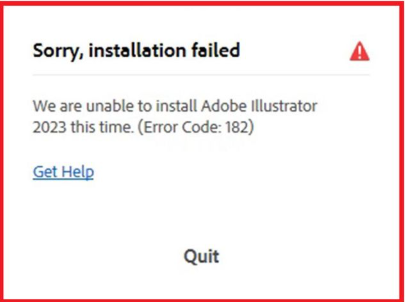
How to Fix Adobe Error Code 182 During Installation?
Adobe Error Code 182 typically occurs when the installation gets stuck at around 5% and fails to proceed further. This usually happens due to one of two main reasons:
- The installation folder path is too long, nested too deep, or placed in a restricted directory, preventing the installer from unpacking and saving the necessary files.
- Your system lacks the necessary permissions, blocking the installer from accessing or modifying the installation folder. This often occurs due to admin restrictions or security settings.
This error is especially common on systems with:
- Strict user account controls (e.g., corporate or school PCs),
- Modified default installation locations, or
- Installers running from external/synced folders (e.g., OneDrive or network drives).
Now, let’s go through the actual fixes to resolve this issue and successfully install your Adobe software.
1. Rename the Setup Folder and Use a Simple Installation Path
Adobe installers are sensitive to folder structure and naming. If the setup folder contains special characters or is buried too deep in the directory tree, the installation may fail.
To avoid this, rename the folder using only basic alphanumeric characters and place it in a root-level location, such as the Desktop or directly on the C: drive.
Avoid launching the setup from synced or cloud directories like OneDrive, as these can also cause access issues.
- Open File Explorer and navigate to your Downloads folder, where the Adobe installation files are typically saved.
- Locate the Adobe installation folder. If multiple versions exist, choose the most recent one containing the setup executable (usually named “Set-up.exe” or similar).

- To avoid path-related installation issues:
- Right-click the folder and select Cut.
- Paste it to your desktop.
- Rename it to something simple like Adobe_Install (avoid spaces and special characters).
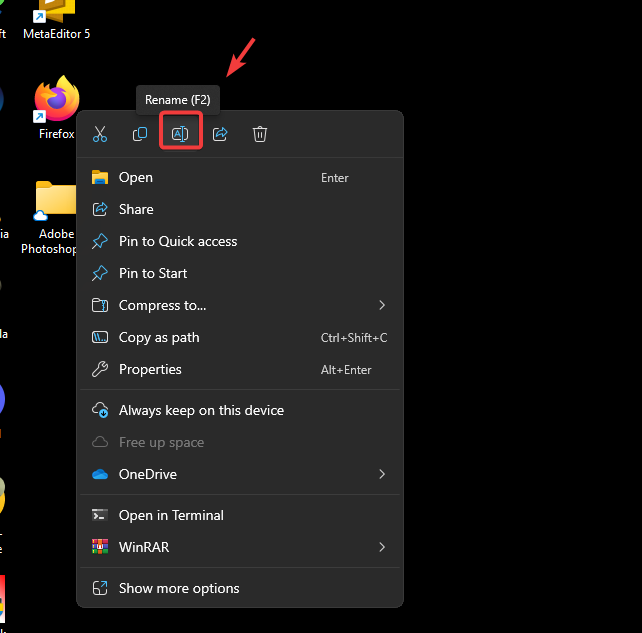
- Open the folder and double-click the setup file to begin installation.
2. Compress and Re-extract the Setup Folder
Sometimes, setup files inherit restrictive permissions from their download location—especially if stored in synced folders (like OneDrive), external drives, or directories locked by system policies. A simple fix is to compress the entire setup folder into a ZIP file and extract it to a neutral location (e.g., your desktop). This resets file permissions and removes hidden restrictions that may block installation.
Note: You need WinRAR for this method.
- Locate the most recent Adobe installation folder (containing the Setup file) and move it to your desktop for easy access.
- Right-click the folder, hover over WinRAR in the context menu, and select Add to Archive to create a compressed version.

- In the compression window, keep the default settings and click OK to create the archive.
- After compression, right-click the newly created archive file, hover over WinRAR again, and select Extract to “Adobe Photoshop” to decompress it.
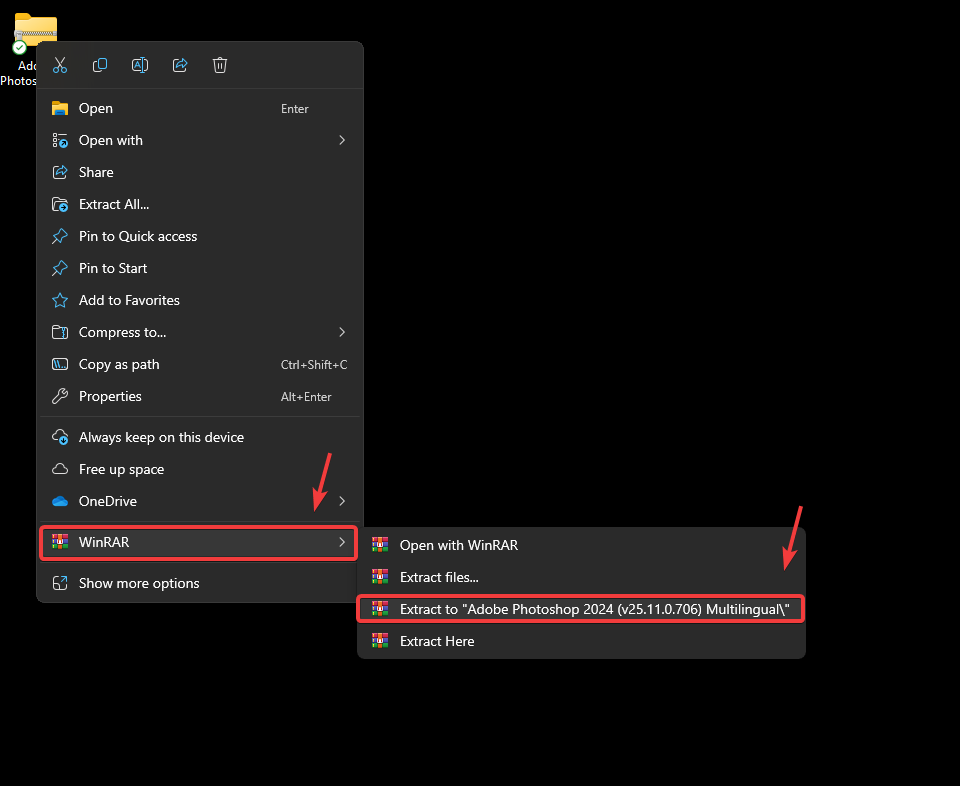
- Once extraction completes, open the resulting folder and run the Setup file. This fresh extraction should resolve previous installation errors.
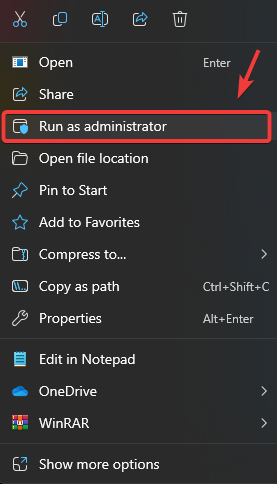
3. Run Adobe Setup as Administrator
If the installer lacks administrator permissions, it may fail to save files to restricted folders, such as Program Files. Running the setup as an administrator grants it the necessary access for a successful installation.
Simply right-click the Adobe Setup file and select Run as administrator.
If the issue persists, try reinstalling the Creative Cloud App if you use it to install Adobe software.