How to: Activate Windows after Changing Hardware
When you upgrade to Windows 10 for free from Windows 7 or 8.1, your Windows activation is linked to the computer’s hardware, not a special code. If you make a big change to your computer—like getting a new motherboard—Windows might think it’s a completely new computer and stop working. The free upgrade license also can’t be reused or moved to another computer like some other keys can.
Once you’re in Windows (even if it’s unactivated),
- Open the Start Menu
- Click All Apps
- Click Contact Support to launch the app
- Navigate to Services & apps > Windows > Setting up
- Here, you can either chat with a Microsoft representative or arrange a phone call
The Microsoft representative will try to reactivate your eligible Windows 10 license for you.
If support cannot reactivate your license, they may suggest the only practical solution: downgrade to Windows 7 (Service Pack 1 or higher), set everything up from scratch, and then upgrade to Windows 10 again. This works because downgrading and re-upgrading will register your new hardware with Microsoft’s activation servers, allowing you to enjoy your free, fully activated Windows 10.
While this process is not ideal—and it can be a bit of a hassle—it’s the most reliable way to get a fully activated copy of Windows 10 after a major hardware change. If you’re unsure how to do all this, don’t worry! Here’s a step-by-step guide:
Step 1: Create a Bootable Windows 7 Installation Media
First, you’ll need to perform a clean install of your legitimate Windows 7. For that, you need a bootable USB drive or DVD with Windows 7 on it. Creating this is easier than you might think! If you need help, check out this step-by-step guide.
Pro Tip: Before you start, **back up your important data** from the drive where Windows 10 is installed. Installing Windows 7 will erase everything on that partition.
Step 2: Change Boot Order & Boot from the Installation Media
By default, computers try to boot from their hard drive first. You’ll need to set your computer to boot from your USB drive or DVD instead. Here’s what to do:
1. Restart your computer.
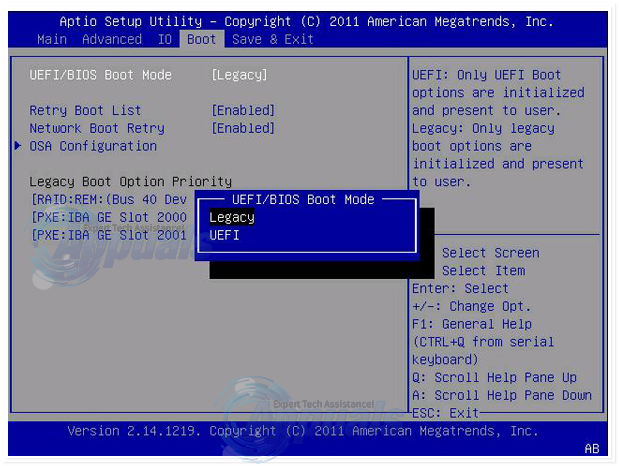
2. On the very first screen, you’ll see instructions to enter BIOS or Setup (often by pressing Delete, F1, or F2).
3. Enter BIOS, then look for “boot order” or “boot configuration”—usually found under the Boot tab.
4. Change the order so your computer checks your USB or DVD drive before the hard drive.
5. Insert your Windows 7 installation USB/DVD.
6. Save and exit the BIOS.
Your computer will restart. If you set the boot order correctly, it will find your Windows 7 installation media and ask you to “Press any key to boot from CD/DVD/USB…”
Press any key to boot from the installation media.
Step 3: Install Windows 7
Once your computer starts from the installation media, it will load the necessary files and guide you through installing Windows 7. Here’s how:
1. Select your Language, Time and currency format, and Keyboard or input method. Click Next.
2. Click Install now.
3. Accept the license terms and click Next.
4. Choose Custom (advanced) installation.
5. On the screen “Where do you want to install Windows?”, select the partition where Windows 10 is currently installed, click Drive options (advanced), then Delete to remove it. Confirm the action. The partition should now display as unallocated space.
6. Select the unallocated space and click Next. Don’t worry—the setup will create a proper partition automatically.
7. The installation will begin. This could take some time, depending on your hardware.
8. Your PC will restart a few times during the process. Just let it finish.
9. When you see the Set up Windows screen, type in a username and a computer name, then click Next.
10. Set up a password (if you want), then click Next.
11. Enter your Windows 7 product key. If you don’t have it handy, be sure to find it before you start—this is a 25-character code unique to your copy of Windows 7. You can also tick the option to Automatically activate Windows when I’m online.
12. Choose your Windows Update settings.
13. Set your Time Zone, Date, and Time, then click Next.
You’re done with the Windows 7 installation!
Step 4: Install All Available Windows 7 Updates
After installing Windows 7, you need to install all updates before upgrading back to Windows 10.
1. Open the Start Menu.
2. Search for “windows update” and open it.
3. Click Check for updates.
4. Wait while your PC searches for updates. There may be a lot, so be patient!
5. Install every available update.
Once you’ve installed all updates, you’re ready to move on.
Step 5: Upgrade to Windows 10
Now you can upgrade to Windows 10 for free again. Here’s how:
1. Download the Windows 10 Media Creation Tool.
2. After downloading, find the file and double-click to launch the tool.
3. When it starts, select Upgrade this PC now and click Next.
4. The tool will begin downloading the files for the upgrade. This depends on your internet speed—just let it run!
5. Accept the License terms to continue.
6. On the Ready to install screen, you’ll see what’s going to happen (which edition of Windows 10 you’ll get and what will happen to your files and apps). Click Change what to keep if you want to adjust settings, then click Next.
7. When you’re ready, click Install. The process is automatic and your computer will restart several times.
8. Once finished, you’ll see the Windows 10 login screen. Log in and enjoy your fully activated, free copy of Windows 10!