FIX: Account has been disabled. Please see your System Administrator
One of the most terrifying problems that any Windows 10 user has ever faced is the “Account has been disabled” problem. The “Account has been disabled” error message (or the “Account has been disabled. Please see your System Administrator” message – to be more specific) basically says that a user account has, for some reason, been disabled.
Account has been disabled” can appear either after an error occurs, leading to you being locked out of your user account, or after your computer shuts down unexpectedly while you’re creating a user account following a fresh Windows 10 installation or upgrade. If this issue arises due to an improper shutdown while creating a user account following a fresh Windows 10 installation or upgrade, you’ll encounter a user account named defaultuser0 upon booting the computer. However, any attempts to log into this user account will result in the “Account has been disabled” message.
The ‘Account has been disabled’ issue completely locks users out of their accounts, and that can be a significant problem for the average Windows 10 user. Understandably, any Windows 10 user would be furious if they were simply locked out of their computer for no apparent reason. However, you can address the ‘Account has been disabled’ issue by using the following two solutions:
Create a new account with administrative privileges in Safe Mode
The folks at Microsoft understand how much the average Windows 10 user can be a goof, which is why all copies of Windows 10 include a hidden account named ‘Administrator’ that has administrative privileges. In the event something happens to your primary Windows 10 account, you can rely on this hidden ‘Administrator’ account and use it to create a new account with administrative privileges for yourself. The hidden ‘Administrator’ account is only accessible when a computer is in safe mode.
- On the sign-in screen, hold down the Shift key on your keyboard and click the Power button at the bottom of the screen. From the menu that appears, click Restart, all while continuing to hold the Shift key.
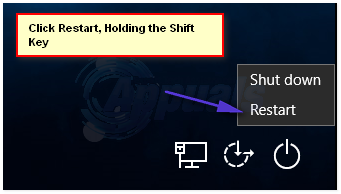
- Only let go of the Shift key when the Advanced Recovery Options menu appears.
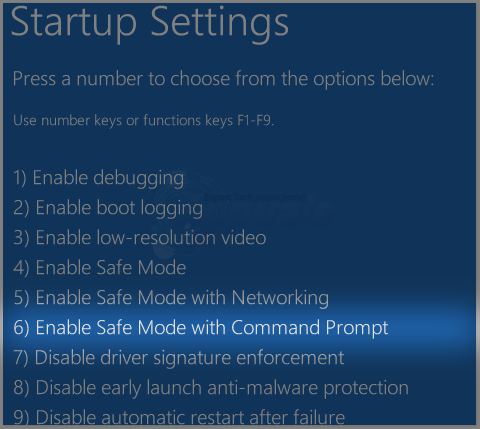
- In the Advanced Recovery Options menu, click on Troubleshoot > Advanced options > Startup settings > Restart. When your computer restarts and you are greeted with a blue screen displaying several different options, press the numerical key on your keyboard that corresponds with ‘Enable Safe Mode with Command Prompt’.
- When your computer boots up, you will be able to see the hidden Administrator. Log into it.
- Open the Start Menu, type cmd into the Search bar and click on the search result titled cmd to open a Command Prompt.
- One by one, type the following commands into the Command Prompt, making sure that you press Enter after typing in each one:
net user /add <name of the user account you want to create>

net localgroup administrators <name of the user account you want to create> /add
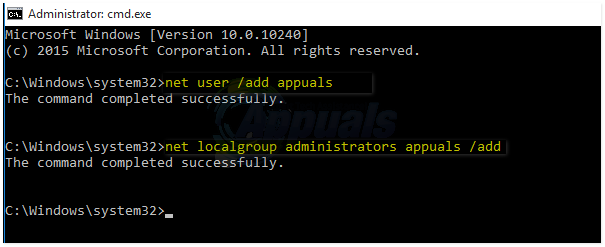
- Once both commands are executed, a new user account with administrative privileges will be created. To activate this, restart your computer, then type ‘shutdown /r’ in the same prompt. You will then be able to log into your new account once your computer has booted up.
Perform a System Image Restore
The second method that you can use to fix the “Account has been disabled” problem is to perform a System Image Restore. Performing a System Image Restore will restore your computer to a previous point in time, a point at which the “Account has been disabled” problem did not exist. Performing a System Image Restore will not result in a loss of personal files or data but can result in the deletion of apps or updates that were downloaded and installed after the point in time to which you are restoring your computer. And best of all, you can perform a System Image Restore without having to login to your user account.
- At the sign-in screen, hold down the Shift key on your keyboard and click on the Power button located at the bottom of the screen.
- From the menu that pops up, click on ‘Restart’, all the while holding down the ‘Shift’ key.
- Only let go of the Shift key when the Advanced Recovery Options menu appears,
- In the Advanced Recovery Options menu, click on ‘Troubleshoot’, then ‘System Image Restore’.
- When provided with system restore points to choose from, choose a point at which the “Account has been disabled” issue did not exist and begin the restoration process.
- When (or if) prompted to select an account, click on the account titled Administrator.
- Wait for the System Image Restore to be completed. Once the process has been completed, you will be prompted to restart your computer, and there will be no trace of the “Account has been disabled” problem once your computer boots up.
Use a PCUnlocker Live CD/DVD or USB to reset your password
PCUnlocker Live is a program designed specifically to allow users of any version of the Windows Operating System to gain access to their user accounts in the event that they either forget their password or another problem is restraining them from being able to unlock their accounts.
- Go here and download and install the latest version of PCUnlocker.
- Run PCUnlocker on a different computer.
- You can use PCUnlocker to create a bootable CD/DVD or USB flash drive that is capable of either resetting your user account password or bypassing it, depending on your desired course of action.
- Insert the password reset or bypass CD/DVD or USB into the affected computer, and then restart it.
- Configure the affected computer to boot from a CD/DVD or USB by fiddling around with its BIOS settings.
- Allow the affected computer to boot from the CD/DVD or USB, then follow the on-screen PCUnlocker instructions to reset or bypass the password for your user account. Once this is done, you should be able to successfully log in to your disabled user account after booting your computer into Windows.
Enabling the Previously Disabled Account
In the User Access Control in Windows, there is an option which allows users to simply re-enable the disabled account. When we do this, the account will be accessible again with all the previous data and configurations stored in it. However, you must be logged in as an administrator to re-enable the account. Here are the steps:
Note: If you do not have an administrator account available, follow the first solution and enable the built-in admin using the command prompt.
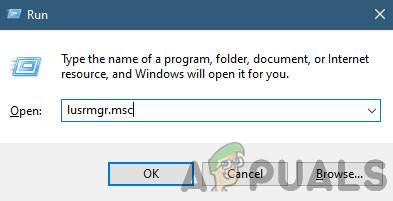
- Press Windows + R and type lusrmgr.msc in the dialogue box and press Enter.
lusrmgr.msc - Once in the Local Users and Groups window, click on Users from the left navigation pane.
- Click on ‘Users’ once, select the user that is disabled, right-click on it, and select.
- Now, under the General tab, uncheck the option that says ‘Account is disabled’.
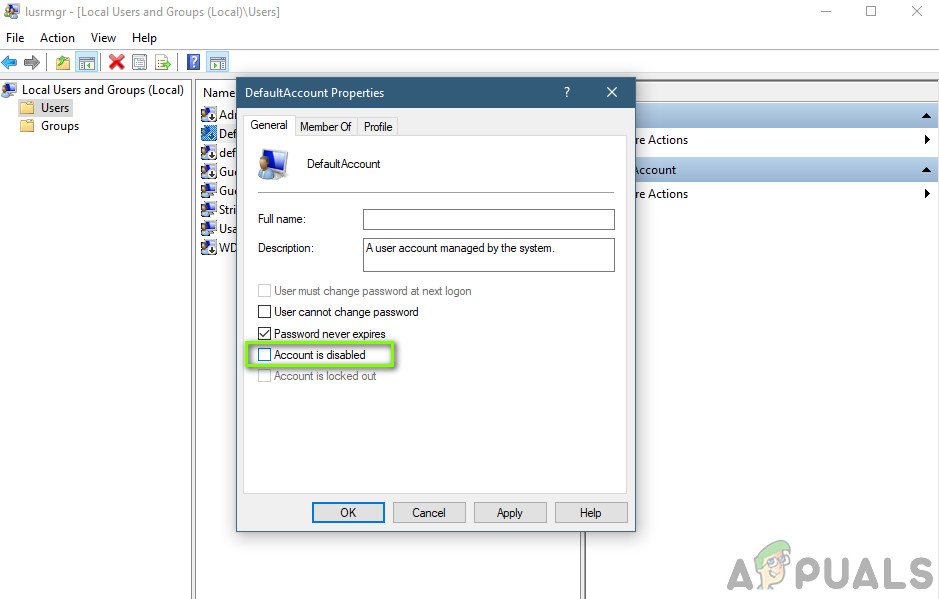
Enabling the Disabled Account - Press OK to save changes and exit. Restart your computer and try logging in the account. See if the problem is solved for good.
Nice tutorial! However, when I booted to the safe mode and it still didn’t allow me to login. Afterwards, I unlocked my admin password by booting off PCUnlocker Live CD.