10 Ways to Stop OneDrive from Syncing on Windows 10 & 11
OneDrive is a cloud-based storage service developed by Microsoft, allowing users to store, share, and access files from anywhere with an internet connection. It seamlessly integrates with Windows and offers convenient synchronization of files across devices.
In this guide, we will walk you through methods to stop OneDrive from syncing for good. Whether it’s to save space or completely control your files, these steps help you achieve a more permanent solution to stop OneDrive’s syncing process. Let’s dive into these methods to ensure OneDrive behaves just as you want it to!
Table of Contents
- Why OneDrive Syncs Everything?
- Why Would You Want to Stop OneDrive from Syncing?
- How to Stop OneDrive from Syncing
- 1. Disable Autosave
- 2. Quit OneDrive
- 3. Stop Syncing All Folders
- 4. Unlink OneDrive
- 5. Stop OneDrive from Automatic Startup
- 6. Disable OneDrive Using Group Policy Editor
- 7. Disable OneDrive Using Registry Editor
- 8. Delete OneDrive Source Folder
- 9. Uninstall OneDrive
- 10. Hide OneDrive (if you can’t uninstall)
- Contact Microsoft Support
- Final Thoughts

Why OneDrive Syncs Everything?
OneDrive‘s default behavior is to synchronize all files and folders to ensure they’re consistently updated across all linked devices. This automatic syncing guarantees that you’re always working with the latest versions, whether you access your files on a computer, tablet, or phone.
The intent is to eliminate the hassle of manually transferring or updating files, allowing for a seamless and hassle-free user experience. By keeping everything in sync, OneDrive aims to provide accessibility and consistency, making it easier for users to work with their data across multiple platforms.
READ MORE: Stuck at Syncing Items to iCloud? Here’s How to Fix ➜
Why Would You Want to Stop OneDrive from Syncing?
Stopping OneDrive’s syncing permanently offers several opportunities for users. Here are some reasons and benefits of taking a more permanent approach to preventing OneDrive from syncing:
- Space Management: Stopping OneDrive’s syncing can free up significant storage space on devices by preventing continuous cloud uploads.
- Enhanced File Control: It ensures that specific files or folders remain exclusively on the device, offering complete control over what gets uploaded to the cloud.
- Consistent Offline Access: It enables files to remain consistently offline, which is beneficial for access in areas with limited or no internet connectivity.
- Data Security Measures: For sensitive or confidential data, keeping it solely on the device enhances security and reduces the risk of exposure in the cloud.
- Resource Optimization: By stopping syncing, resources like battery life and system performance are preserved, ideal for devices with limited power or performance capabilities.
- Tailored User Experience: Halting synchronization empowers users to customize OneDrive to match their individual preferences and needs more precisely.
READ MORE: How to Fix OneDrive not Syncing ➜
How to Stop OneDrive from Syncing
Though there are some ways to pause OneDrive synchronization, here we will tell you how to stop OneDrive from syncing permanently on Windows 10 and 11.
NOTE: Most of these methods work the same on both Windows versions with similar names but different interfaces. Where they’re different, it’ll be highlighted as such.
1. Disable Autosave
The first method is disabling the autosave feature. It is enabled on most Windows by default, and you can follow these steps to disable it:
↪ On Windows 10
- Click on the OneDrive icon on the right side of the taskbar.

Select OneDrive - Select “Help & Settings.”
- Now, click on “Autosave.“
- Uncheck the boxes for “Automatically save photos and videos to OneDrive whenever I connect a camera, phone, or other devices to my PC” and “Automatically save screenshots I capture to OneDrive.”

Make sure these boxes are unchecked - Also, select “Update folders“> “Stop protecting” to halt syncing.

Stop protecting
↪ On Windows 11
- Go to “File Explorer.”
- In the left pane, there will be OneDrive. Right-click on it and select “Settings.”

Go to OneDrive > Settings - Click on “Sync and backup.“
- Toggle off the options for “Save photos and videos from devices” and “Save screenshots I capture to OneDrive.”

Toggle off the buttons
2. Quit OneDrive
Here’s how you can quit OneDrive:
- Click on OneDrive’s icon and select the gear icon.
- Choose “Pause syncing.”
- Now, click on “Quit OneDrive.”

3. Stop Syncing All Folders
Another method to stop OneDrive synchronization is by selecting the folders. Follow the below-mentioned process to do so:
↪ On Windows 10
- Go to “OneDrive” > “Help & Settings > “Account“
- Click on “Choose folders.”

Choose folders - Here, uncheck all the folders so none will be synced to the cloud.
↪ On Windows 11
- Navigate to “Settings“> “Sync and backup.”
- From this window, click on “Manage backup.”

Select Sync and backup > Manage backup - In this window, a list of all synced folders will appear. Simply toggle the button next to each folder to halt the syncing process.

Toggle the buttons
4. Unlink OneDrive
You can unlink your PC to stop automatic syncing. Here’s how to do that in Windows 10 and 11:
- Go to OneDrive “Settings.”
- Click on “Account.”
- Now, select “Unlink this PC.” It will unlink your PC from OneDrive and halt the syncing process.

READ MORE: How to Unlink Gmail Account from Android or From Your PC ➜
5. Stop OneDrive from Automatic Startup
You can also stop OneDrive from syncing using automatic startup. To do so, follow these steps:
- Navigate to OneDrive “Settings.“
- Under the “General” tab, uncheck the option “Start OneDrive automatically when I sign in to Windows.”

6. Disable OneDrive Using Group Policy Editor
You also have the option to utilize the Group Policy Editor (GPE) to deactivate OneDrive. It’s worth noting that the Group Policy Editor is specifically available in the Professional, Workstation, and Enterprise editions of Windows 11. To disable OneDrive using GPE, adhere to these steps:
- Open the Group Policy Editor by typing “gpedit” in the Windows search bar and pressing Enter.

gpedit - Navigate through the following path in the Group Policy Editor: “User Configuration“> “Administrative Templates“> “Windows Components“> “OneDrive.”
- Find the policy named “Prevent the usage of OneDrive for file storage” in the right pane and double-click on it.

Double click on Prevent the usage of OneDrive for file storage - Select the “Enabled” option to prevent OneDrive from functioning for file storage.

Select Enabled - Click “Apply” and then “OK” to save the changes.
- Restart your system for the changes to take effect.
READ MORE: How to Reset Local Group Policy Settings to Defaults in Windows ➜
7. Disable OneDrive Using Registry Editor
An alternative method to deactivate OneDrive on Windows 11 involves using the Registry Editor. Follow these steps:
- Access the Registry Editor by searching for “Registry editor” or “regedit” in the Windows search bar. Alternatively, use the Windows+R shortcut keys to open the Run command box, input “regedit,” and press Enter.

Type regedit - Type the following location in the address bar: Computer\HKEY_LOCAL_MACHINE\SOFTWARE\Policies\Microsoft\Windows\OneDrive.
- Look for the “DisableFileSyncNGSC” DWORD in the right pane. Double-click on it and change its value to “1.”
- If the “DisableFileSyncNGSC” DWORD or “OneDrive” folder isn’t present, you must create them. Here’s how:
a. Right-click the ‘Windows‘ folder, select ‘New,’ and then choose ‘Key.’ Rename the folder to ‘OneDrive.’
b. Right-click the ‘OneDrive‘ key, go to ‘New,’ and select ‘DWORD (32-bit) Value‘. Rename this value to ‘DisableFileSyncNGSC.’

c. Double-click on the created ‘DisableFileSyncNGSC‘ DWORD and set the value to ‘1‘ in the ‘Value Data‘ field. Click ‘OK‘. Restart your system to apply the changes.

Images from All Things How
8. Delete OneDrive Source Folder
Deleting the OneDrive source folder involves removing the local OneDrive folder from your device, effectively stopping the syncing process. But keep in mind that this might not be possible in Windows 11.
The OneDrive source folder is typically located in the user’s profile directory. It’s within “C:\Users[YourUsername]\OneDrive” by default. The folder name might appear as “OneDrive” or “OneDrive – [Your Organization]” if it’s associated with a specific managed account or organization.
Here’s how you can do it:
- Open “File Explorer” on your device.
- Navigate to the path C:\Users[YourUsername]\OneDrive or OneDrive and right-click on it to select “Delete.”

SEE ALSO: Delete a File or Folder using PowerShell ➜
9. Uninstall OneDrive
The last solution to implement is uninstalling OneDrive. You should consider deleting the application to spot the sync when all else fails. You can do that in two ways; let’s get into it.
↪ Via Control Panel
In Windows 10, you can uninstall OneDrive via the Control Panel by following these steps:
- Open the Control Panel by searching for it in the Windows search bar.
- Click on “Programs.”

Programs - Look for “Microsoft OneDrive” in the list of installed programs.
- Right-click on it and select “Uninstall.” Follow the on-screen prompts to complete the uninstallation process.

Uninstall OneDrive
↪ Via Command Prompt
Here’s the process of uninstalling OneDrive through Command Prompt:
- Right-click the Start button, and select “Terminal (Admin).”
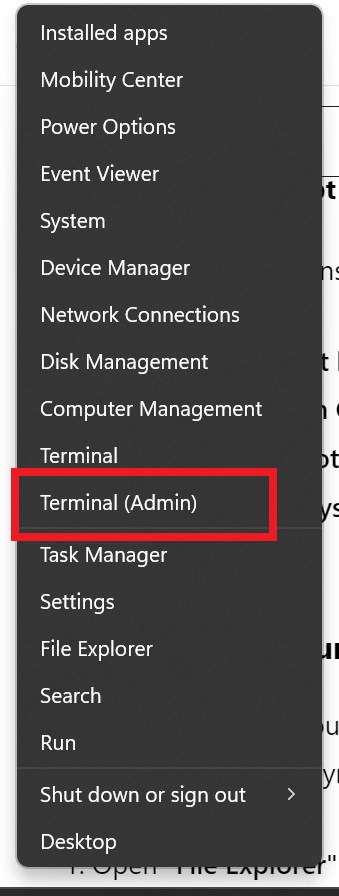
Select Terminal (Admin) - Type “taskkill /f /im OneDrive.exe” and press Enter to stop any running OneDrive processes.
- Enter “%SystemRoot%\SysWOW64\OneDriveSetup.exe /uninstall” for 64-bit systems or “%SystemRoot%\System32\OneDriveSetup.exe /uninstall” for 32-bit systems to initiate the uninstall process.
10. Hide OneDrive (if you can’t uninstall)
At times, uninstalling OneDrive might not be feasible. In such cases, hiding the app can prevent syncing without deleting files. Here’s how:
- Open “File Explorer” and right-click on OneDrive from the left panel.
- Choose “Properties” and navigate to the “General” tab.
- Check the “Hidden” box at the bottom. Click “Apply” and then “OK.”

Hide OneDrive | 10pcg - If OneDrive runs in the background quit the app or reboot your system to complete the process.
Contact Microsoft Support
If you encounter any issues while implementing these methods to manage OneDrive, don’t hesitate to contact Microsoft Support for further assistance. Their expert guidance can provide additional insights and solutions to address any complexities you might face during the process.
Keep in mind that these steps offer different approaches to tailor OneDrive to your preferences, but when you need further support, Microsoft’s team is readily available to help.
SEE ALSO: How to Contact Snapchat Support in 2023 [4 Different Ways] ➜
Final Thoughts
As we come to an end, we hope these tips have given you a better handle on managing your OneDrive. It’s all about making technology work for you, and these methods offer a range of ways to fine-tune your experience.
Putting a permanent stop to OneDrive’s syncing process is a significant decision for users seeking lasting control over their files. These methods aren’t just about pausing; they’re about making a concrete change in OneDrive’s behavior.
FAQs
Absolutely, you can selectively stop syncing certain files or folders in OneDrive. Within the OneDrive settings, you can choose which files or folders you want to sync or unsync.
Hiding OneDrive in File Explorer prevents the app from displaying but doesn’t stop syncing. It’s merely a way to hide the app interface. To halt syncing, you’d need to use other methods like disconnecting from the internet or utilizing specific settings within OneDrive.
Yes. OneDrive syncs files across all devices using the same account. Any changes made on one device will reflect on all others linked to the same OneDrive account.