How to Disable Hyper-V in Windows?
Hyper-V is a replacement for Windows Virtual PC as the hardware virtualization component for computers running Windows 8 or later. It can be used to expose virtual machines to one or more networks. The Hyper-V tool isn’t used by the average consumer and is mostly useful to experts who know their way around the complexities of command lines.

In some cases, it was seen that certain applications require Hyper-V to be disabled in order to be run. In this article, we will teach you the easiest ways to disable Hyper-V in Windows 10. Make sure to follow the steps carefully in order to avoid further complications.
How to Disable Hyper-V in Windows 10?
There are many ways to disable an application in Windows 10. Some are specific to each program while others can be applied to all of them. Below are listed two of the easiest methods to disable Hyper-V on your computer.
Method 1: Using DISM Commands
Command Prompt can be used to execute an infinite amount of commands. This shortens the process and allows for convenient execution of a particular function. Therefore, in this step, we will be using Command Prompt to disable Hyper-V on Windows 10. In order to do that:
- Press “Windows” + “R” keys simultaneously to open the Run prompt.
- Type in “cmd” and press “Shift” + “Ctrl” + “Enter” simultaneously.
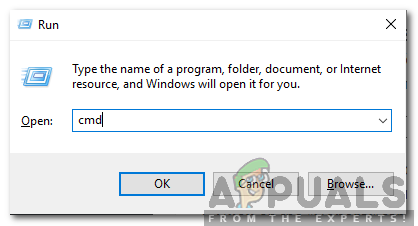
Typing cmd in the Run Prompt and pressing Shift + Alt + Enter to open an elevated Command Prompt - Click on “Yes‘ in the prompt to provide administrative privileges.
- Type in the following command to disable Hyper–V and press “Enter”
dism.exe /Online /Disable-Feature:Microsoft-Hyper-V - This will disable Hyper-V until it is re-enabled.
- Execute the following command in order to re–enable it
dism.exe /Online /Enable-Feature:Microsoft-Hyper-V /Al
Method 2: Using BCDEDIT Commands
The above method does disable Hyper-V but it requires numerous reboots and although it is effective, it is a lengthy process. Therefore, in this step, we will be using a more convenient method to disable Hyper-V using a different set of commands. In order to do that:
- Press “Windows” + “R” keys simultaneously to open the Run prompt.
- Type in “cmd” and press “Shift” + “Ctrl” + “Enter” simultaneously.
Typing cmd in the Run Prompt and pressing Shift + Alt + Enter to open an elevated Command Prompt - Click on “Yes‘ in the prompt to provide administrative privileges.
- Type in the following commands in order to disable Hyper-V and press “Enter”
bcdedit /set hypervisorlaunchtype off - This will disable Hyper-V until it is re-enabled.
- In order to re-enable Hyper-V, type the following command and press “Enter”
bcdedit /set hypervisorlaunchtype auto