High CPU Usage by State Repository Service on Windows 10
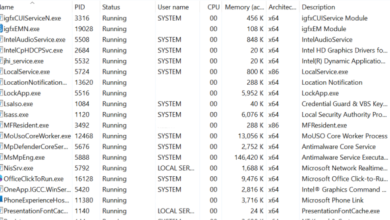
Some Windows 10 users are reporting CPU usage spikes (to almost 100%) usage caused by the State Repository service. This issue seems to affect every CPU threat and makes, games applications and media to stutter. Upon investigating the Event Viewer, some affected users have discovered a lot of consecutive errors related to the State Repository service.

If the issue is being caused by a common glitch, the issue can be resolved easily simply by restarting the repository service. However, if you’re encountering this issue along with frequent error entries in Event Viewer, you should be able to fix the issue by cleaning the component store or by performing a clean install or in-place repair.
But as it turns out, most instances of this problem are actually triggered by Microsoft Edge in one way or another. To resolve this issue in this case, you’ll need to repair Microsoft Edge from the Apps & Features menu. If that doesn’t work, you should consider reinstalling every built-in UWP app.
There’s also the option of disabling the State Repository service altogether in order to stop the high CPU usage, but this will affect the functionality of Microsoft Edge.
How to fix the High CPU usage caused by the State Repository Service?
Method 1: Restart the State Repository Service
Before trying out more complex fixes, you should start by seeing if the issue is not being caused by a simple glitch that affects the State Repository Service on Windows 10. If you’re looking for a temporary fix that will reduce the CPU usage immediately, you should try restarting the state repository service.
A lot of affected users have confirmed that this operation has managed to bring the resource usage down considerably (at least until the next system startup).
Although this fix won’t fix the issue indefinitely, it’s still the preferred approach if you’re looking for something quick and non-intrusive that will stop the general stuttering from occurring.
- Press Windows key + R to open up a Run dialog box. Next, type ‘service.msc’ inside the text box and press Enter to open up the Services screen.

Type “services.msc” into the Run dialog and press Enter Note: When you’re prompted by the UAC (User Account Control) window, click Yes to grant admin access.
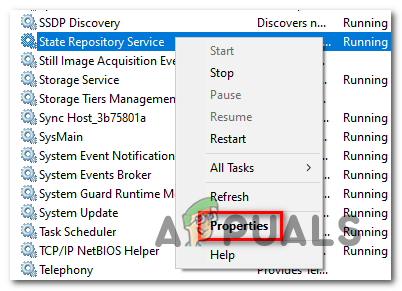
- Once you’re inside the Services screen, move down to the right-hand section and scroll down through the local services until you locate the State Repository Service. After you locate the service, right-click on it and choose Properties from the newly appeared context menu.
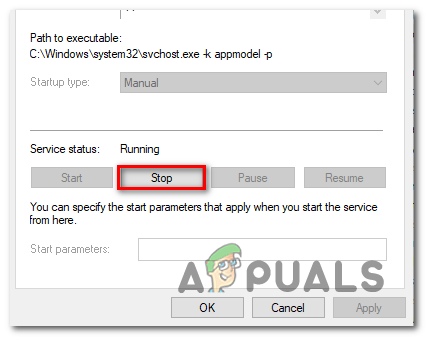
Accessing the State Repository service properties - Once you’re inside the Properties screen of the State Repository Service, select the General tab from the top of the screen and click on Stop (under Service status).
Restarting the state repository service - After you manage to stop it, wait for a couple of seconds before starting it again.
- Open up Task Manager by pressing Ctrl + Shift + Esc and see if the CPU usage has gone down.
In case the CPU usage of the State Repository service returns to high value or you’re looking for a more permanent fix, move down to the potential next fix below.
Method 2: Cleaning up the component store
If you’re frequently seeing high CPU usage caused by the State Repository Service and you’ve also discovered a lot of different errors pointing towards the same service inside the Event Viewer, chances are the problem is being caused by a corrupted component store.
When it comes to this particular scenario, the issue can be resolved swiftly by using the DISM (Deployment Image Servicing and Management) to replace corrupted instances with healthy copies.
Note: Before starting with this method, keep in mind that DISM is heavily reliant on Windows Update to download healthy copies that will be used to replace corrupted data. Because of this, you’ll need to ensure that your Internet connection is stable before initiating this procedure.
In what follows, we will initiate a component cleanup from an admin terminal using DISM and then finishing it up with an SFC (System File Checker scan).
Note: It’s important to follow the steps below in the same order in order to get the issue resolved.
- Open up a Run dialog box by pressing Windows key + R. Next, type ‘cmd’ inside the text box and press Ctrl + Shift + Enter to open up an elevated Command Prompt window. When you see the User Account Control (UAC) prompt, click Yes to grant administrative privileges.

Running Command Prompt - Once you’re inside the elevated CMD terminal, type the following command and press Enter to perform a cleanup on the Component Store (%WinDir%\WinSxS):
DISM /Online /Cleanup-Image /StartComponentCleanup
- After the operation is complete, continue by deploying the next command by typing the following command and pressing Enter:
DISM /Online /Cleanup-Image /RestoreHealth
Note: This operation will start by backing up all your system files against known good copies stored on the Windows Update servers.
- Once the operation is complete, restart your computer.
- After your computer boots back up, check and fix any remaining system file corruption by typing the following command and pressing Enter:
SFC /ScanNow
- Once the scan is complete, restart your computer once again and see if the problem is fixed at the next computer startup.
In case you’re still noticing high CPU usage associated with the State Repository Service and frequent errors in Event Viewer, move down to the next potential fix below.
Method 3: Repairing Microsoft Edge
As it turns out, Microsoft Edge is a built-up application with the potential of abusing the State Repository Service. Under certain circumstances (especially when 3rd party extensions are installed), Microsoft Edge has the potential of becoming a huge CPU hogger, to the point where it slows the whole system down.
Several affected users that faced the same problem have confirmed that they finally managed to resolve the issue by going to the Apps and Features menu and resetting Microsoft Edge from the Advanced options menu.
This operation will end up removing any temp or 3rd party data that might be responsible for the high CPU usage of the State Repository service.
Here’s a quick guide on resetting the Microsoft Edge from the Apps and Features:
- Press Windows key + R to open up a Run dialog box. Next, type ‘ms-settings:appsfeatures’ inside the text box and press Enter to open up the Apps & Features menu of the Settings app on Windows 10.
- Once you’re inside the Apps & Feature menu, move over to the right section of the screen and use the Search box to search for ‘Microsoft Edge‘.
- After the results appear, click on Microsoft Edge once, then click on the hyperlink associated with Advanced options.
- Inside the Advanced Options menu of Microsoft Edge, scroll down to the Reset section and click on the Repair button.
- Wait until the process is complete, then restart your computer once the operation is finished.
- At the next startup, repeat the action that was previously causing the high CPU usage of the State Repository service and see if the issue is now resolved.

In case the same problem is still occurring, move down to the next potential fix below.
Method 4: Reinstalling every Built-in app
If you’re encountering the issue on a Windows 10 build raging between v1703 and v1709, chances are the problem is facilitated by an inconsistency has to do with the fleet of built-in apps that Windows 10 has by default.
Several affected users have confirmed that they managed to fix the issue by reinstalling every built-in app with a single Powershell command.
This operation will end up reinstalling and re-registering every built-in app, which takes care of every glitched UWP app instance that might contribute to the high CPU usage of the State Repository service.
Here’s a quick guide on reinstalling every built-in app using powershell:
- Press Windows key + R to open up a Run dialog box. Next, type ‘powershell’ inside the text box and press Ctrl + Shift + Enter to open up an elevated Powershell terminal window.

Run dialog: powershell Then press Ctrl + Shift + Enter - Once you’re inside elevated Powershell prompt, type the following command and press Enter to reset every UWP built-in application:
Get-AppXPackage -AllUsers | Foreach {Add-AppxPackage -DisableDevelopmentMode -Register "$($_.InstallLocation)\AppXManifest.xml"} - After the command is successfully completed, close the elevated instance of Powershell and restart your computer.
- As soon as the next startup is complete, monitor your computer to see if you’re still experiencing high CPU spikes caused by the State Repository service.
In case the same problem is still affecting your machine, move down to the next potential fix below.
Method 5: Disabling the State Repository Service
Keep in mind that by default, the State Repository service improves on the functionality of Microsoft Edge by acting as a browser cookie. It works by regularly taking a snapshot of the browsing information – this helps Microsoft Edge to continue where it left off (even across multiple devices).
If you have no use of this service (e.g. you don’t use Edge), one way to ensure that the State Repository service is no longer taking a lot of your CPU resources is by preventing it from starting at every system startup.
This operation can be achieved by using MSConfiag to disable the startup key associated with the State Repository Service. Here’s a quick guide on how to do this:
Note: The steps below can be followed on every Windows version, not just Windows 10.
- Press Windows key + R to open up a Run dialog box. Next, type ‘msconfig.msc’ inside the text box and press Enter to open up the System Configuration utility.

Opening System Configuration Note: If you are prompted by the User Account Control, click Yes to grant admin access.
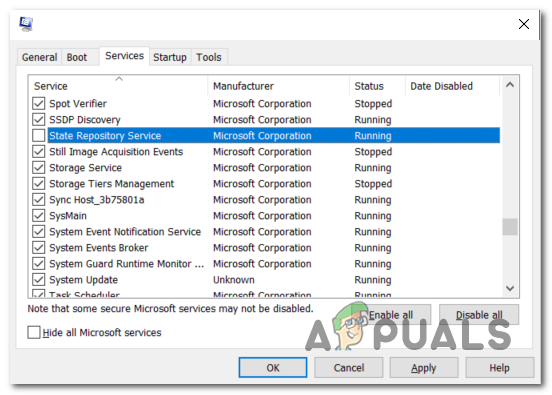
- Once you’re inside the System Configuration utility, select the Services tab from the ribbon menu at the top.
- After you manage to arrive in the correct menu, scroll down through the list of services and locate the State Repository Service. When you see it, uncheck the icon associated with it and click Apply to save the modification.
Disabling the State Repository Service - Close the System Configuration utility, restart your computer and see if the issue is resolved at the next computer startup.
In case you’re still encountering the same high CPU usage caused by the State Repository service, move down to the next potential fix below.
Method 6: Performing a clean install or in-place repair
If you followed all the potential fixes above and none of them have helped you to reduce the CPU usage of the State Repository service, it’s clear that you’re encountering the issue due to some type of system corruption that cannot be fixed with the regular channels.
If you’ve come this far without a result, the only recommended fix we have left for you is to reset every Windows component (and boot related data) in order to ensure that no corrupted system file is creating the issue.
When it comes to resetting every involved Windows component, there are two ways forward:
- Clean Install – This potential fix is the most convenable out of the bunch. You don’t need a compatible installation media and the fix can be deployed directly from the GUI menu of Windows 10. However, without backing up your data in advance, expect partial data loss (including apps, games and personal media stored on the OS drive)
- Repair Install – A repair install is the most focused approach, allowing you to reset your computer without any data loss (even your games, applications and user preferences will remain intact). However, you will need a compatible installation media in order to deploy this repair strategy.