Fix: Windows 11 Screensaver / Display Sleep Functions Not Working
Windows 11 Screensaver or Display Sleep Functions not working is encountered by users when the PC runs out of battery; Windows turns on this feature to save power on the PC to give it some backup time. But sometimes, this feature might not work, and the user starts reporting the problem on the forum site.
Therefore, we researched to get to the bottom of the problem and found this is occurring due to outdated display drivers or wrongly configured power settings. Luckily there are solutions that worked for several users to get past the problem on Windows 11.
1. Unplug Connected Devices
If disabling the external devices won’t solve your problem and the problem continues, we suggest you unplug all the connected devices. For this, follow the instructions below:
- Unplug all the connected peripheral devices.
- Restart your system.
2. Remove the Battery
If your system doesn’t sleep consistently even after proper settings, it may be because the battery is causing the problem. Therefore, you must remove the battery from your laptop and wait 15 minutes. Now, place it back and check if the problem is resolved.
3. Quit Microsoft Edge in the Background
It has often been noticed that running Microsoft Edge in the background prevents your system from sleeping. Therefore, it is suggested to quit Microsoft Edge to escape the problem. Follow the below step-by-step instructions to close Microsoft Edge on Windows 11:
- Press the Ctrl+Shift+ Esc keys altogether at the same time to launch Task Manager.
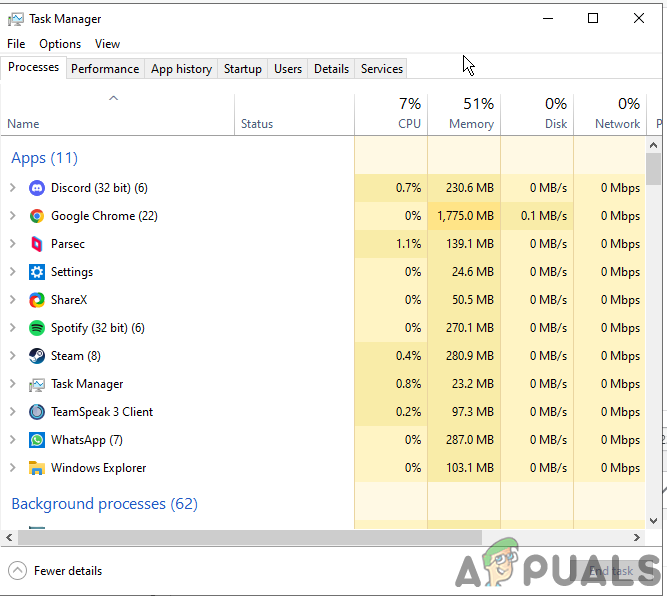
Open Task Manager - On the Processes tab, navigate to Microsoft Edge and select it.
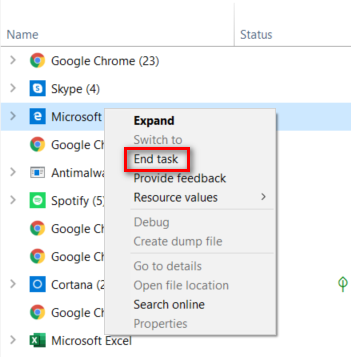
End task on Microsoft Store - Now, click the End Task button at the bottom to quit.
4. Adjust Power And Sleep Settings
The primary reason causing this issue on Windows 11 is the Sleep Mode settings. Many users fix the problem by adjusting both the power and sleep settings in Windows 11. Follow the below instructions to do so:
- Launch Settings on your Windows 11 by holding the Windows key+I key.
- Head to the System on the left side.
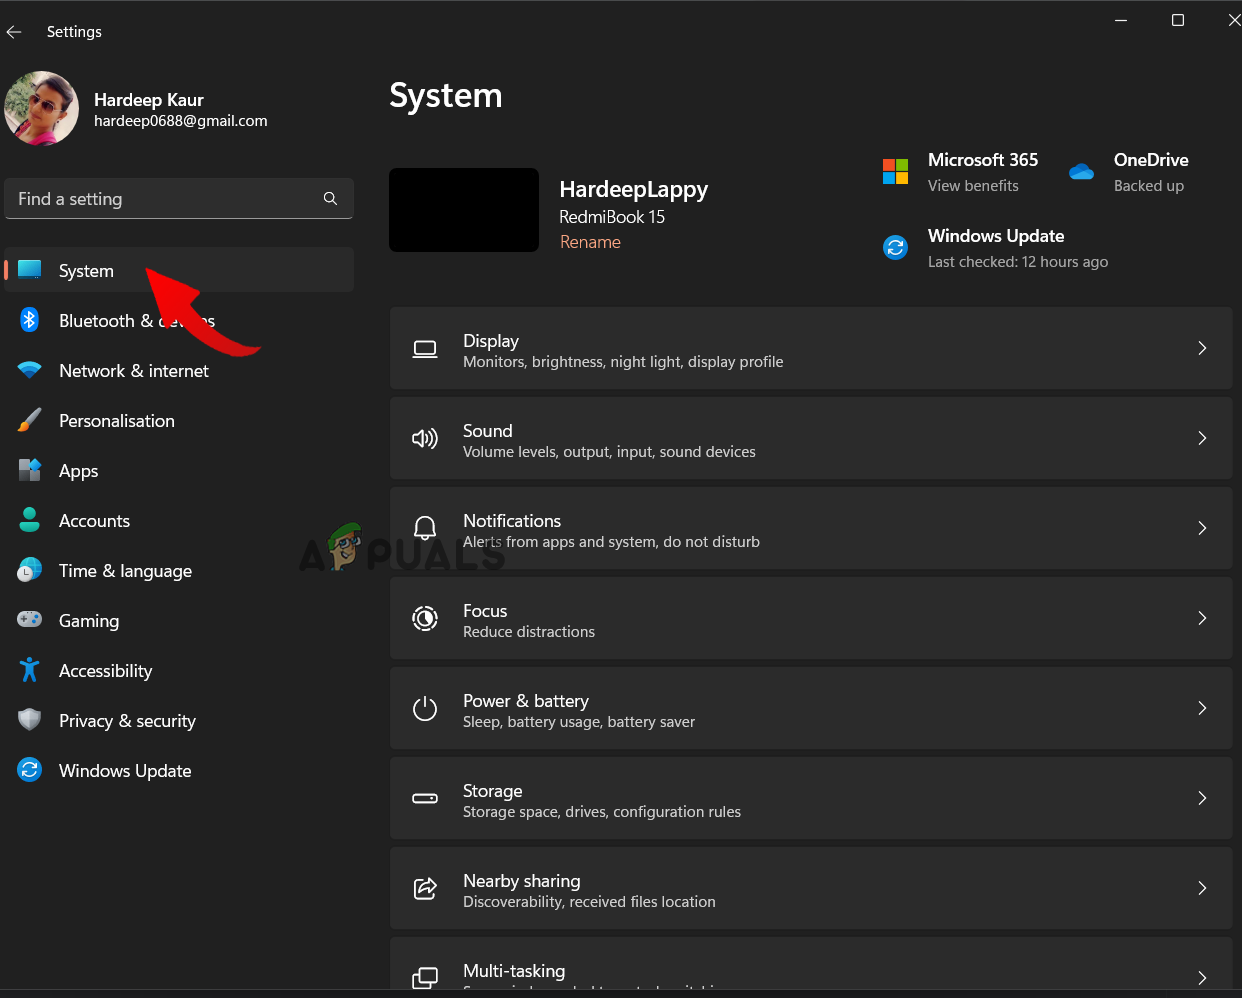
Click on System on Windows Settings - Next, select Power & battery options in the right pane.
- Now, expand the drop-down menu for Screen and sleep option.
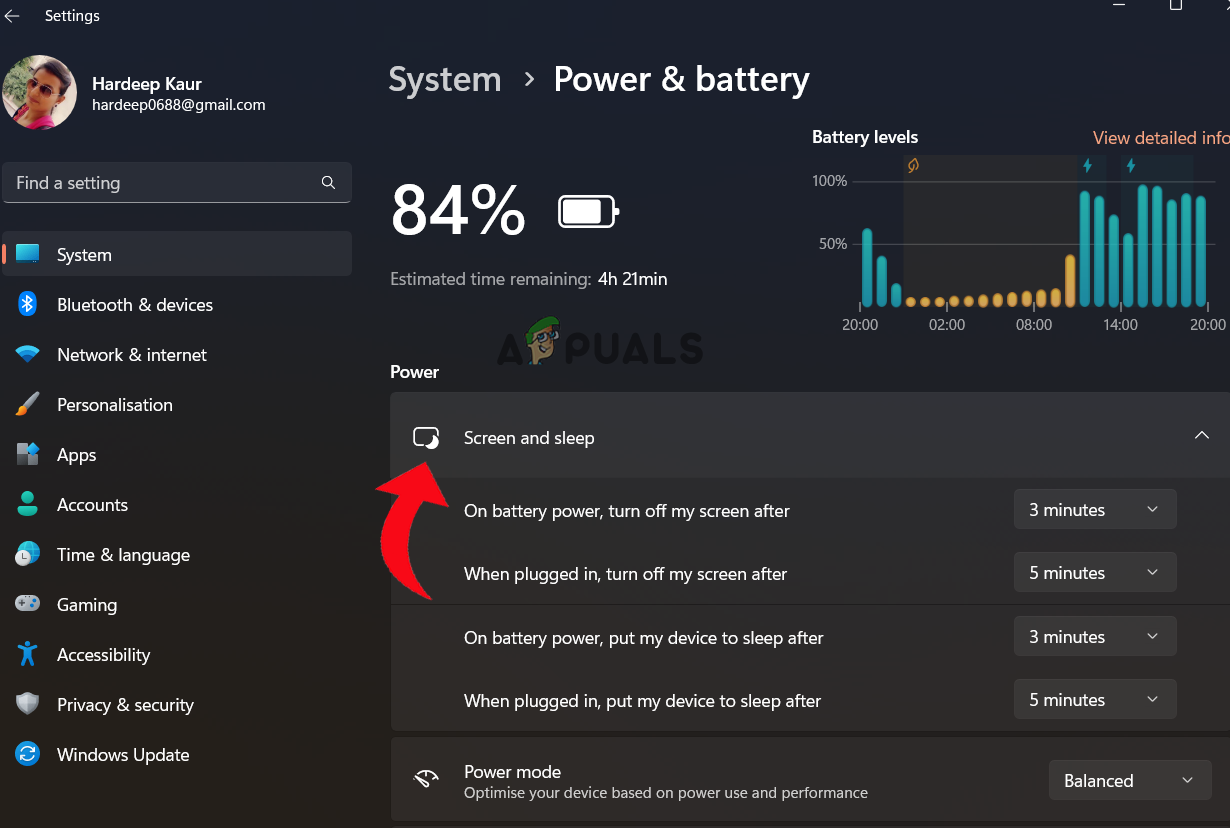
Click on the Screen and sleep option. - Lastly, customize the timer for both device and screen to go to sleep.
5. Run SFC or DISM Scan
It has already been specified above that corrupt or missing system files can also be a major reason such a problem occurs. Therefore, we suggest you perform the inbuilt SFC or DISM scan to look for the corrupt or missing file and repair it.
Below are the steps to perform an SFC scan:
- Open the Run dialogue by holding the Win key and pressing the R key.
- Then, on the run box, type cmd and press Enter key to open Command Prompt.
- Next, on the cmd panel, type the command sfc/scannow and press Enter to execute SFC scanning.
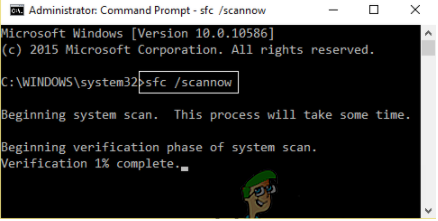
Type the command SFC/SCANNOW - Now, wait for the scanning to complete. Once done, exit the cmd panel and check for the issue is resolved or not. But if you still see the error, run the DISM scan and solve the problem in your case.
Follow the steps below to perform DISM Scan:
- Press the Win +R key simultaneously to open the Run dialogue box.
- Next, launch Command Prompt by typing cmd on the run box and pressing Enter.
- Now, execute the DISM /Online /Cleanup-Image /RestoreHealth command on the opened cmd panel and press Enter.
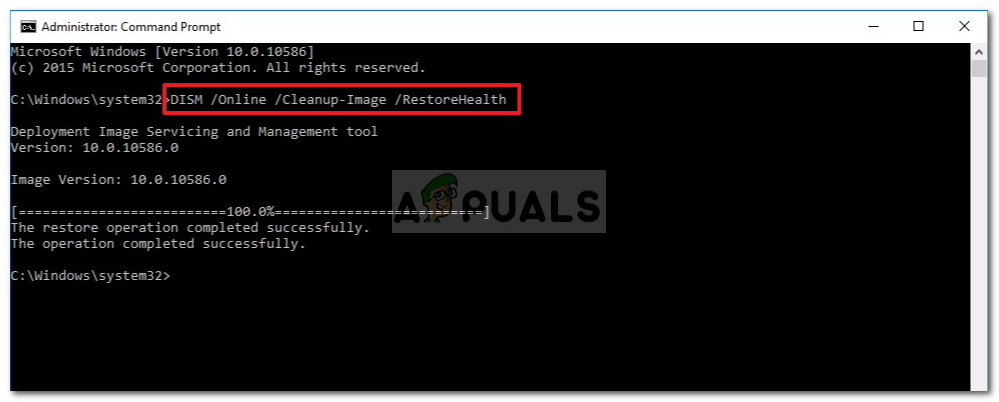
Run the DISM /Online /Cleanup-Image /RestoreHealth command - Wait until the DISM scans, repairs, or replaces the corrupt or missing system files.
- Once completed, reboot your system and verify if the problem has been solved.
Note: Do not perform any other action while the scanning is in process
6. Disable Wake Timers on Your PC
Another possible solution that helped many users get rid of the screensaver not working on the Windows 11 problem is disabling the Wake Timers option on Windows 11 PC. Follow the steps below to turn off Wake timers.
- Go to Windows Search and type cmd on the search box.
- Select the Control panel from the results and double-tap on it to open.
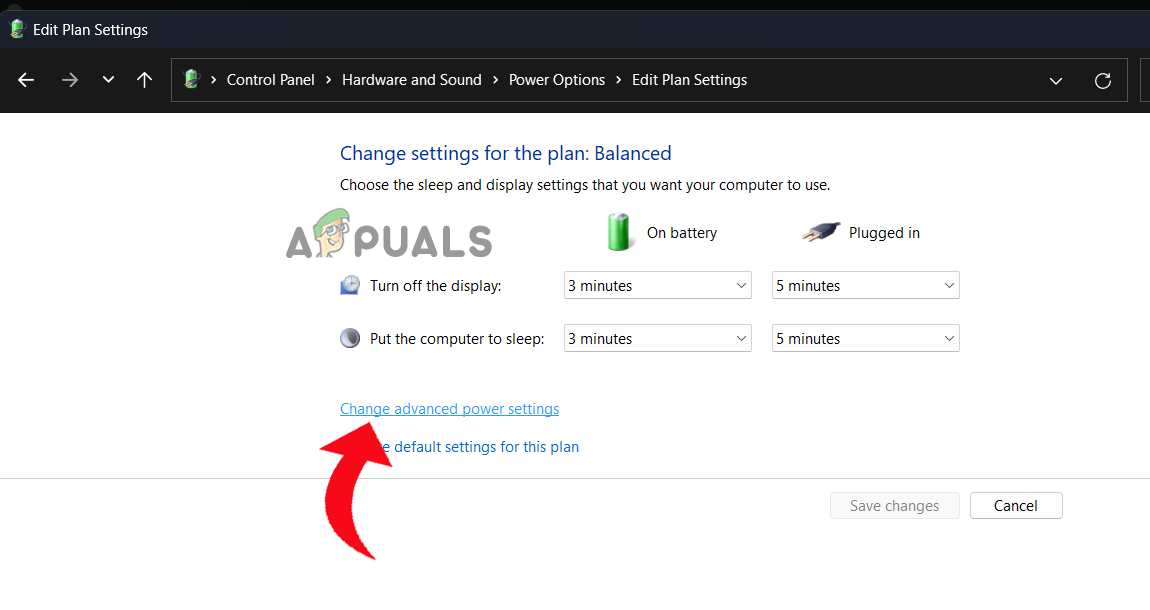
- On the Control Panel, click Hardware and Sound and select Power Options from the right pane.
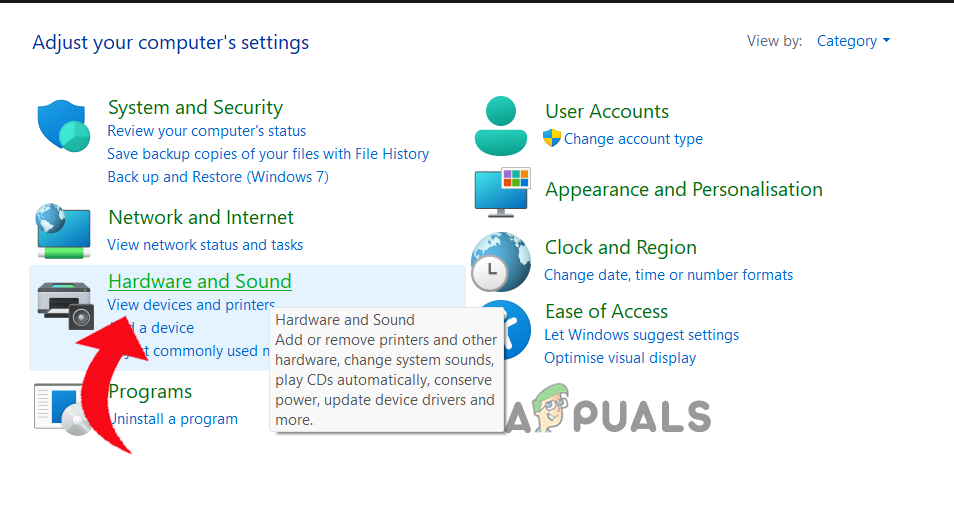
Click on the Hardware And Sound option - Click on the option Change plan settings next to Balanced under preferred plans.
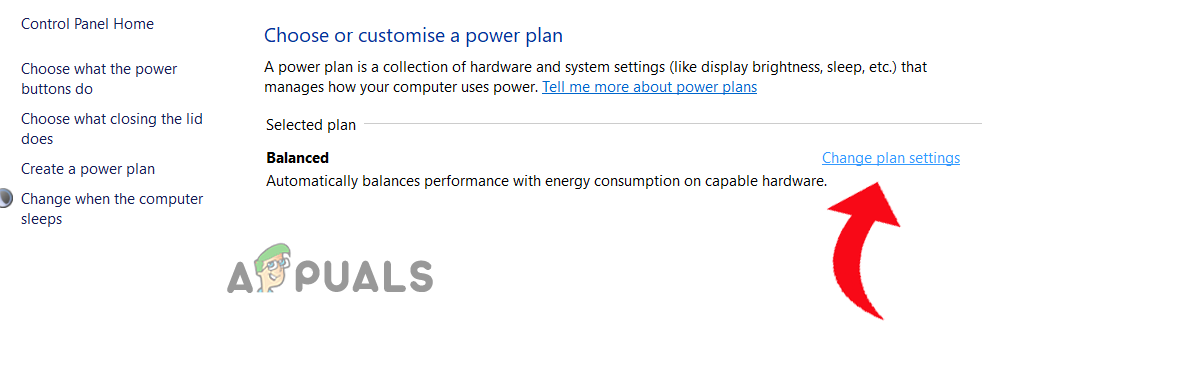
Click on Change plan settings next to Balanced - Next, tap the option Change Advanced Power Settings option.
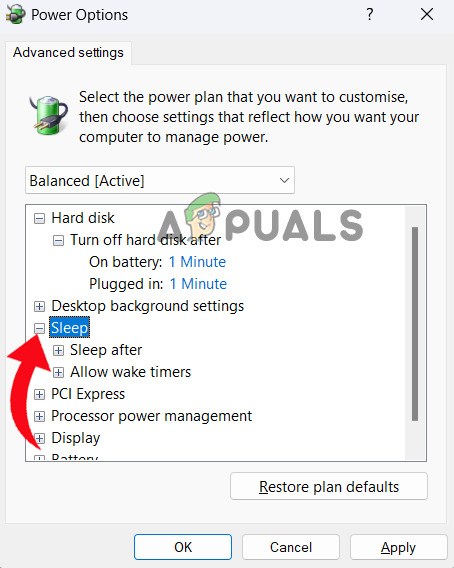
- Scroll down and expand the Sleep option by clicking on the + icon.
Expand the Sleep option - Now, select Allow wake timers and expand the drop-down menu for setting and select Disable.
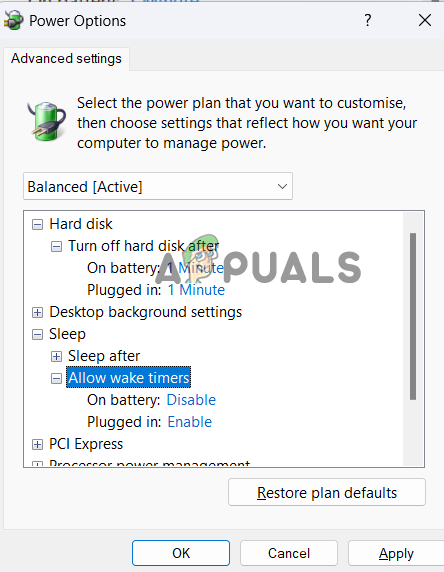
Disable Allow Wake Timers - Click on OK and exit the screen to check for the issue.
7. Update Your Windows 11
An outdated Windows 11 version is another reason that causes such issues, as older versions are not capable enough to support some features and hence can cause such issues. So, if you are using the older version of Windows 11, try updating it to the latest available version to escape the problem. Follow the instructions below to update your Windows 11 PC:
- Open Settings on your Windows 11 PC by pressing the Win+I key together simultaneously.
- Then, head to the Windows Update section and click on Check for Update under the Windows Update tab.
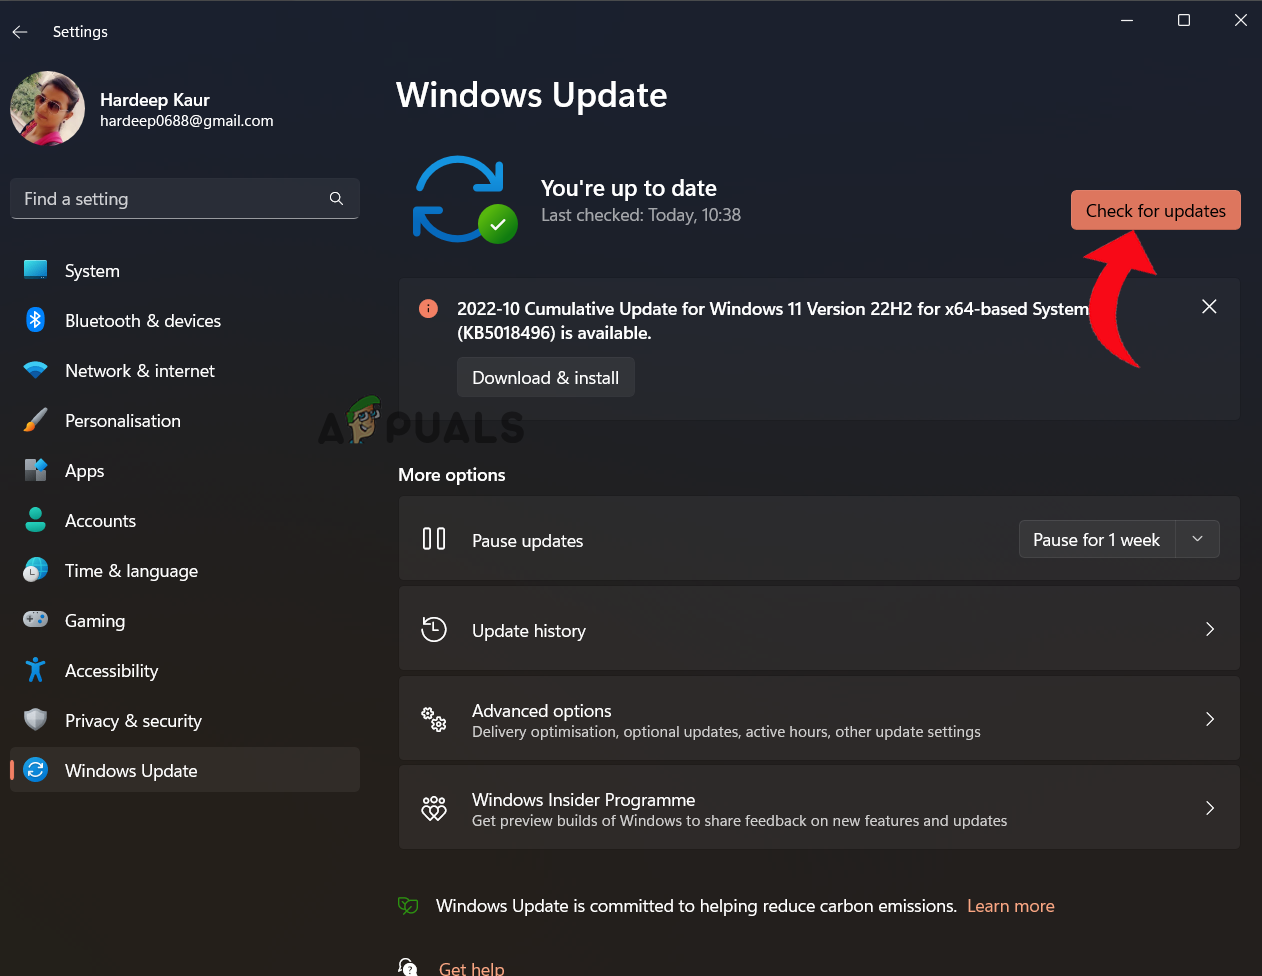
Click on Check for Update - If any update is available, download the latest update by clicking the Download & Install button.
- Wait for Windows to download the latest update, restart your PC, and check for the issue.
8. Turn Off Hybrid Mode on Your Windows PC
Hybrid mode on your Windows 11PC combines sleep mode and hibernate mode. This feature saves Power on your system. So, if you have difficulty using Screensaver, try disabling this feature and check if the problem gets resolved.
Here are the instructions to turn off Hybrid mode:
- Go to Windows Search and type cmd on the search box.
- Select the Control panel from the results and double-tap on it to open.
- On the Control Panel, click on Hardware and Sound and select Power Options from the right pane.
Click on the Hardware And Sound option - Click on the option Change plan settings next to Balanced under preferred plans.
- Next, tap the option Change Advanced Power Settings.
Click on the Change Advanced Power Settings. - Scroll down and expand the Sleep option by clicking on the + icon.
- Next, expand the option Allow Hybrid Sleep by tapping the + icon and selecting off to disable it.
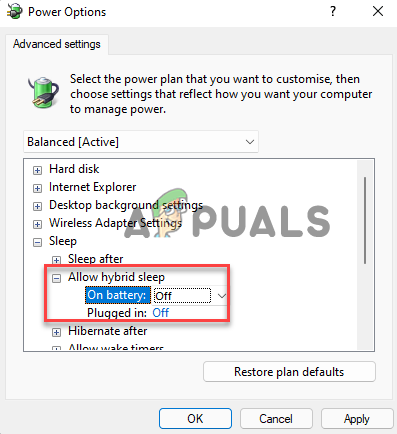
Disable Allow Hybrid Sleep - Select off on both the On Battery and Plugged in options.
- Tap OK and Apply to save the changes and exit.
9. Run Power Troubleshooter on Windows 11
Windows 11 has multiple troubleshooters to help you find and fix various issues on your PC. So, if you are dealing with a Display sleep functions not working problem, use the Power troubleshooter to find and resolve the problem. You need to follow the instructions below as mentioned to do so:
- Launch Windows Settings by holding the Windows keys and pressing the I key on the keyboard.
- Next, choose System from the left pane.
Click on System on Windows Settings - Click on Troubleshoot option on the right and head to the Other troubleshooters.
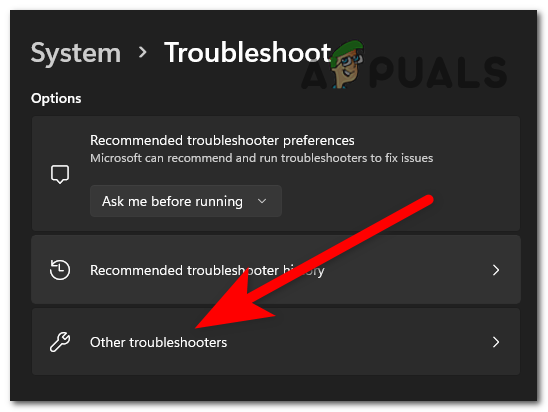
Click on Other Troubleshooter - Scroll down and tap the Run button next to Power.
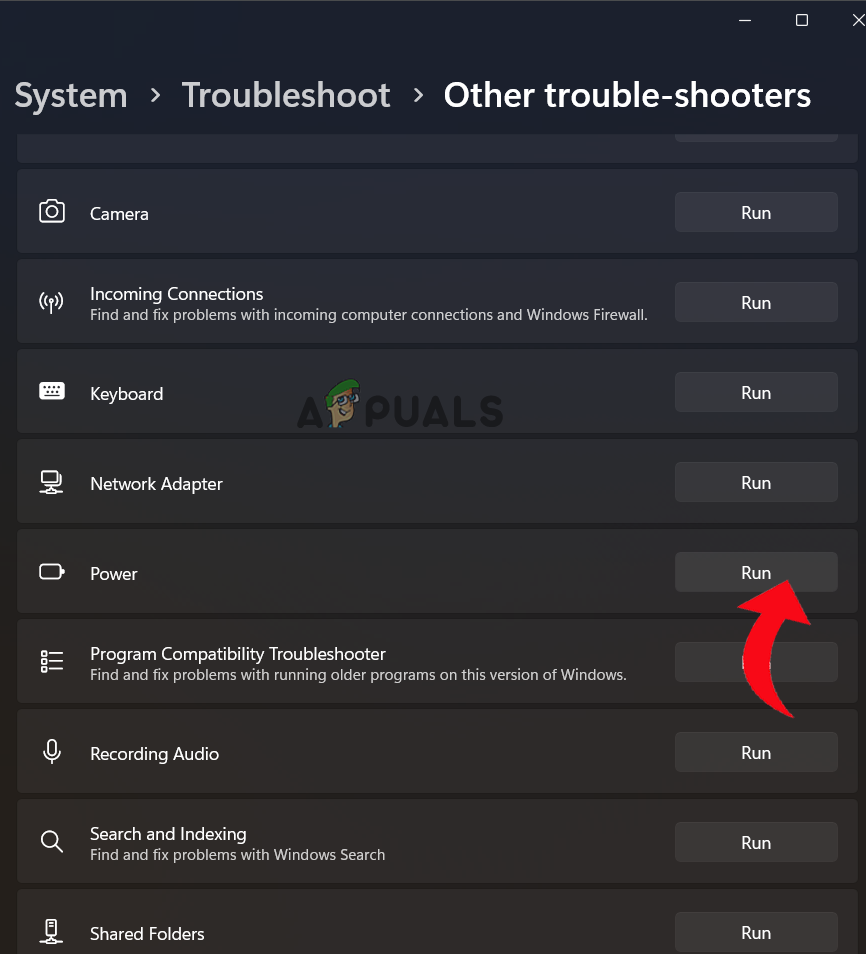
Tap on Run next to Power - Now, wait until the Power troubleshooter detects and fixes the issues with your system’s power settings.
10. Disallow Devices to Wake Up Your Windows 11 System
If you have connected any external devices (keyboard, mouse, trackpads, etc.) to your system, it may become the reason why the sleep function is not working. It might be possible that one of the connected external devices is waking up your Windows 11 PC from sleep. So, you must ensure that you disable all the connected devices when facing such a problem.
You can do so with a few simple instructions below.
- Press Windows + X and look for Device Manager.
- Once it appears, tap twice on it to launch.
- Next, scroll down and double-tap the Mice and other pointing devices option to expand.
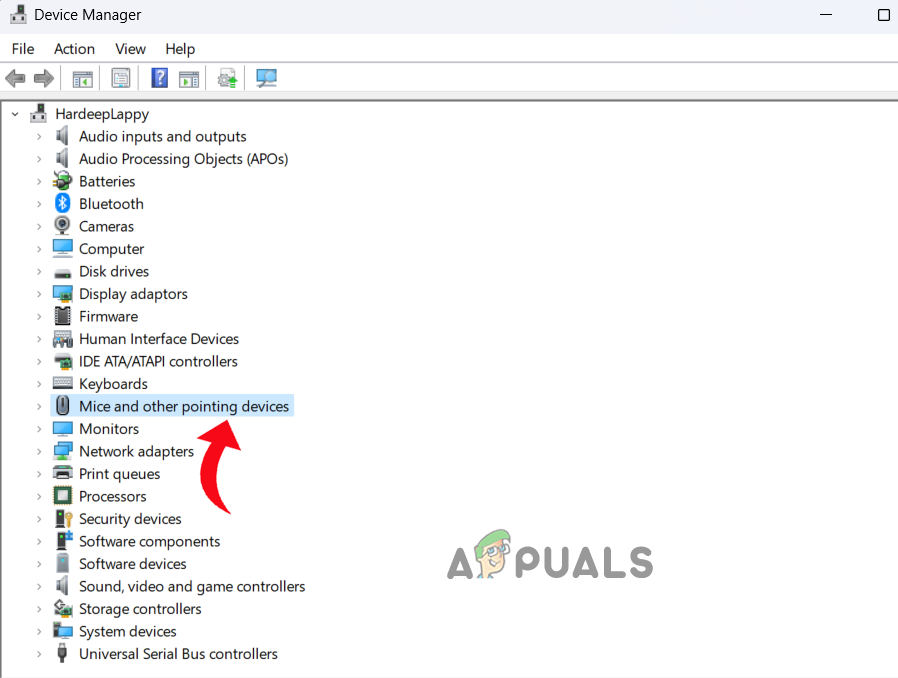
Click on Mice and other pointing devices - Now, select the connected mouse and make a right click on it, and select Properties.
- Go to the Power Management tab and uncheck the option box for Allow this device to wake the computer.

Uncheck the box Allow this device to wake the computer - Click on OK to save the changes, and repeat the steps above for the keyboard and trackpad.
11. Check Your Windows 11 PC for Viruses and Malware
If your Windows 11 PC Screensaver is not working, it might be because your system is affected by a virus or malware. So, here you can use Windows 11 inbuilt antivirus tool to scan and remove malware and viruses from your PC.
- Go to the Start menu, look for Windows Security, and tap twice when it appears on the search result.
- Next, select Virus & threat protection
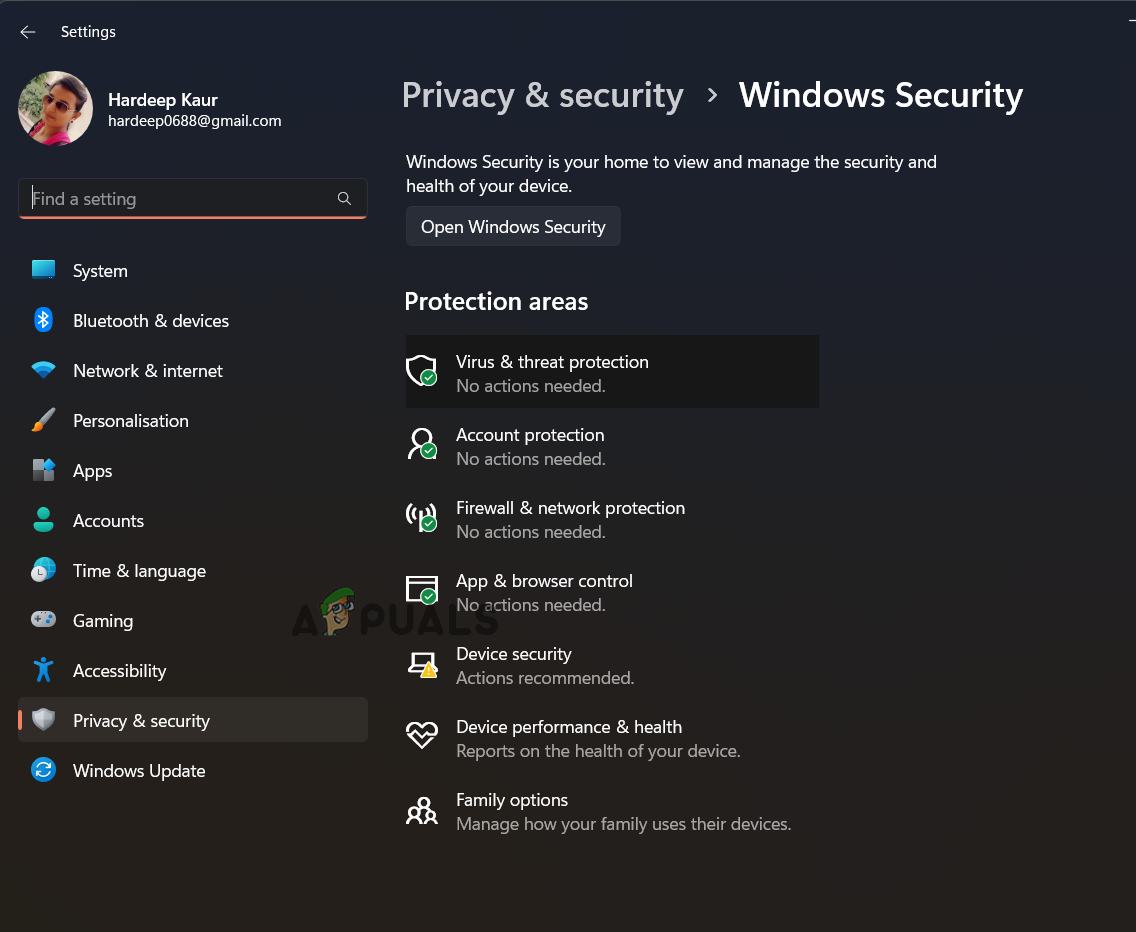
Click on Virus & Threat Protection - Click on the Scan option.
- Then, select Full scan and click on Scan now.
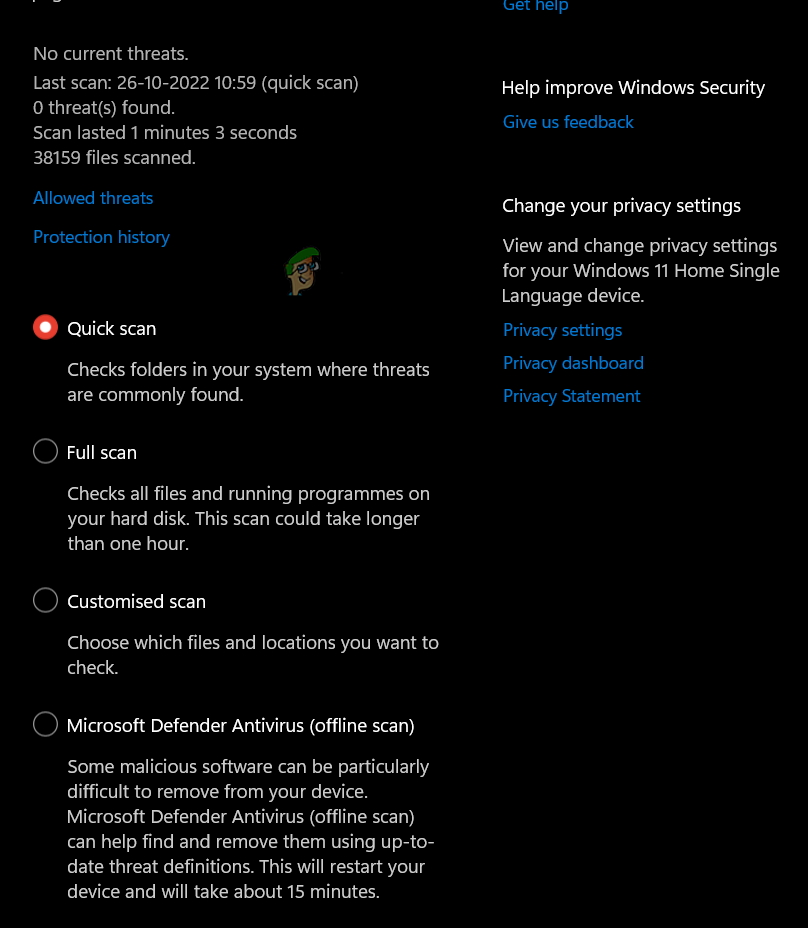
Select Full Scan - Now, wait until the tool detects and removes the virus-affected files from your system.
12. Disable Fast Startup
The fast startup feature boots your system right after a complete shutdown. But at times, this feature starts conflicting with the Display sleep function and prevents it from working. And Windows 11 comes with the enabled fast startup by default. You need to disable the fast startup to fix the problem. You can do so by using the control panel.
Follow the steps to disable fast startup on your Windows 11 PC:
- Go to Windows Settings and look for the Control Panel.
- Once it appears on the search results, double-tap on it to open.
- On the next screen, select Hardware and Sound and click the Power Options on the right pane.
Click on the Hardware And Sound option - Next, select what the power buttons do on the left side and tap the Change settings that are currently unavailable option.
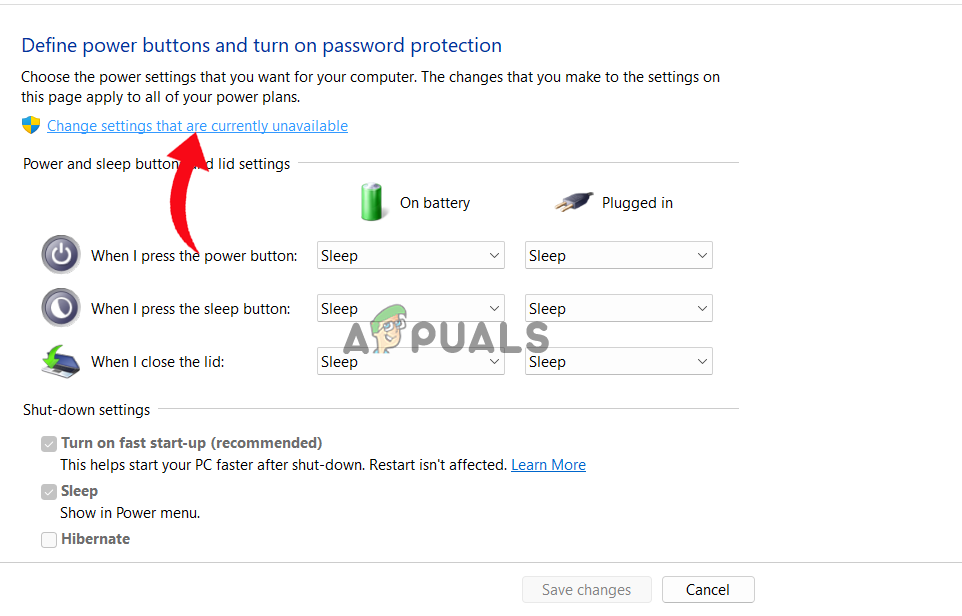
Tab on the Change settings that are currently unavailable - Now, uncheck the option box for Turn on fast startup under shutdown settings.
14. Update Display or Graphics Driver
Graphics drivers are an important part of the system. So, when you use outdated or corrupted GPU drivers, you run into this issue. Therefore, we suggest you use the latest GPU drivers to avoid facing such a situation.
You can download the latest and compatible graphics drivers simply from the official website of the driver’s manufacturer. Also, you can use Device Manager to update the driver automatically.
You need to follow the following steps:
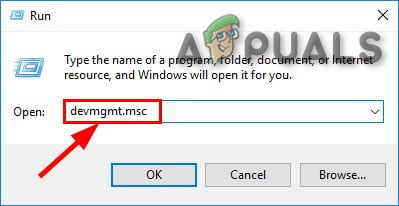
- Hold the Win key and press the R key to launch the Run dialogue box.
- Type devmgmt.msc on the Run box and press Enter key to launch Device Manager.
Type devmgmt.msc in the Run box - Then, navigate to the Display adapter option and click twice to expand.
- Now, select the dedicated GPU driver. Make right-click on it and select Update Driver.
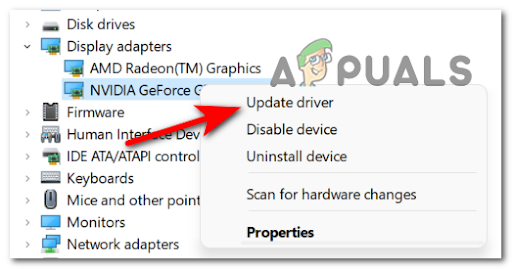
Click on Update Driver - Select the option Search automatically for updated drivers.
- Wait until Windows 11 scans and finds the latest available driver. If any are available, your PC will download and install them automatically.
- Reboot your system once and check for the problem.
So, this is all about the Windows 11 Screensaver, or Display Sleep functions not working problem. I hope the article served you well and the problem has been solved with effective solutions.