How to Speed Up Google Chrome
We all know that Google Chrome is one of the top internet browser in the market and most of us prefer it over other browsers. But nothing is perfect and Google Chrome have its fair share of problems as well. One of the main problem that haunts its users is the memory consumption of Google Chrome.
It is a well-known problem of Google Chrome that it uses a lot of memory. In extreme cases, you might even see Google ran out of memory errors as well. And even if you don’t see any of these issues, you will certainly feel the memory consumption of Google Chrome. This is mainly because Google Chrome implements process isolation. This basically means that every tab of your browser is a separate process. So, in case a tab gets stuck or hangs, it won’t affect the whole browser. This also makes Google Chrome a lot more secure and stable but at the cost of memory consumption. Most of the time Google Chrome will be very slow even if you have a good pc or Google Chrome might work fine but it will make your computer slow. This is mainly because most of the RAM will be consumed by Google Chrome, thus, leaving only a portion of RAM available for other apps. The overall memory consumption of Google Chrome can cause a lot of problems related to slow browsing and multitasking.
But there are a lot of ways that you can improve the performance of Google Chrome. You can easily adjust the amount of memory that Google Chrome uses or you can disable some functionality to reduce the amount of memory consumption or you can enable some features that will increase Google Chromes speed. A lot of things can be done to increase the performance of Google Chrome.
So, here’s a list of things that you can do to improve the performance and speed of Google Chrome.
Method 1: Increase Chrome Cache Size
Increasing the Google Chrome’s cache size is a great way to increase the speed of Google Chrome. Cache is basically a temporary storage where Google Chrome (or any other program) will store information that needs to be fetched multiple times. In case of Google Chrome, it will store website related data in its cache so if you visit a website again, Google Chrome will use the information stored in cache to speed up the process. This is the purpose of cache, rather than fetching the same information multiple times, store it in cache and fetch it from there when needed.
So, as you can imagine, increasing the size of the cache will definitely increase the speed of Google Chrome. But, you have to be careful and shouldn’t allocate huge amounts of memory to Google Chrome’s cache.
Before you increase the size of the Google Chrome’s cache, you need to check the current size and maximum limit of cache size first. Follow the steps given below to check the cache size and various other information of Google Chrome
- Open Google Chrome
- Type chrome://net-internals/#httpCache in the address bar and press Enter
- Click Cache (from the left side)
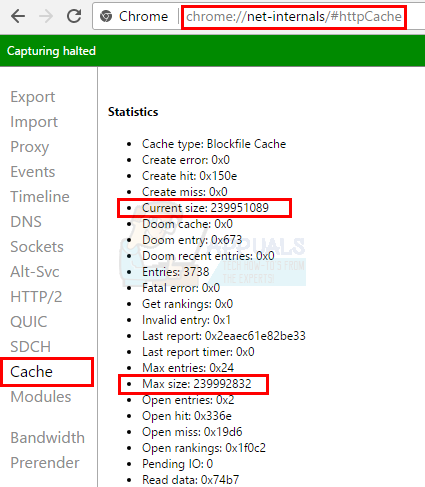
Now you should be able to see the current size and maximum size of the cache in Google Chrome. There’s a lot more information on this page but you are concerned only with the current size and max size of Google Chrome’s cache. Keep in mind that the size is in bytes.
Now, follow the steps given below to increase the size of the cache
- Close Google Chrome
- Locate the Google Chrome’s shortcut icon. If you don’t have a shortcut icon then follow these steps to make one
- Hold Windows key and press R
- Type C:\Program Files (x86)\Google\Chrome\Application and press Enter.
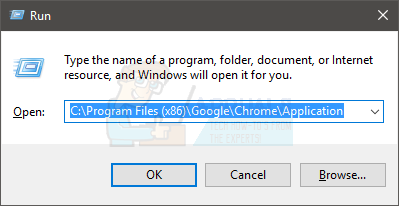
- Right click the Google Chrome’s application icon and select Create shortcut.

- Click yes if it says it can’t create a shortcut here. This will make a shortcut on your Desktop.

- Now go to your Desktop and proceed.
- Right click the shortcut icon and select Properties
- Select Shortcut tab
- You should be able to see the path of this shortcut in the section Target
- Type –disk-cache-size=10000000 at the end of the path in the section Replace 10000000 with the amount you want to allocate. You can allocate whatever amount you want but for your reference 1073741824 bytes is 1GB.
- Click Apply then OK.

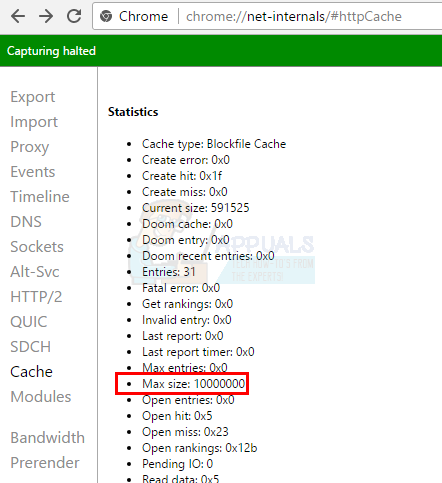
Once you are done, open Google Chrome and start browsing. There won’t be an issue and it will use the cache according the size allocated by you.
Method 2: Remove Unwanted Extensions
Extensions are a great way of adding an additional functionality to Google Chrome. There are plenty of useful extensions available in the Chrome Store. But keep in mind that extensions run in the background and use resources. Even if you don’t see your extension working they are using resources. This will certainly have an effect on your browsers performance. So, disabling or completely uninstalling the extensions is a great way to improve the overall performance.
- Open Google Chrome
- Type chrome://extensions in the address bar and press Enter.
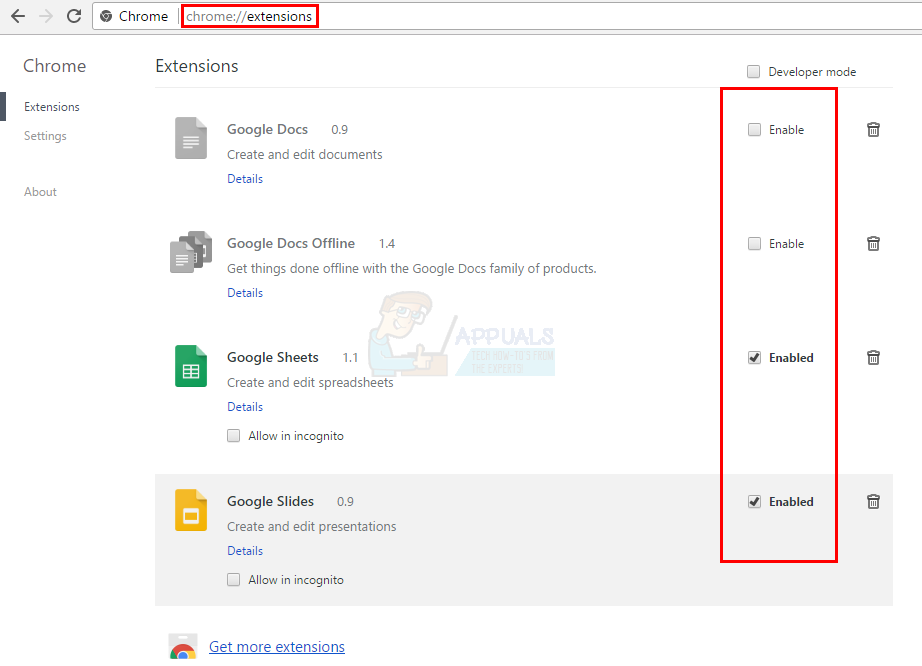
Disable all the extensions that you don’t use by unchecking the option named Enabled. This way you will keep the extension but will only temporarily disable it. If you want to re-enable the extension then just come back to this page and check the box that says Enabled.
If you think you don’t need the extension at all then you can uninstall it completely. Follow the steps given above and click the Dustbin icon in front of the extension. It will uninstall the extension from your browser.
Method 3: Remove Unwanted Apps
Just like extensions, uninstalling webapps is a great way to increase the available resources and, therefore, the speed of Google Chrome. So, remove the apps that you don’t need or use anymore to increase the overall performance of Google Chrome.
These are the steps to remove webapps from Google Chrome.
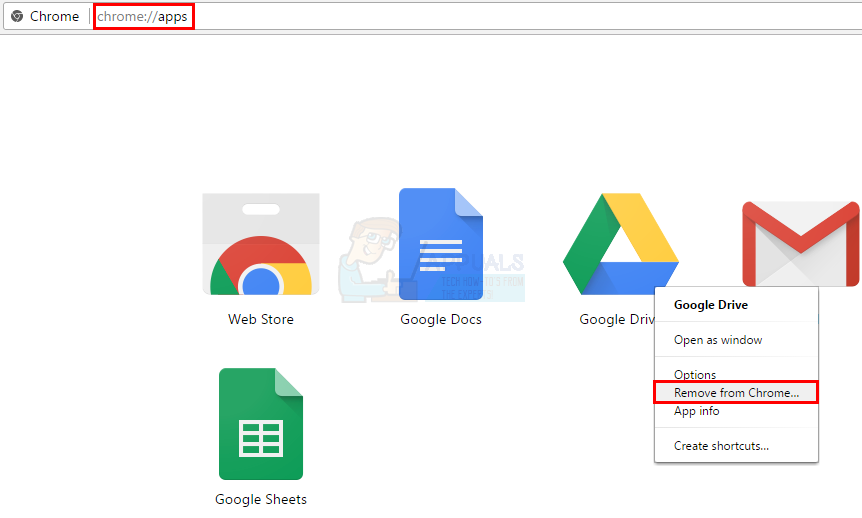
- Open Google Chrome
- Type chrome://apps in the address bar and press Enter
- You will see all the webapps that are installed on your browser.
- Right click the webapp that you don’t want or use and select Remove from Chrome…
- Click Remove again to confirm.
Once you are done, repeat the above steps for other unwanted webapps as well.
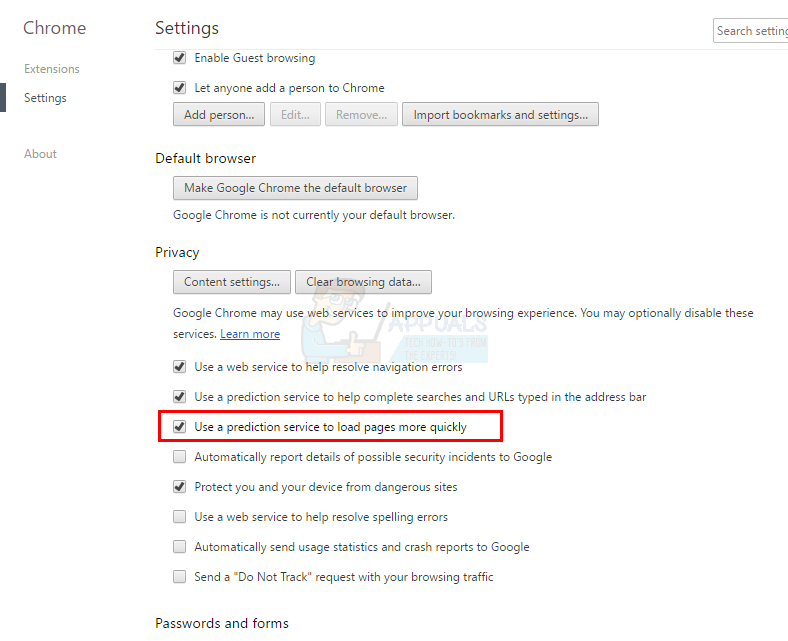
Method 4: Use Prediction Service
Use of prediction service will let Google Chrome prefetch the data of websites which will make the performance a lot better. Turning on this option is very useful and shouldn’t be turned off.
Use of prediction service is turned on by default in Google Chrome so if you haven’t changed it then you don’t have to worry. But if you did change it or you just want to check whether the option is turned on or not, then follow the steps given below
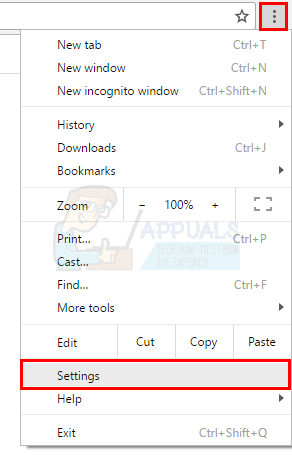
- Open Google Chrome
- Click on the Google Chrome menu (3 dots) on the upper right corner
- Select Settings.
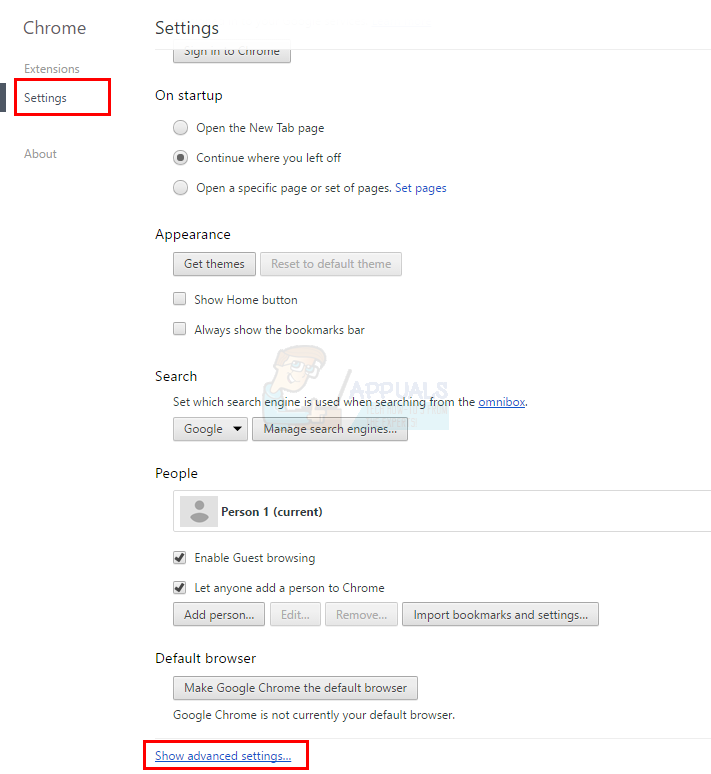
- Scroll down and select Show advanced settings…
- Check the option that says Use a prediction service to load pages more quickly (under Privacy section).
Once you’re done, your Google Chrome will start using this service to increase the performance of your browser.
Method 5: Experimental Features
The experimental features of Google Chrome are the features that aren’t tested properly and are really new or under development. These features are, as their name suggests, experimental and so they can cause crashes. But, some of these features are very useful and even if they are buggy, they can be used to increase the performance of Google Chrome.
Follow the steps given below to access these features
- Open Google Chrome
- Type chrome://flags in the address bar and press Enter
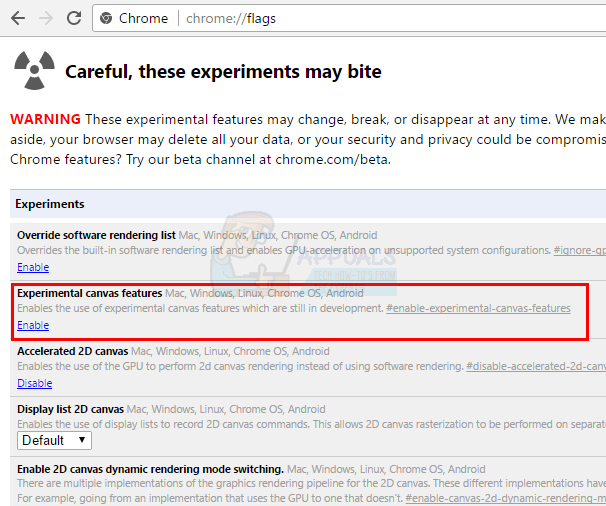
Now you should see a page with a lot of options and a warning on the top. As you can see, these are experimental features which can cause a lot of things including crashes. But, we won’t be playing with all of the features. There are some specific features that you can turn on that makes Google Chrome much better and aren’t known to cause any major problems.
You can find the below listed features by pressing CTRL and F simultaneously (CTRL + F) in the browser and then typing the name of the feature rather than scrolling. It will save a lot of time.
Experimental Canvas Feature: Locate the feature named Experimental Canvas Feature and click on the Enable button under it. This basically amplifies the loading performance and increase the performance of Google Chrome. You should be able to see a Relaunch Now button on the bottom of Google Chrome. Click that button to relaunch the browser so that this feature can take effect.
Fast Tab/Window Close Feature: This feature will increase the response time of Google Chrome while closing or opening Tab/Windows. Locate the feature named Fast Tab/Window Close and click Enable under it. You should be able to see a Relaunch Now button on the bottom of Google Chrome. Click that button to relaunch the browser so that this feature can take effect.

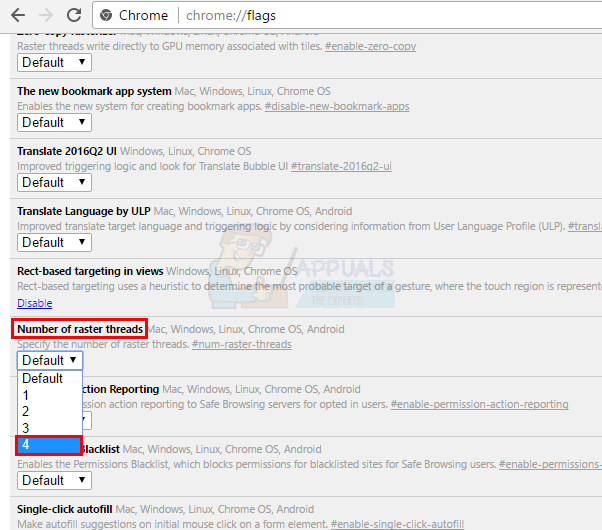
Number of Raster Threads Feature: Locate the feature named Number of Raster Threads and select 4 from the drop down button under it (it should be on Default). This will speed up image rendering performance. Once you are done, you will see a relaunch now button at the bottom. You can click it to relaunch Chrome so that this feature can take effect.
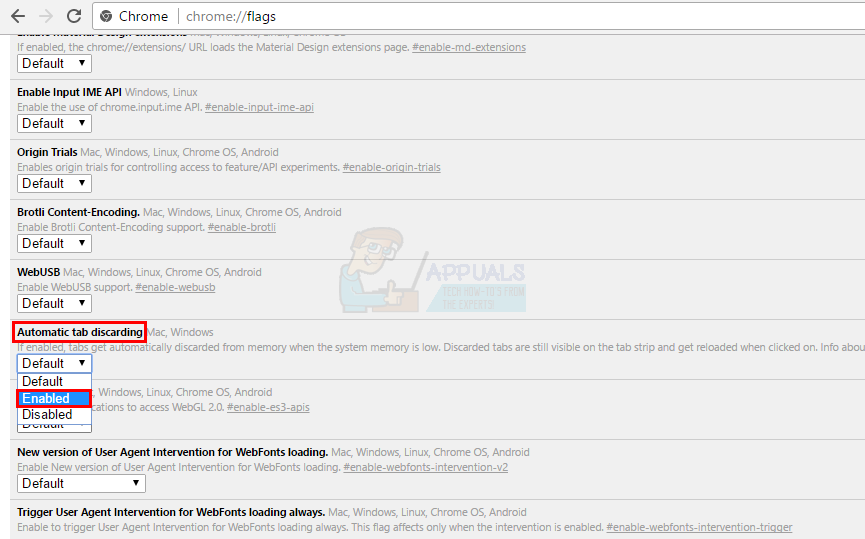
Automatic Tab Discarding Feature: This feature is very useful because, if enabled, it automatically discards the tabs that aren’t in use. Discarding a tab will release the memory so the performance of Google Chrome will be better with this option enabled. The discarded tab will still be shown on the browser and will be loaded upon opening the tab.
Locate the feature named Automatic Tab Discarding and select enabled from the drop down menu under it. Once you are done, you will need to relaunch Google Chrome to make this feature work. You will also see a relaunch button at the bottom of Google Chrome.
Simple Cache for HTTP Feature: This feature uses the latest way of caching in Google Chrome that is much better compared to the old way. So enabling this feature will serve you well in terms of Google Chromes performance. Locate the feature named Simple Cache for HTTP and select Enabled from the drop down list under it (it should be on Default).
Don’t forget to relaunch Google Chrome after this. The feature will only take effect once you relaunch Google Chrome.

Tile Width and Height Features: These are two features that can be used to make your Google Chrome a lot faster. Basically, changing these values will let Google Chrome access more RAM than before which will increase its performance. This should be used in the case where you know you have more than enough RAM for Google Chrome. If you already have less RAM available then letting Google Chrome consume more RAM will only create problems.
So, locate Default tile width and Default tile height (both should be together) and select 512 from the drop down menu under them (it should be on Default). 512 should be enough for the performance increase. Once you are done, relaunch your browser and it should be a lot better in terms of performance.
Once you enable these features, Google Chrome will be much better in terms of performance and memory consumption.
Keep in mind that these are experimental features and can be removed in any update. So if you don’t see an option mentioned here, don’t worry. It simply means that it was removed by the developers.
There are a lot of other features as well that can be used to add functionality to Google Chrome but you shouldn’t play with them unless you are sure what you’re doing. Using these features is more than enough to give your Google Chrome a performance boast.