Cannot Add or Create New Cells in Excel
Microsoft Excel causes issues when adding new ceels because of cell protection, too long filename path, merged rows/columns and because of other internal Excel components. This is a very common phenomenon and can be resolved by following some very simple steps as listed below.
What causes Microsoft Excel Not to Add New Cells?
- Cell Protection: Users apply different types of cell protection to protect their data and sheets/files. If any type of cell protection is applied to the sheet/file, then it can cause the current issue.
- Applied Formatting to the Whole Row/ Column: Users tend to unintentionally apply formatting to the whole row/column which isn’t allowed by Excel.
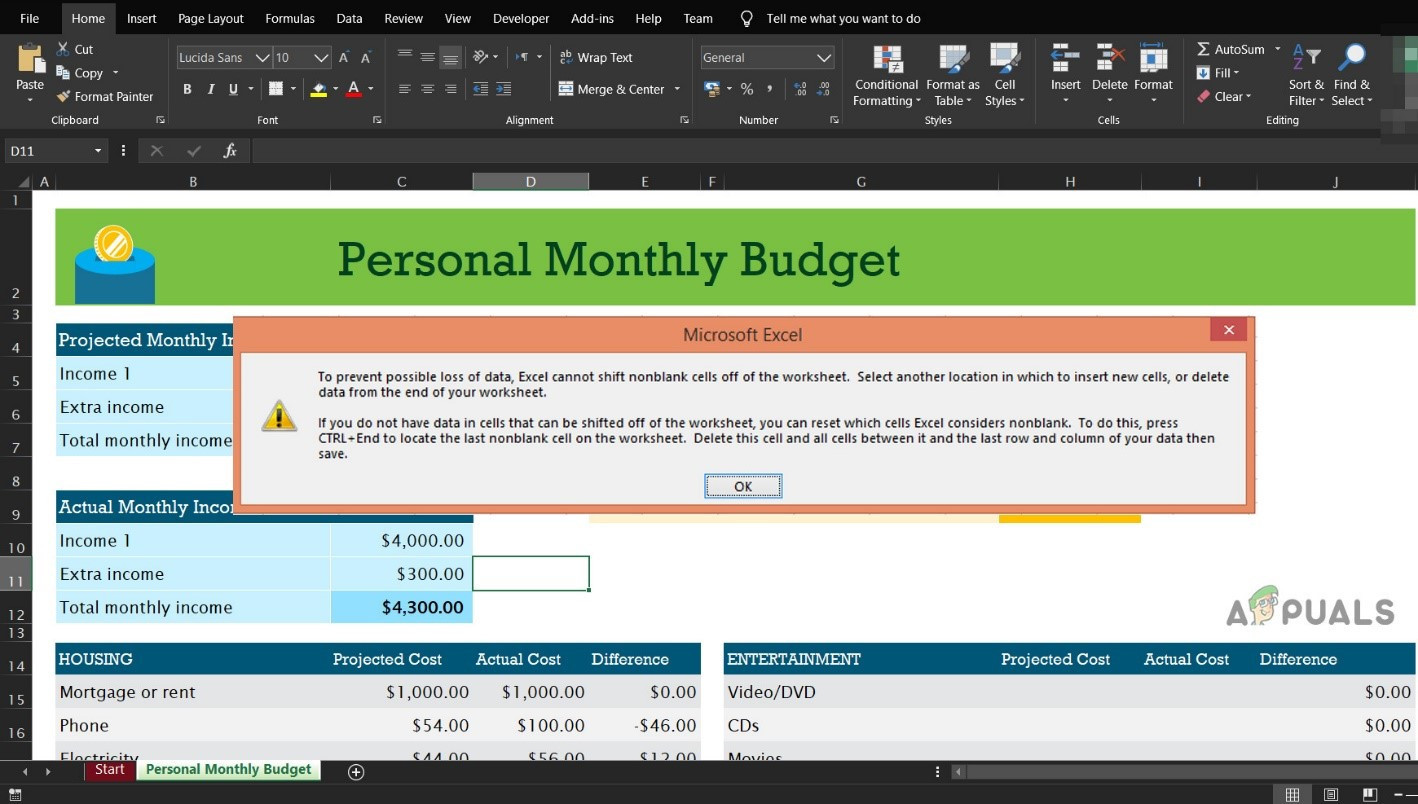
- Contents in the Last rows/columns: If the last row/column of the sheet holds some content which you are trying to replace, then to avoid data loss, Excel will restrict you from adding new cells.
- Too Long File Name Path: The filename path is the address of your file for Windows and if it is too long, then it can cause the issue you are facing.
- Merge Rows/Columns: If the users merges the whole row/column into a single cell, then Excel will not let you insert new rows/columns and show the current problem.
- Freeze Panes: Freeze panes on the sheet help a user in data insertion and management. If a user has applied freeze panes, then the user will face the current problem.
- Range Format as Table: Numerous cases have come forward where adding new cells in a selected area which involved blank space and a table causes the issue of not being able to add new cells.
- File Format Limitations: Excel has different file formats for different versions and different purposes, and each format has its limitations. If you are using a version that has limited functionality then you may encounter the current problem.
- Untrusted Source: Excel by default restricts the execution of files from untrusted sources. If the file you are using is not from a trusted source, then it can force Excel into the current error.
How to Fix not being able to Add new Cells in Excel?
Before trying the solutions, unhide rows and columns that are hidden in the sheet. Also, if you are using any macros on the sheet that is reporting to another hidden spreadsheet then make sure that the hidden sheet has not reached the max number of rows/columns.
1. Remove Cell Protection
Excel has built-in cell protection functionality which enables users to protect their data and sheet. If there is any type of protection applied to the sheet, then it can cause Excel to prevent adding of new cells to preserve the existing data. In that case, removing the protection of the cells may solve the problem.s
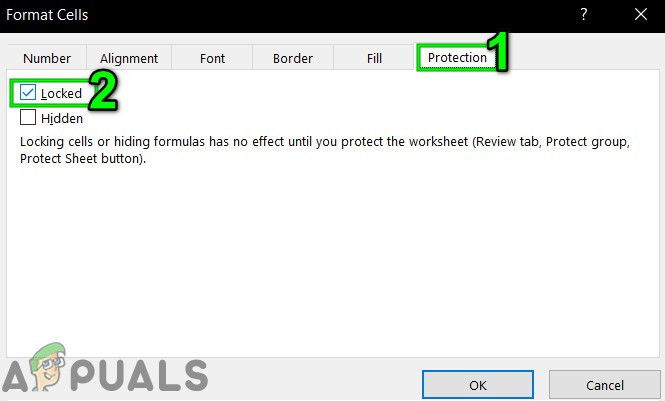
- Press Ctrl+A to select all the cells of the sheet and then on the Home tab click on Format and then in the drop-down menu click on Format Cells.
- Now click on the Protection tab and then uncheck on the Locked
Uncheck Locked Cells in Protection - Now click on the Review tab and click on Protect Sheet or Protect Workbook and enter the desired password to unprotect the sheet or workbook.
- Save and close the file and reopen the file and check if you can insert new rows/columns.
2. Reduce Long File Name Path
The filename path is the address of a file in Windows. If the Excel file name pathname is too long then it can force the Excel to restrict you from adding new cells. In that case, saving the file to a place where the filename path is not too long may solve the problem.
- Open the problematic file.
- Click on the File tab and then in the right pane click on Save as.

Save As Excel File - Now in the save as dialogue box, go to a convenient location, for testing preferably to the desktop.
- Close the Excel and open the file saved to the newer location and check if you can insert rows/columns to the sheet.
3. Unmerge the Rows/Columns
Users tend to unintentionally merge the complete row and column to a single file whereas they want to merge just a few cells. This merging of whole row/column can cause the Excel to restrict the adding of new cells with a justification of “To prevent possible loss of data” because when you have merged all cells in one row (then another column could not be added) or you have merged all cells in one column (then another row could not be added). In that case, unmerging the row/column may solve the problem.
- Find the merged rows/columns. You might have to look through your worksheet to find the merged column/row.
- For column, click on the top Heading cell of the merged column and then on the Home tab click on Merge and Center, which will un-merge the column. Repeat the process on any other merged columns.
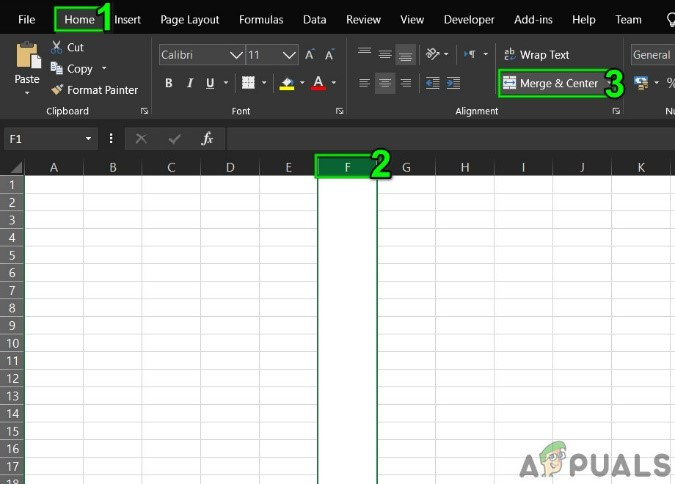
UnMerge Column - For row, click on the left Heading cell of the merged row and then on the Home tab click on Merge and Center, which will un-merge the row. Repeat the process on any other merged rows.
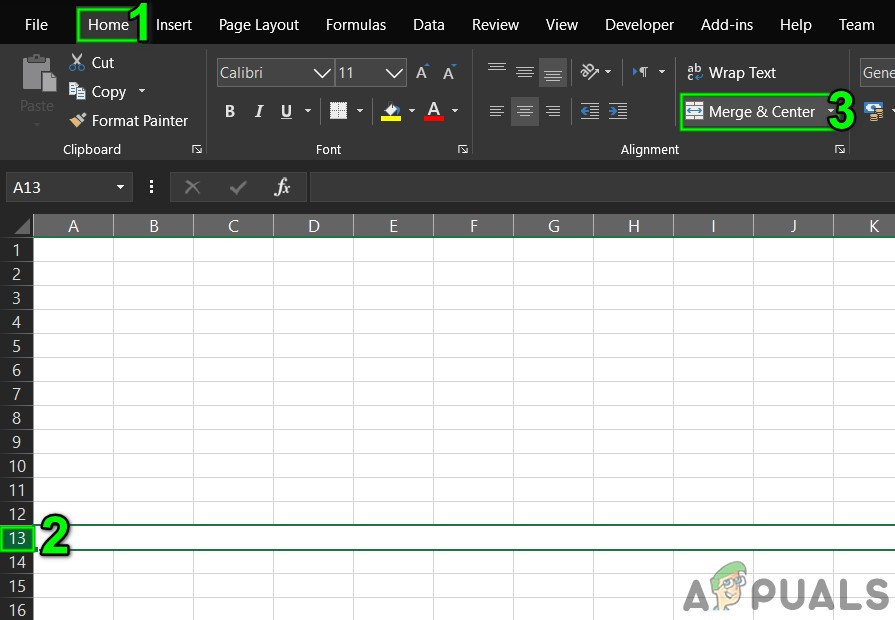
Unmerge Rows - Now save and close the file. Then open the file and check if you can insert new rows/columns in the sheet.
4. Unfreeze Panes
Freezing panes help user in achieving greater results with their data. If you are using freeze panes functionality of Excel then it will not let insert new rows and columns to the sheet. Unfreezing the panes may solve the problem.
- Click on the View tab and then on the Freeze Panes.
- Now in the drop-down list, click on Unfreeze Panes.
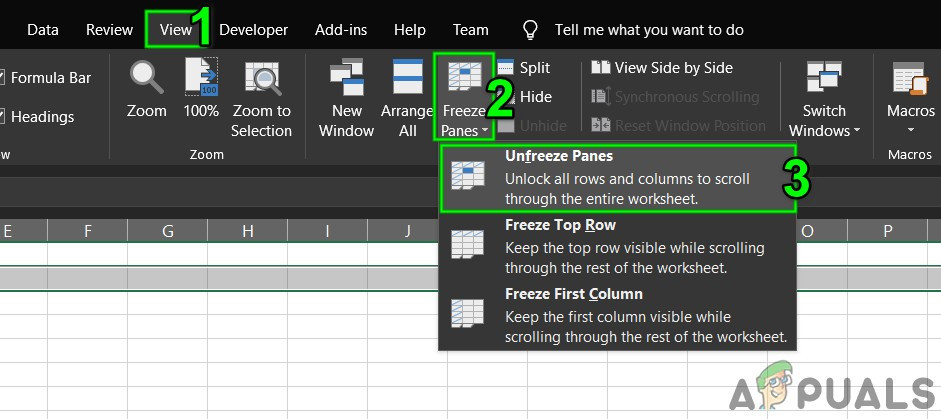
Unfreeze Panes - Save and close the file.
- Reopen the file and check if you can insert new rows/columns.
5. Format Table as Range
Tables are a great way to store data in Excel. If you are using Table in the Excel sheet then in some scenarios the user cannot add or delete the rows/columns in the sheet. In that case, converting the table to the range may solve the problem.
- Click anywhere in the table than in the Table Tools click on Design.
- Now in the Tools group, click Convert to Range.
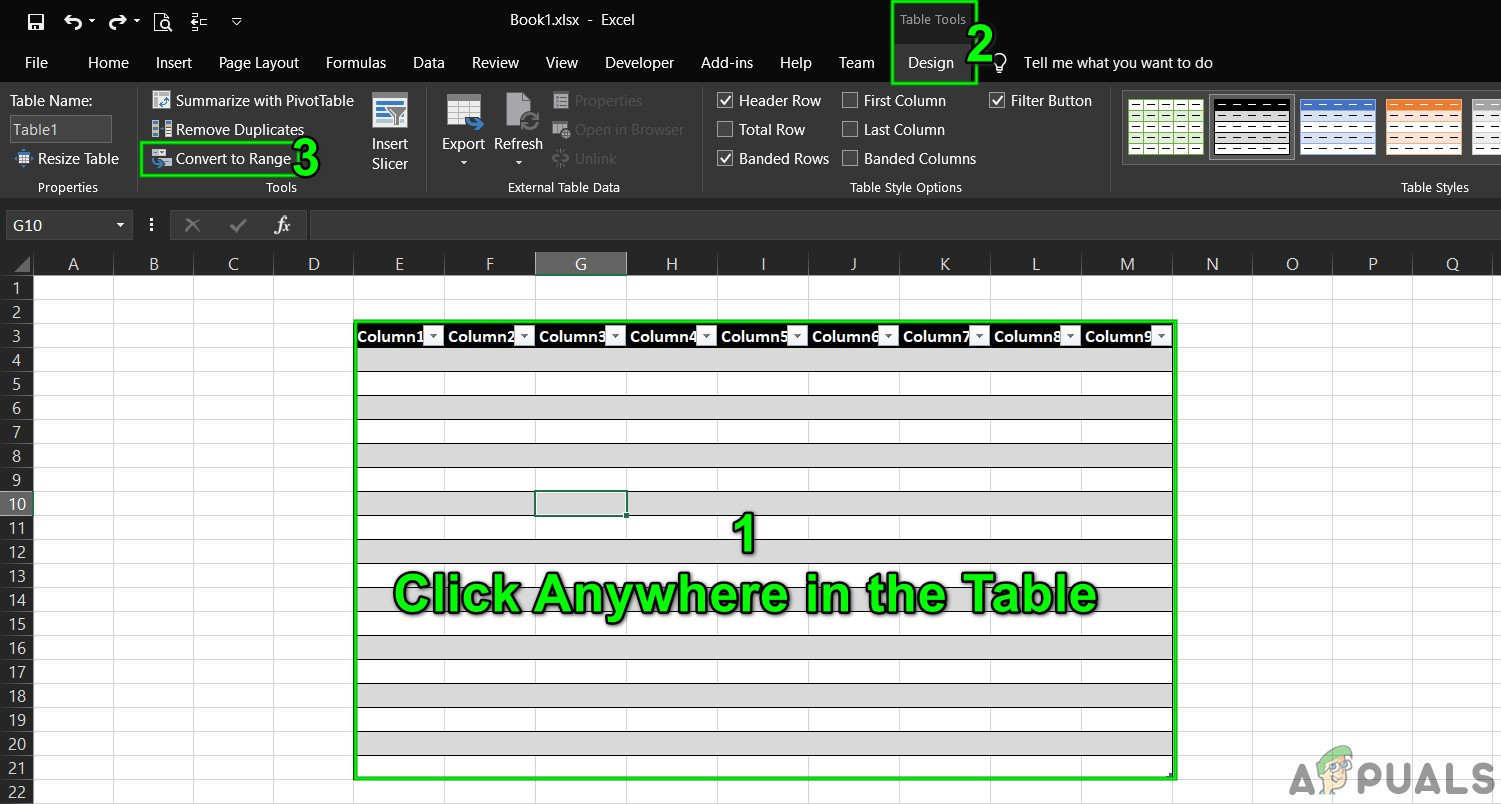
Convert Table to Range - Save and close the file.
- Reopen the file and check if you can insert new rows/columns without any problem.
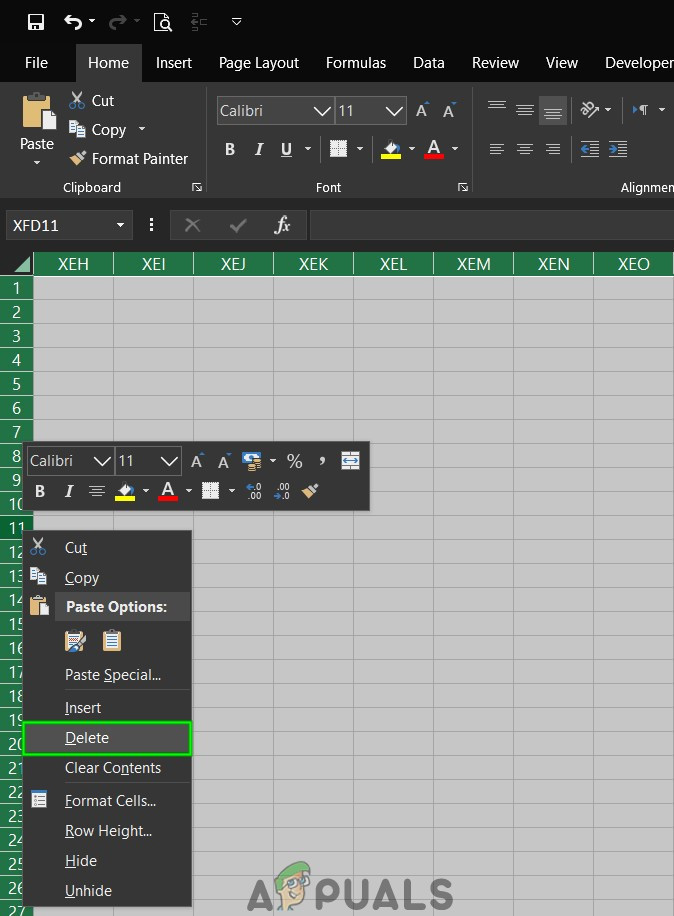
6. Clear Content and Formats From Non Used Rows/Columns
Although you think you have no data in the last row/column, Microsoft Excel does not “think” that way. Users sometimes unintentionally block the whole row/column by clicking the “Row/column Number” on the left/top side of the worksheet and then applying formatting either changing color or by applying a border etc. And when users try to insert a new row/column then the current issue occurs. This happens because of formatting used on the whole row/column as Excel is forced in “thinking” that this row/column is not empty. In that case, clearing the formatting from the whole rows/columns may solve the problem.
For column insertion
- Open the problematic workbook.
- Click at the heading cell (The heading cell is the first cell in each column, and indicates which column you are in).of the column next to your last data column and then press Shift+Ctrl+Right Arrow to make selection up to the last column of the sheet.
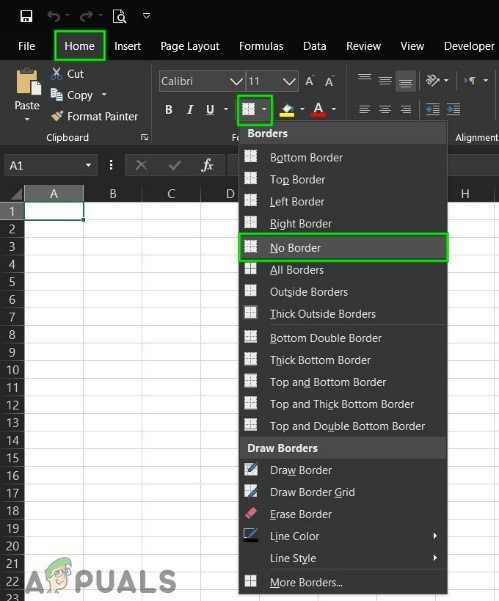
- On the Home tab, click on Borders and then click on “No Border“.
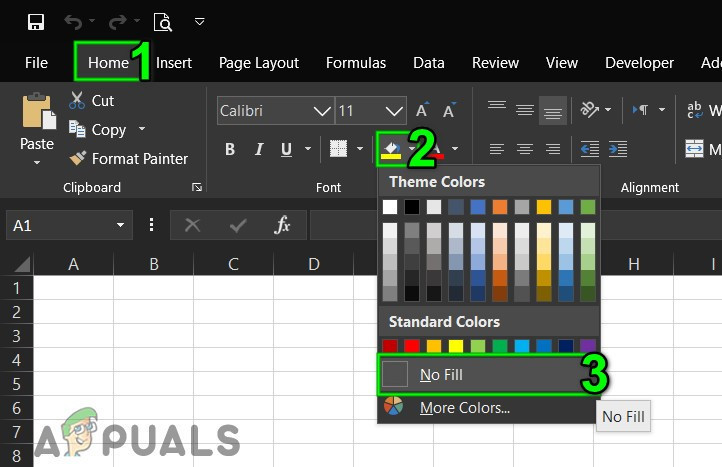
Applied No Border Formatting - On the Home tab, click on Theme Colors and then click on “No Fill“.
Applied No Fill to the Cells - Press “DELETE” in the keyboard to clear any value from cells.
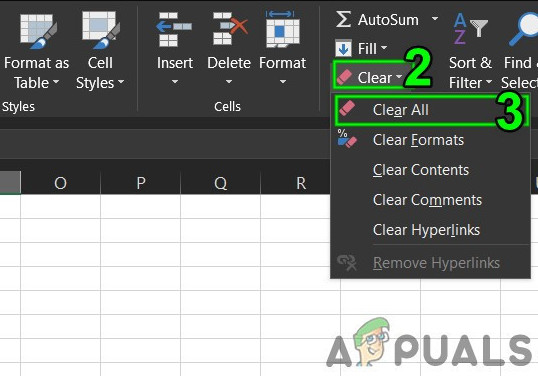
- On the “Home” tab, click on the Clear and then click on Clear Formats.
- Again, click on the Clear and then click on Clear All.
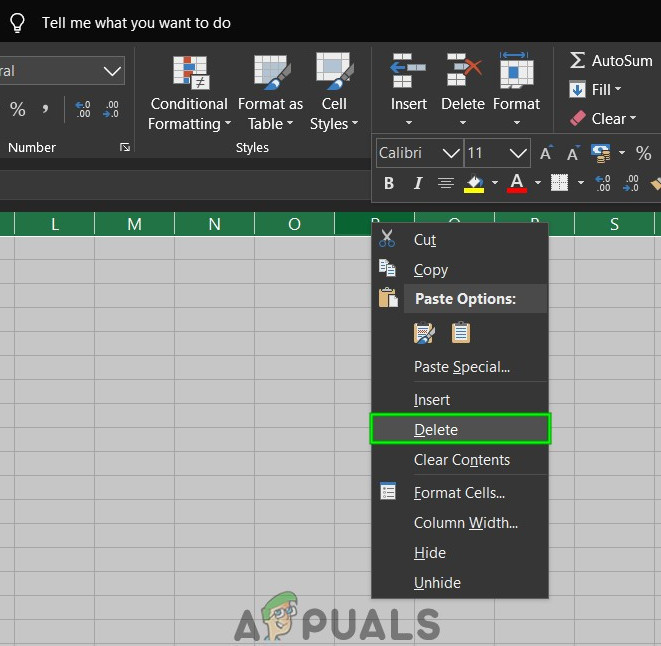
Clear Formats and All - Now right-click on top of any column so that the selection remains intact. And in the resulting menu, click on the Delete.
Delete Columns - Save and close the file and then open the file again.
For Row insertion
- Open the problematic sheet.
- Click at the left heading cell (which indicates which row you are in) of the row next to your last data row and then press Shift+Ctrl+Down Arrow to make selection up to the last row of the sheet.
- Follow step 3 to step 7 of the column insertion method.
- Now right-click on Left of any row so that are selection remains intact. And in the resulting menu, click on the Delete.
Delete Rows Contents - Save and close the file and then open the file again. And check if you can insert the new row/column in the sheet.
Also, to avoid problems of similar nature, it is always a good idea to not paste data in a spreadsheet using Ctrl + V if feasible otherwise. Then follow the steps below:
- On the Home tab, click on Paste
- Now click on Paste Special
- Then click on Values.
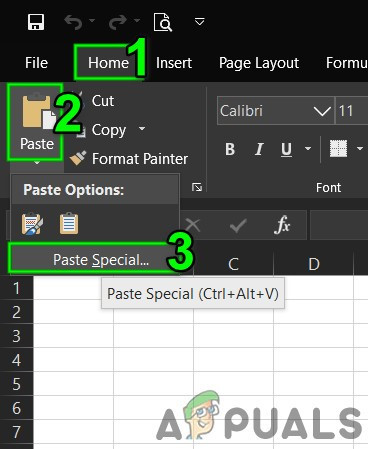
Paste Special - Press OK
7. Change the File Format
This error may also be occurring due to the format limitation of the Excel file you are using for example if you are using XLS, then convert it to XLSX, XLSM or CSV or vice versa. Thus, changing the Excel file format may solve the problem.
- Open the problematic file.
- Click on the File tab and then in the right pane of the window click on Save as.
- In Save as dialogue box, click on Save as Type drop-down and then select a different file format that the file is currently using for example if you are using XLS then choose XLSX file format and then click on Save button.

Select File Format to Save As - Now close the file and Excel and then open the newly saved file and check if you can insert new rows/columns in the sheet.
8. Trust the Source
Excel has a built-in functionality to stop the execution of Excel files from untrusted sources. If the file you are using is from the Untrusted source then Excel’s built-in security functionality will display the error message when the user will try to insert new rows/columns. In that case, adding the location of the file in the Trusted location may solve the problem.
- Open the problematic file and click on the File tab and then click on Options.
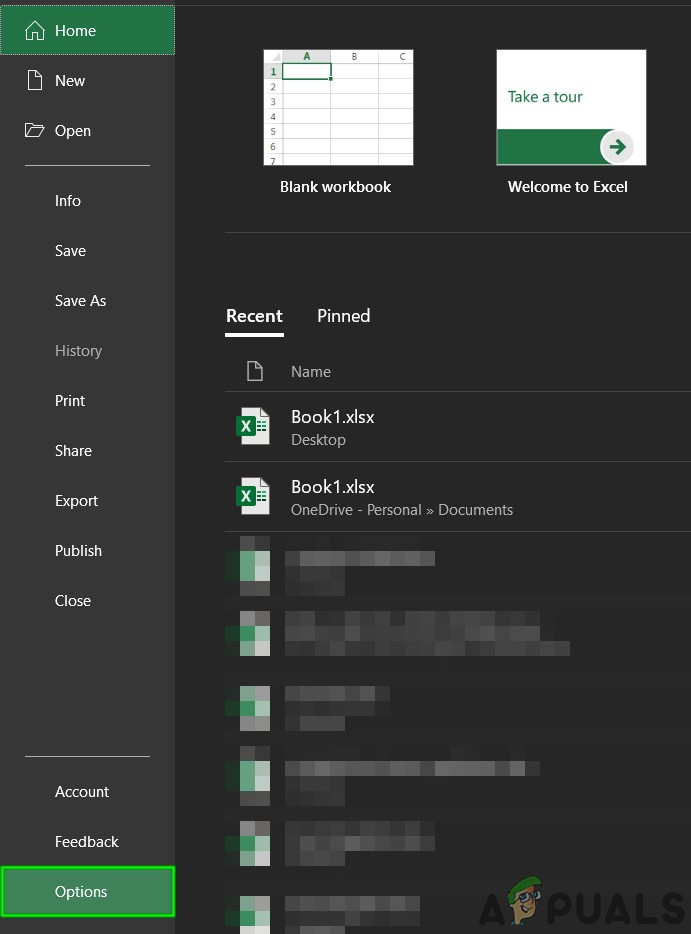
Open Excel Options - Now click on Trust Center and then click on Trust Center Settings.
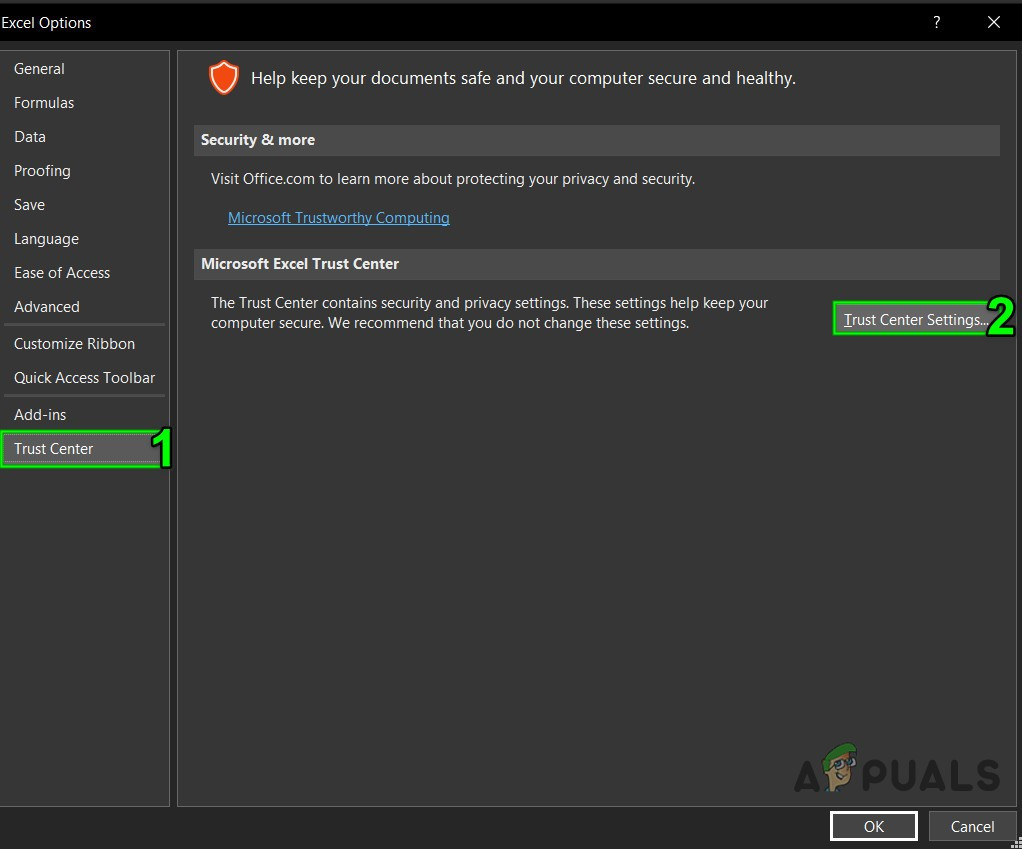
Trust Center Settings - Now click on the Trusted Locations and then click on Add New Location.
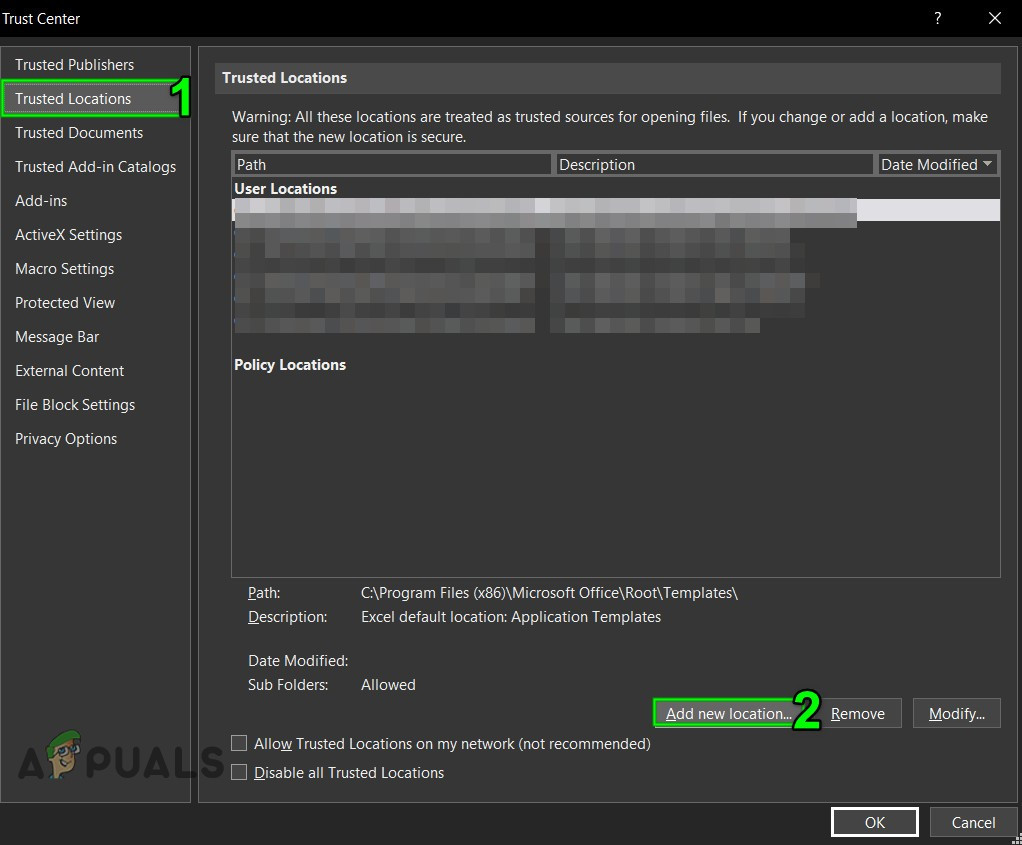
Add New Trusted Location - Now in the Trusted Location window, click on Browse.
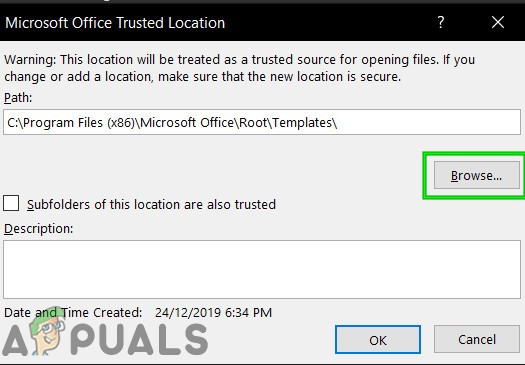
Browse to Location - Now navigate to the location of the Excel file and then click Ok.
- Again, click Ok and once again click Ok.
- Now close the file and Excel and then Reopen the file and check if you can add new rows/columns to the sheet.
9. Use VBA to Force Used Range
If due to a glitch, Excel is not able to add new rows or columns and nothing has helped us so far, then it is time to get our hand dirty with some VBA. Do not worry! Steps are quite simple and straight forward.
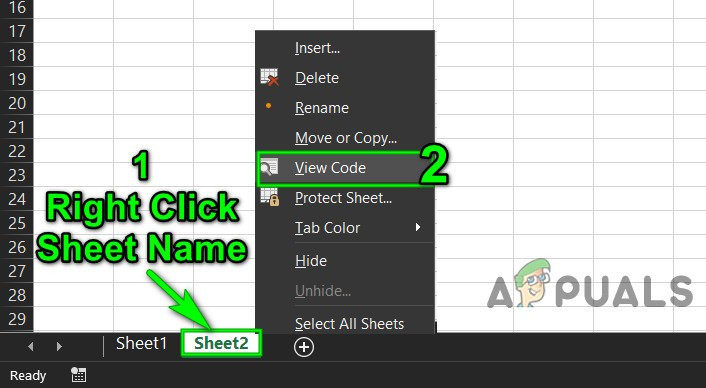
- Open the worksheet where you cannot add new rows/columns and then Right-click on the worksheet tab (name of the sheet at the bottom) and in the resulting menu click on View Code.
View Code after Right Click Excel Sheet Name - In VBA Editor, press Ctrl+G, which will show the Immediate window.
- In the Immediate window, type UsedRange and then press Enter.
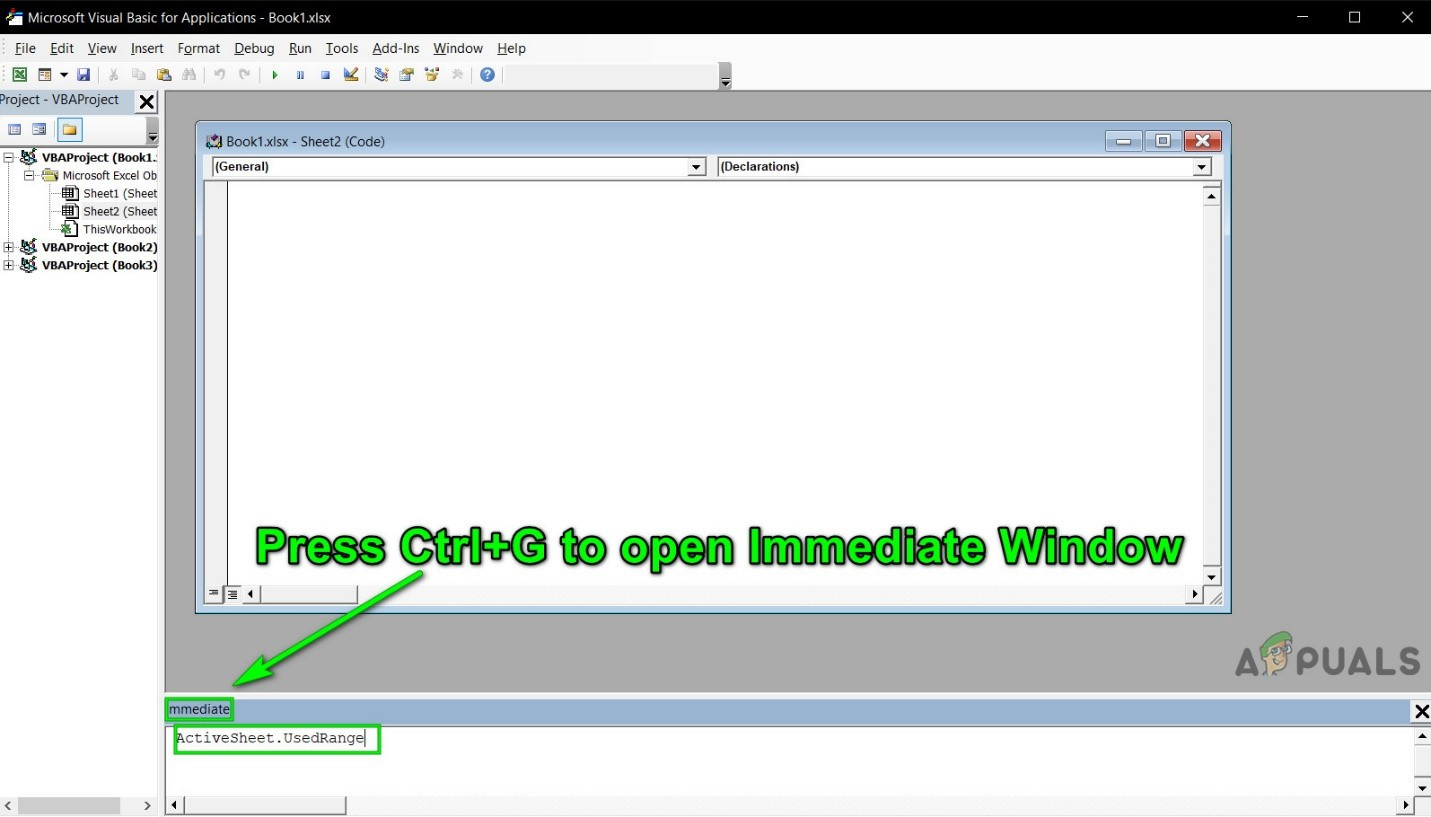
Open Immediate Window - Although nothing will be shown after running the above command, it forces Excel to change the Used Range of the problematic worksheet to conform to just the area where the user data is.
- Now click on File and then click on Close and Return to Microsoft Excel.
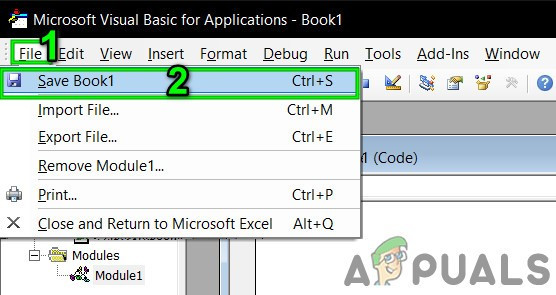
Save the VBA File - Save and close the file and Excel and then reopen the file and check if you can add new rows or columns to the file.
10. Copy to the New Sheet
If nothing has helped you, then most probably, the file you are editing is corrupt. In that case, copying data from this file to a new one is the solution left for us.
- Open the problematic sheet and select and copy your required data.
- Now click on the File tab and click on New and then click on Blank Worksheet.
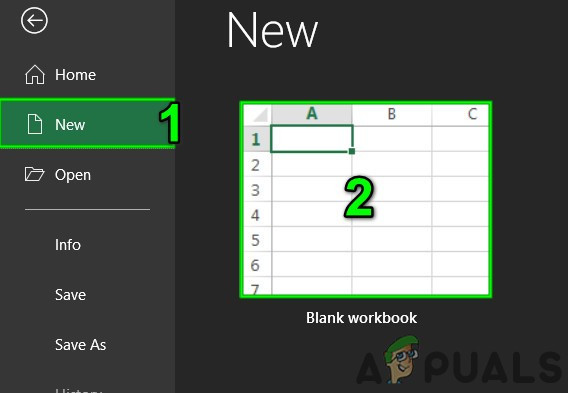
Create New Blank Workbook - Now paste the copied data.
- Save and close the new file and reopen the new file and check if you can insert new rows/columns to the sheet.
11. Use the Office Online
If none of the above methods worked for you, then using Office Online may solve the problem as the problem may be due to some issue with your system.
- Open and log in to your OneDrive in an internet browser.
- Click on the Upload button and then click on files.

Upload File to OneDrive - Now navigate to and select your problematic Excel file and then click on Open.
- Now in OneDrive, click on your recently uploaded Excel file to open it in Excel Online.
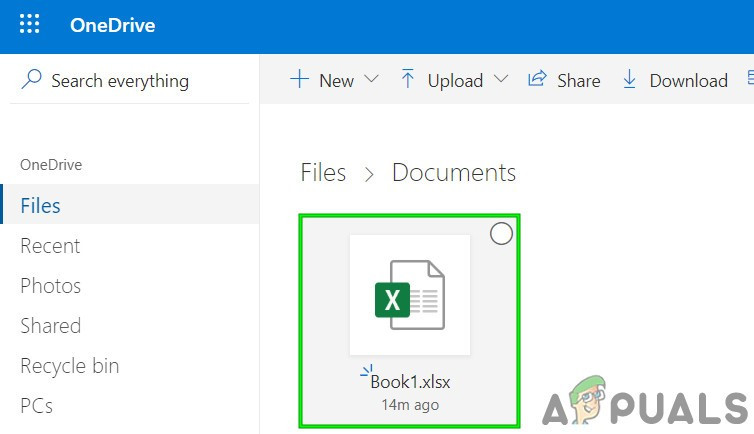
Open Excel File in OneDrive - Now try to add new rows/columns to the file.
- If succeeded, then download the file and use it on your system