How to Fix Taskbar Not Working on Windows?
Windows 10 surely brings a lot of improvements and features over its predecessors but it also has its fair share of bugs as well. The problematic taskbar is one of those problems. For most of the users who upgraded to Windows 10 are likely to see a taskbar that isn’t fully functional. The problem varies from person to person but the most common symptoms are that you won’t be able to click anything on the taskbar and your tiles will disappear. Some users have also complained about their Start Search bar not working.
This is basically a bug in Windows 10 update which will surely be solved in the future updates. Since Microsoft is rolling out updates fairly quickly, this was bound to happen. Although its inconvenient but the problem is solvable and the solutions given below works for the majority of users.
So, start from method 1 and keep going on until the problem is solved.
Uninstall any Antivirus that you might have especially if it is Norton. These Antivirus programs are known to cause issue so it’s good to uninstall them before following the methods given below. Once you are done, reinstall the Antiviruses because those are essential for the security of your system.
Method 1: PowerShell Command
Since the problem is with one of the Windows components i.e. Windows taskbar, you can solve it by running a command in the PowerShell and then deleting the folder associated with the taskbar. It has worked for many users and will most likely work for you as well.
Note: Before starting to follow this method, make sure your Windows Firewall is running. If you don’t know how to turn on the Windows Firewall or whether it’s turned on/off then follow the steps given below
- Hold Windows key and press R
- Type services.msc and press Enter

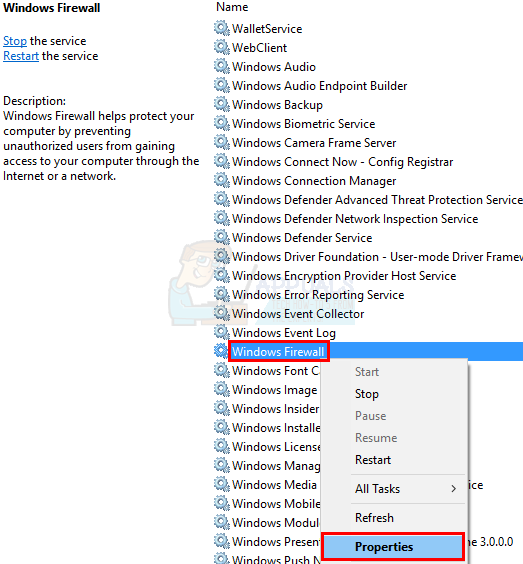
services.msc - Locate the service named Windows Firewall
- Right click Windows Firewall and select Properties
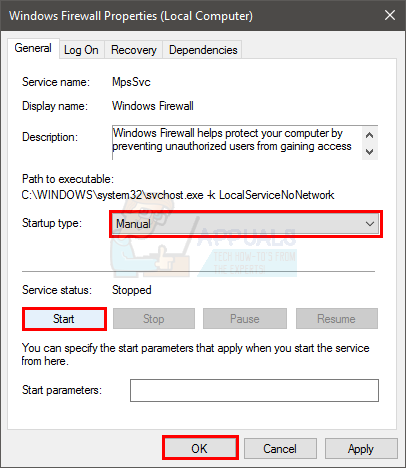
- Select Manual from the drop down menu in section Startup Type
- Click the Start button in section Service Status (you should be able to see the status change to running once the service starts)
- Click Ok
Now that the Windows Firewall is turned on and we are sure of it. Let’s start working on the solution for this problem.
- Press CTRL, ALT and DELETE simultaneously (CTRL + ALT+ DELETE)
- Select Task Manager
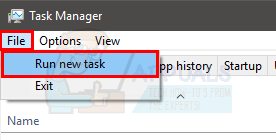
- Click File
- Select Run new task
- Check the option that say Create this task with administrative privileges
- Type powershell and press Enter
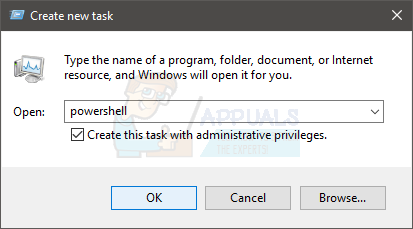
- Type Get-AppXPackage -AllUsers | Foreach {Add-AppxPackage -DisableDevelopmentMode -Register “$($_.InstallLocation)\AppXManifest.xml”} and press Enter. You can check the problem is solved or not because he problem gets solved for some users after running this command. So just check the taskbar (no need to restart) and if it isn’t fixed then continue.

- Hold Windows key and press R
- Type C:\Users\%username%\AppData\Local\ and press Enter
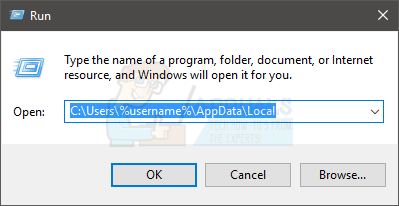
- Locate a folder named TileDataLayer. Right click and select Delete. If you can’t see the folder anywhere in the location then it must be hidden. Unhide the folder by following the steps given below
- While you are in the File Explorer, Click View
- Check the option that says Hidden Items in the section Show/hide
- Now check if the folder appears or not
- Close the windows and double click Recycle bin (located on the Desktop screen)
- Locate the same folder that you delete TileDataLayer. Right click and select delete. Click yes if it asks for confirmation.
If you can’t delete the TileDataLayer folder then follow these steps
- Hold Windows key and press R
- Type services.msc and press Enter

- Locate a service named tiledatamodelsvc or Tile Data model server
- Right click the service tiledatamodelsvc or Tile Data model server and click Stop

- Now repeat the steps from 5-9 given above.
Wait a couple of minutes after the folder is removed from the recycle bin. Then check if the issue is still there.
Method 2: PowerShell Command (Alternative)
This is another command that you can run in the PowerShell of Windows that have worked for plenty of users.
- Press CTRL, ALT and DELETE simultaneously (CTRL + ALT+ DELETE)
- Select Task Manager
- Click File
- Select Run new task
- Check the option that say Create this task with administrative privileges
- Type powershell and press Enter
- Type Get-AppXPackage -AllUsers |Where-Object {$_.InstallLocation -like “*SystemApps*”} | Foreach {Add-AppxPackage -DisableDevelopmentMode -Register “$($_.InstallLocation)\AppXManifest.xml”} and press Enter
Now check and see if the problem is solved or not.
Method 3: Checking for Updates
It is possible that a certain bug/glitch in the operating system is preventing the taskbar from functioning properly. Often, these bugs are fixed by new updates to the operating system. Therefore, in this step, we will be checking for new updates to the operating system.
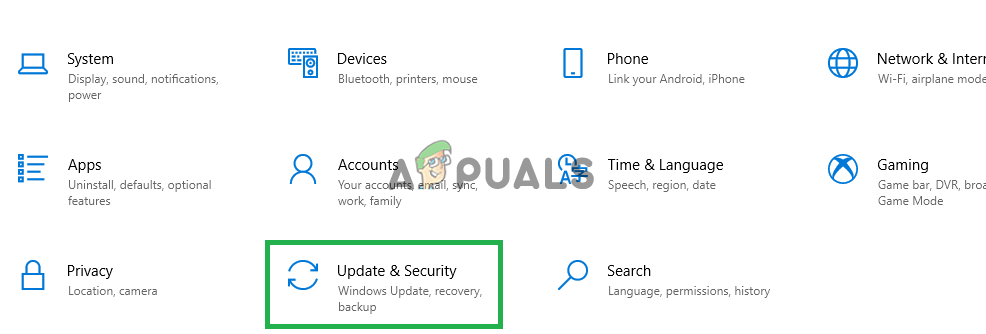
- Press “Windows” + “I” keys simultaneously.
- Click on the “Updates & Security” button.
Clicking on the “Updates & Security” option - Click on the “Check for Updates” button and wait for the checking process to be completed.
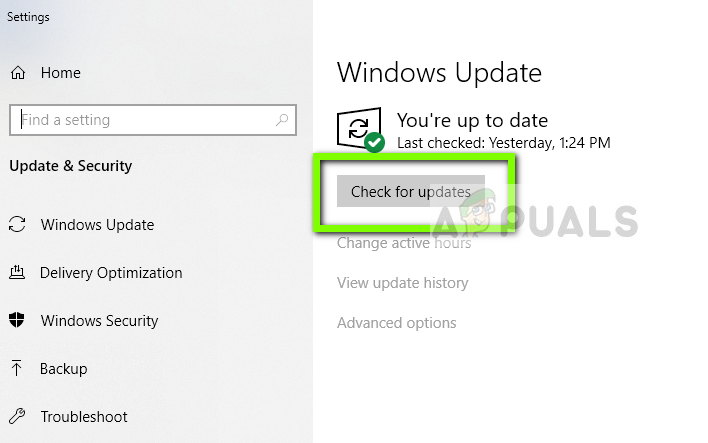
Checking for Updates – Windows Update - If new updates are available they will automatically be downloaded and installed.
- Restart the computer to apply the updates and check to see if the issue persists.
Method 4: Performing an SFC scan
An “SFC” scan checks the computer for any corrupt or missing drivers and registry files. Therefore, in this step, we will be performing an SFC scan. For that:
- Press on the “Windows” + “R” keys simultaneously to open up the Run prompt.
- Type in “cmd” and then press “Ctrl” + “Shift” + “Enter” to open it as an administrator.
- Type in “sfc/scannow” and press “Enter“.
- The tool will now scan all of your system files, wait for the verification process to finish,
- Once the scan is finished, check to see if the issue persists.
Performing an SFC scan
Method 5: Creating a New Microsoft Account
Sometimes, certain user data might be corrupted. This corrupt data can interfere with certain elements of the operating system and prevent certain features from working properly. Therefore, in this step, we will be creating a new Microsoft Account to fix this issue. For that:
- Click on the “Start Menu” button and select the “Settings” icon.
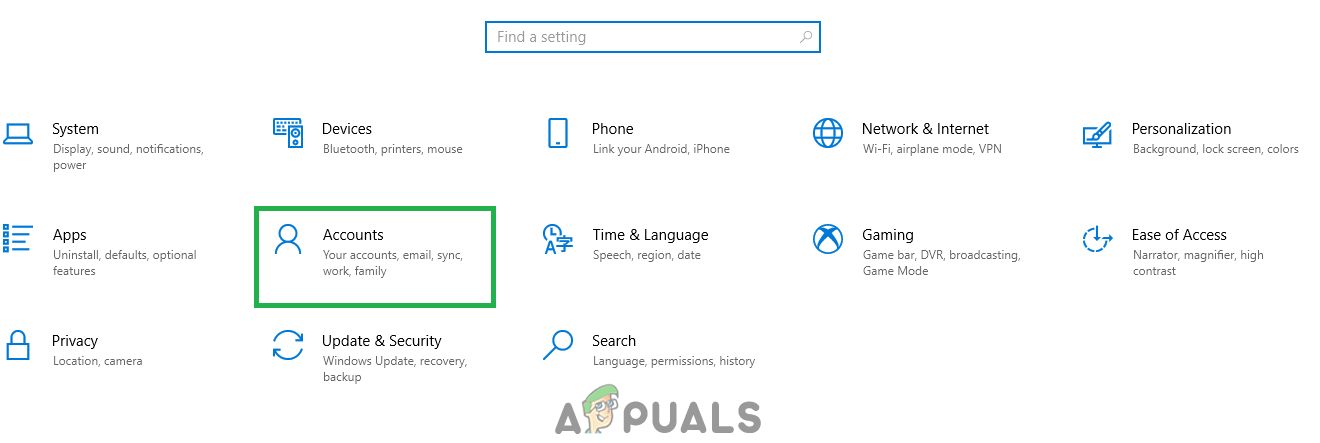
- Inside the settings, click on the “Accounts” button.
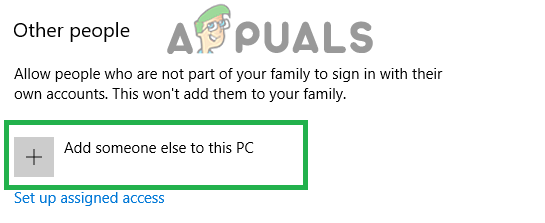
Selecting “Accounts” from settings - Select the “Family & Other People” from the left pane and click on “Add someone Else to this PC“.
Clicking on “Family & Other people” and selecting “Add someone else to this PC” - Click on the “I don’t have this person’s sign in information” option and select the “Add a user without a Microsoft Account” setting.
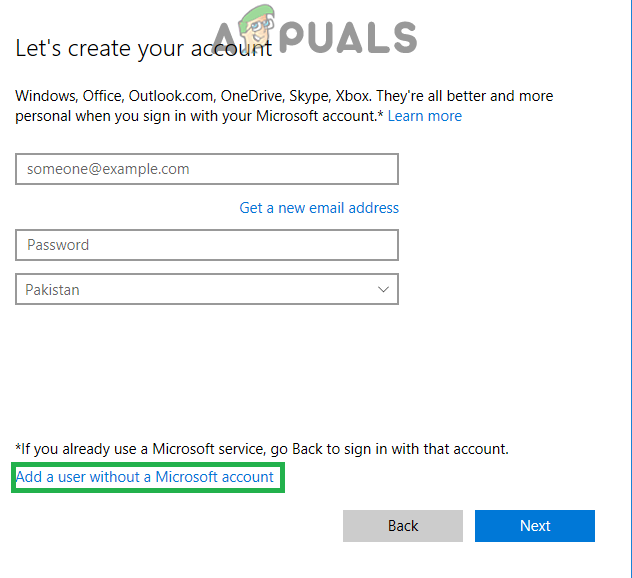
Clicking on the “Add without Microsoft account” option - Enter the credentials for the account you want to create and click on “Next“.
- Once the account is created, click on the account and select the “Change account type” Option.
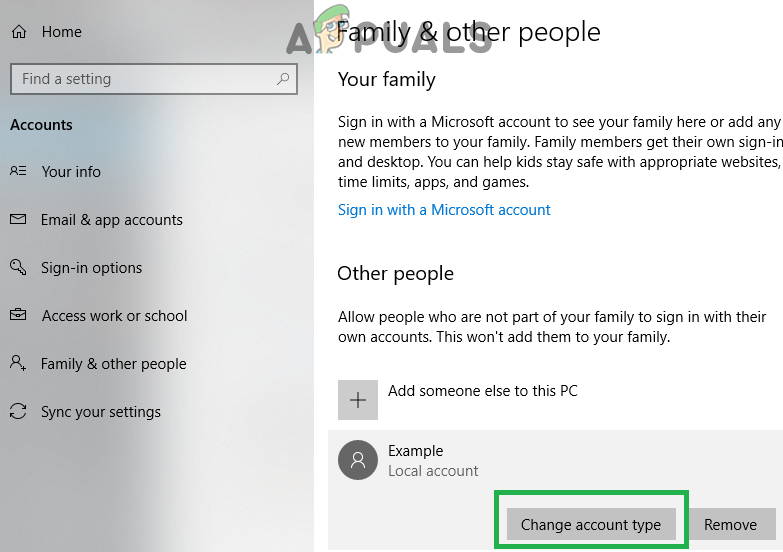
Clicking on the “Change Account Type” option. - Click on the dropdown and select “Administrator” from the options.
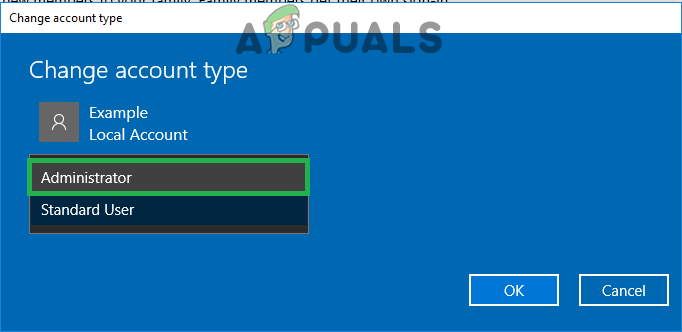
Selecting “Administrator” from the list - Click on “OK” and sign out of the current account.
- Sign in to the new account, run the application and check to see if the issue persists.
Method 6: Application Identity Service
Going into the services and turning on a service named Application Identity Service is also known to solve this problem for quite a few users.
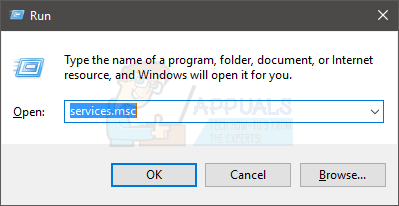
- Hold Windows key and press R
- Type services.msc and press Enter
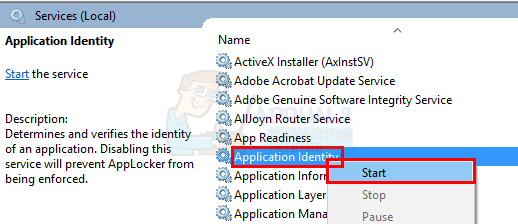
- Locate a service named Application Identity. Right Application Identity and select Start
- Wait a minute or two and then restart your computer
Once you are done, check whether the taskbar has started working or not.
Method 7: Safe Boot Option
Performing a safe boot has also worked for many users. But the real problem of going into the msconfig is that you cannot access your taskbar and start search so you have to make it work from another angle.
The steps for accessing msconfig without using your start search or taskbar are given below.
- Right click on an empty space while you are on your Desktop screen
- Select New then click Shortcut
- Type msconfig when it asks to enter the location
- Click Next
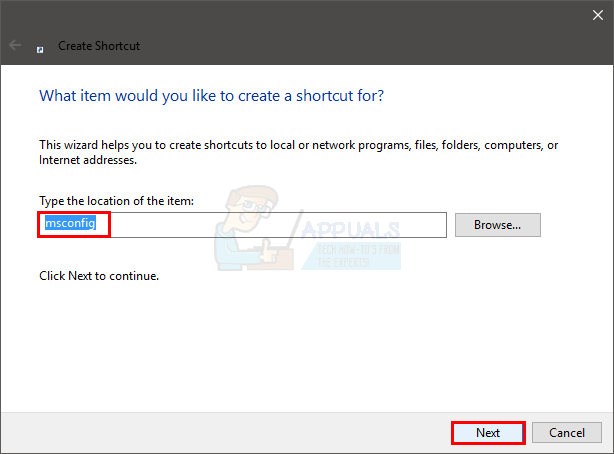
- Name it whatever you want and then click Finish

- Double click this newly made shortcut (it will appear on your desktop now)
- Click Boot tab
- Check the option that says Safe Boot
- Click Network option
- Click Apply then click Ok
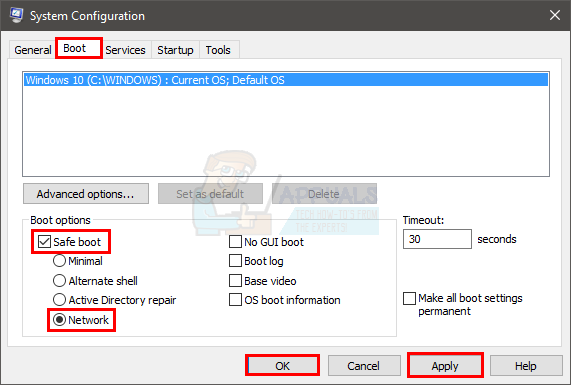
- It will ask you whether to restart computer right now. Select YES
- Once restarted, double click the shortcut (that you made earlier) again
- Select Boot tab
- Uncheck the option Safe Boot
- Click Apply and then select Ok
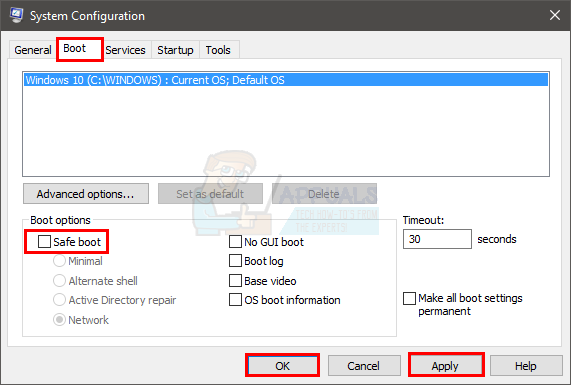
- Now restart again and everything should be fine now.
Once your computer has restarted, check whether the taskbar is working or not. It will most likely work this time.