How to Fix QuickBooks Error 15215
QuickBooks Error 15215 usually appears after or before installing a major update and the problem can be caused by several different factors. Usually the scenario goes like this: The users are able to install all updates successfully except the Maintenance Update Releases. When they attempt to install them as well, they receive the following message:
Maintenance Release update error 15215: QuickBooks could not verify the digital signature for the update file.
Having problems with updating QuickBooks can be really bad because users need the new updates which usually contain new tax forms, especially when a new year update is released. That is why it’ quite important to keep QuickBooks updated at all costs and that is why it’s important to handle this error successfully. Follow the solutions presented below to fix this issue:
Solution 1: Problems the Digital Signature Certificate
QuickBooks errors starting with 15*** are usually related to digital signature certificates and you will need to make sure you install the proper one in order to install the update successfully. This can be a somewhat lengthy process but it will definitely help if you stick to the instructions provided.
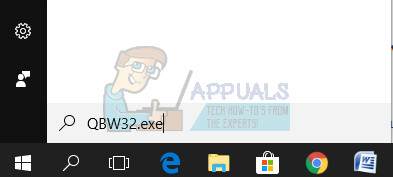
- Do a Windows Search for QBW32.exe or locate it manually in C:\Program Files\Intuit\QuickBooks if you are using an older version of Windows.
- Right-click on the QBW32.exe file, and select Properties.
- Navigate to the Digital Signature tab and make sure that Intuit, Inc. is selected in the list of available signatures.
- Next, click on Details and, when the Digital Signature Details window opens, click on the View Certificate option.
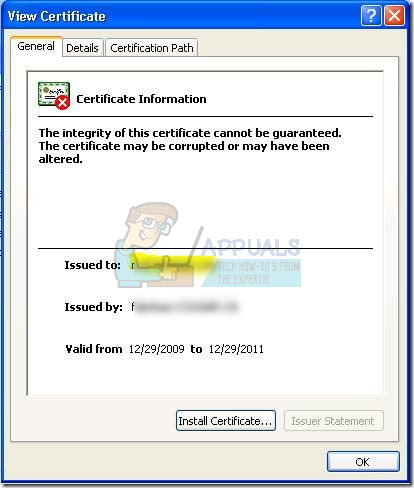
- Locate the Install Certificate button in the Certificate windows and click on it. Click on Next until you see the Finish button which should mean the Certificate has been installed correctly. Click on Finish.
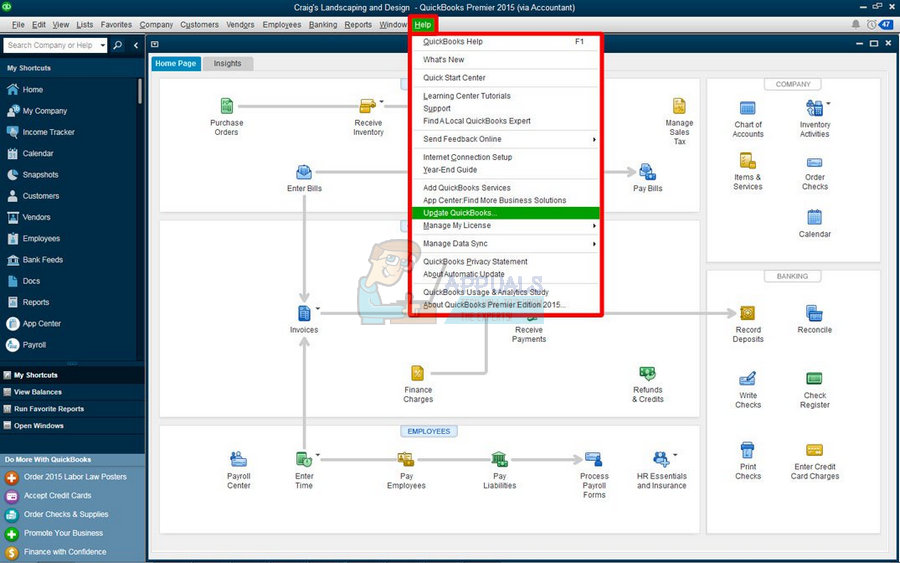
- Restart your PC, reopen QuickBooks and try downloading and installing the update again by clicking under the Help menu button and choosing the Update QuickBooks option.
Solution 2: Problems with Internet Explorer in General
There are quite a few things which can go wrong with Internet Explorer and, because of the fact that your Internet connection somewhat depends on it, you may notice that QuickBooks updates won’t work until you fix a couple of things regarding your Internet connection.
Before we start, you firstly need to check whether the time and date on your computer are configured correctly by following the steps below:
- Open Date and Time settings by opening the Start menu, opening the Settings app by clicking on the gear icon above the power icon, choosing the Time & language option, and navigating to the Date & time tab.
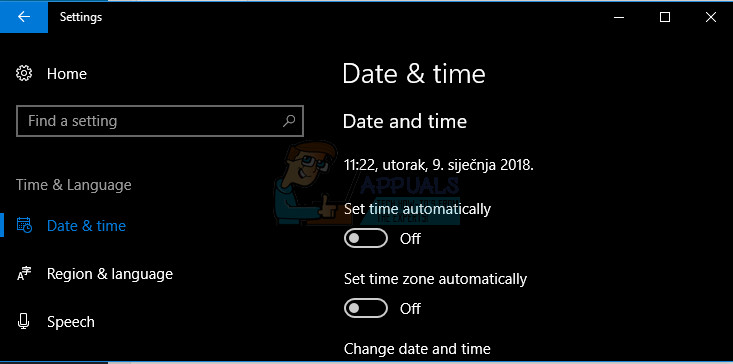
- In the Date and Time tab, make sure that your computer’s date and time are correct. If the time is not correct, you can try turning the Set time automatically option on or off, depending on the default state.
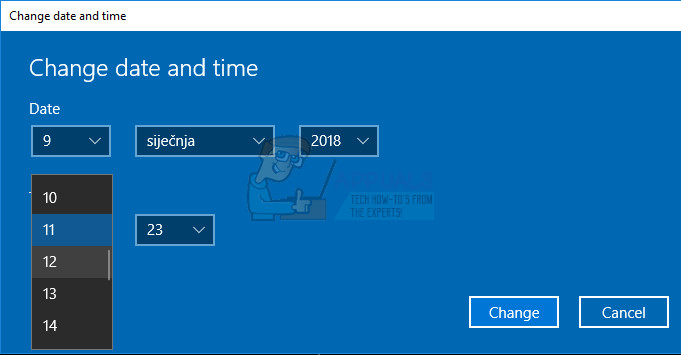
- To change the date, under Date, click the dropdown menu in order to find the current month in the calendar, and then click the current date.
- To change the time, under Time, click the hour, minutes, or seconds that you want to change, and then slide the values until you settle for the one correct according to your location.
- When you have finished changing the time settings, click OK.
Alternative: People who failed to fix their issue by tweaking the settings in this way can also do it in Control Panel. The settings are similar but now you can set your time to sync with the Internet time.
- Navigate to Control Panel > Clock, Language and Region > Date and time > Set the time and date > Internet time > Change settings.
- Now check the Synchronize with an Internet time server option and click on the Update now button. Then click OK, Apply, OK and close Control Panel.

- Once you’re done with synchronization, the problem should be fixed immediately.
If these options were enabled to start with, try disabling them, restarting your computer, and checking to see if the time is set correctly now.
Now that you are sure that the Time and Date settings are configured correctly, it’s time we move on to fixing Internet Explorer. We will start by making it the default browser for the purposes of successfully installing the QuickBooks update. You can always revert these changes.
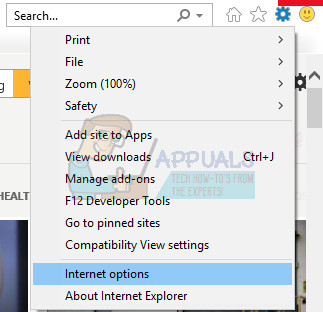
- Open Internet Explorer and click on the Gear icon located in the top right corner.
- From the menu which opens, click on Internet options.
- Navigate to the Programs tab and click on the Make Default button under the Default Web Browser option.
- Click OK in order to apply the changes.
The next thing on our checklist is checking whether the encryption on Intuit’s site is working properly by visiting it. Intuit requires the high 128 encryption in order to run the updates.
- Open Internet Explorer and navigate to Intuit’s official website.
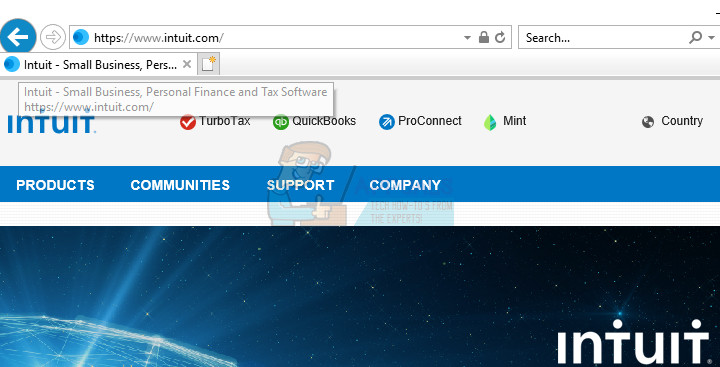
- Press the Alt key on your keyboard which should display the menu bar. Navigate to File >> Properties.
- Under the Connection section, check the number left of the “bit encryption”.
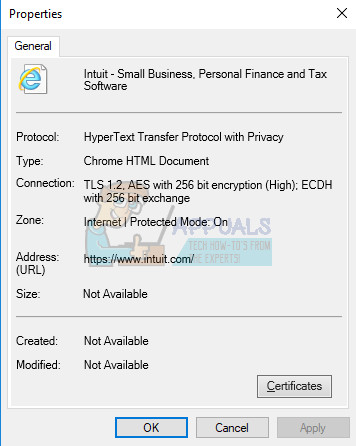
- If the number is less than 128 bit, that means that Internet Explorer is broken and you may need to fix, update, or reinstall it by following the instructions on this link.
The final step in this solution is to update Internet Explorer settings and make sure your Internet connection is configured correctly to update QuickBooks.
- Open Internet Explorer and click on the Gear icon located in the top right corner.
- From the menu which opens, click on Internet options.
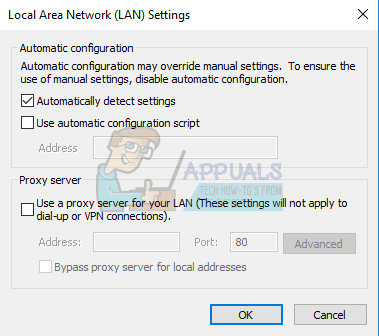
- Navigate to the Connections tab and click on LAN Settings.
- Mark the checkbox next to Automatically Detect Settings and make sure the Proxy servers are blank unless you actively use one, which is not recommended while updating QuickBooks.
- Make sure you apply these changes before you navigate to the Advanced tab. Locate the SSL 2.0 and SSL 3.0 and make sure they are marked. After you have marked them, uncheck the box next to the Check for publisher’s certificate option.
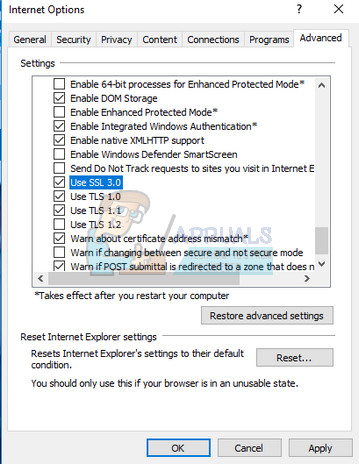
- While still in the Advanced tab, scroll down to the bottom of the window and make sure the TLS 1.2 option is not checked.
Solution 3: Make Sure Your Firewall Isn’t Blocking QuickBooks
Firewalls can prevent QuickBooks from accessing the Internet properly and that is a major concern. Different firewalls may be installed on your computer but it’s not recommended to use more than one. Let’s take a look at how to make sure QuickBooks files are not blocked by Windows Firewall:
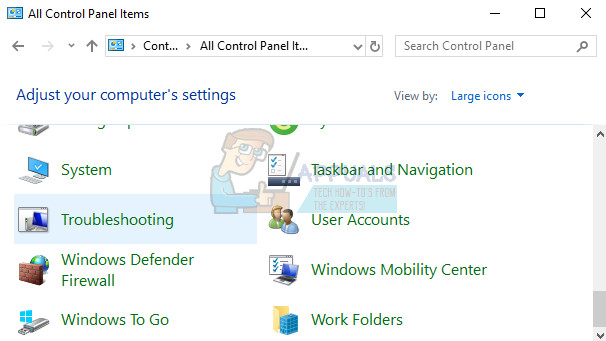
- Navigate to Control Panel by searching for it in the Start menu and click on System and Security >> Windows Firewall. You can also switch the view to Large or Small icons and click on Windows Firewall instantly.
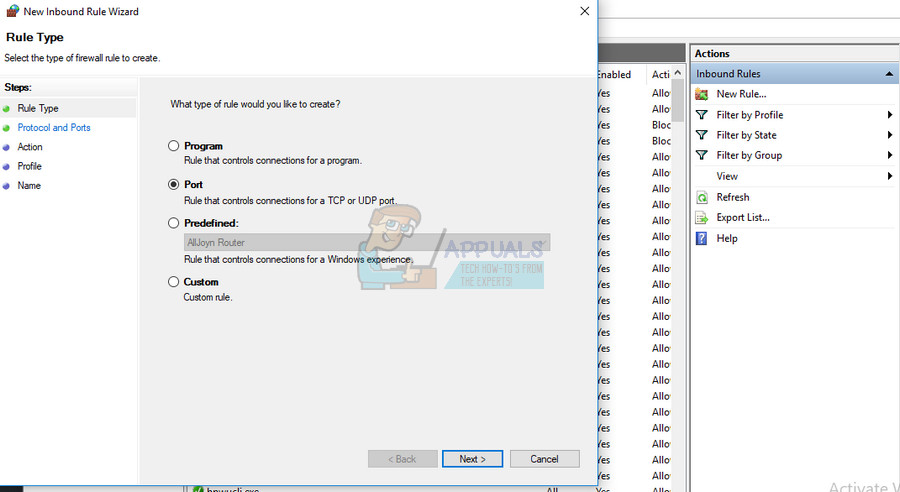
- Select the Advanced settings options and highlight Inbound Rules in the left section of the screen.
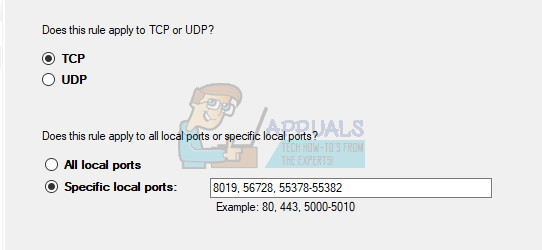
- Right click on Inbound Rules and click on New Rule. Under the Rule type section, select Port. Select TCP from the first set of radio buttons (TCP is recommended) and switch the second radio button to “Specific local ports. You will need to add the following ports in order to fix QuickBooks updating functionality:
QuickBooks Desktop 2018: 8019, 56728, 55378-55382
QuickBooks Desktop 2017: 8019, 56727, 55373-55377
QuickBooks Desktop 2016: 8019, 56726, 55368-55372
QuickBooks Desktop 2015: 8019, 56725, 55363-55367
- Make sure you separate them by a coma right to the last one and click on Next after you have finished.
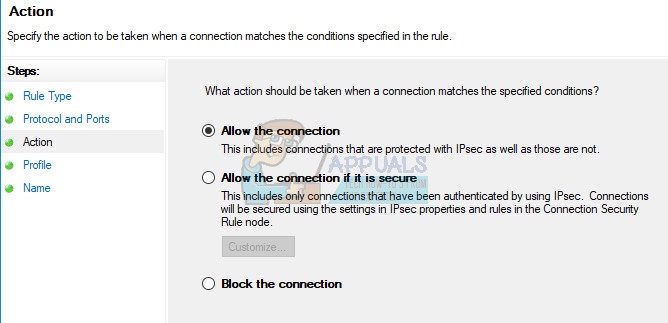
- Select the Allow the connection radio button in the next window and click Next.
- Select the network type when you want to apply this rule. If you switch from one network connection to another quite often, it’s recommended that you keep all of the options checked before clicking Next.
- Name the rule something which makes sense to you and click Finish.
- Make sure you repeat the same steps for Outbound Rules (choose Outbound rules in Step 2).
Solution 4: Try Running the Update Yourself in Several Different Ways
After you have performed the steps above, it’s wise to try and engage the updating process manually by following the instructions below. The update should install now and you shouldn’t have problems with future updates unless something else goes wrong.
- Choose the Update QuickBooks option which is located under the Help menu at the top of the screen.
- Click Options and choose the Mark All option. Click the Save button and click Update Now. Click Reset Update then click the Get Updates button.
- When the Update Complete message appears, close QuickBooks Desktop.
- Open QuickBooks Desktop. If you get the message prompting you to install update, click Yes.
Next, you will need to check whether the Payroll updates have installed successfully since they can sometimes malfunction easily and cause this error in the first place.
- Go to the Employees menu at the top of the QuickBooks window.
- Select Get Payroll updates option.
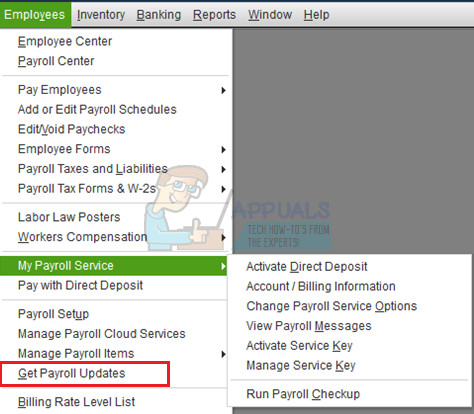
- Make sure that the Download entire payroll update is selected and click Update.
Solution 5: Installing the Updates Manually
If the method above failed to fix your issue, you can always try and install the update manually from Intuit’s official site. This method has proven to be quite useful when there is a problem with updating QuickBooks in general. However, this is a one-time fix and you may never know if the next update is going to cause the same error.
- Navigate to the Update to the Latest Release option.

- Make sure that your product is selected. If it’s not, click the Change option and select your QuickBooks product.
- Click the Update button and choose where you want to save the file. Click on the Save button.
- When the download completes, locate the file you just downloaded and double click to install the update. You may need to restart Windows after the installation is complete.
- Once it’s done, open QuickBooks and press F2 to check if you’re on latest update.