What is ‘gamebarpresencewriter.exe’ and How to Disable It
In the recent updates, Microsoft released a feature named as “Game Bar” in Windows which allows users to record their experience when they are playing games. This is a very useful feature and gets handy as you don’t have to exit the game or enable some third-party program to record your session. Instead, the game bar automatically launches whenever you play any game and lets you use tools using hotkeys. The executable ‘gamebarpresencewriter’ is the process for executing the Game Bar functionality.
You can easily access the Game Bar when you are playing any game by pressing Windows + G. It includes options to take a screenshot, record your gameplay, or quickly launch the Xbox application.
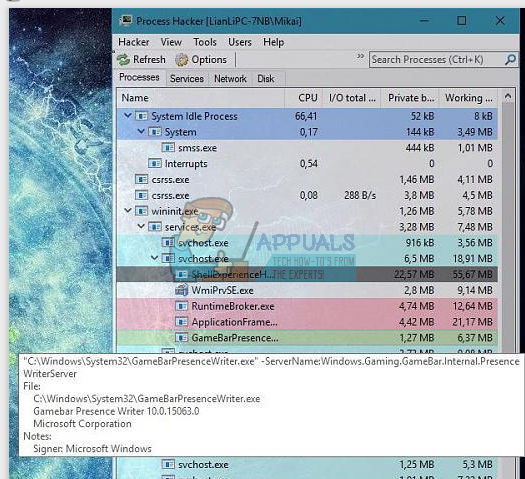
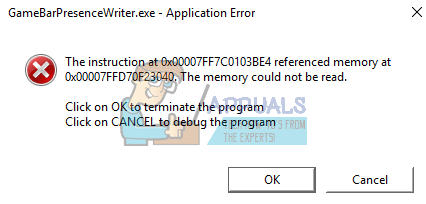
However, there were many users who reported that this application was causing abnormal CPU or Memory usage whenever they launched any game on their computers. Furthermore, there was also the case where an error popped up because the Game Bar files were not available in the system to use. Keeping errors aside, there were severe cases of people not being able to disable the Game Bar from launching itself whenever they opened any game.
There are a few workarounds to solve these problems. If you are experiencing high CPU or memory usage when playing games, we can try disabling the game bar and check if this fixes the problem. If this doesn’t work, we can try disabling the entire game DVR and the game bar from registry settings on your computer. Do note that you will require administrative privileges to perform the workaround.
It should also be noted that some Xbox games are dependent on game DVR for their smooth operation. If you disable it, they may become unstable and produce unexpected errors. If they do, you can always revert the changes using the same method.
Solution 1: Turning Game Bar off in Xbox app
The Game Bar is primarily a feature of the Xbox application present in your Windows. We will first try disabling the Game Bar directly from the Xbox application and see if this makes any difference. If this doesn’t work, we will consider disabling Xbox DVR or the Game Bar using the registry.
- Press Windows + S, type “Xbox” in the dialogue box, and open the application.
- Click on the Settings icon present at the bottom left side of the screen. Now select “Game DVR” from the list of tabs and uncheck the option ”Record game clips and screenshots using Game DVR”.
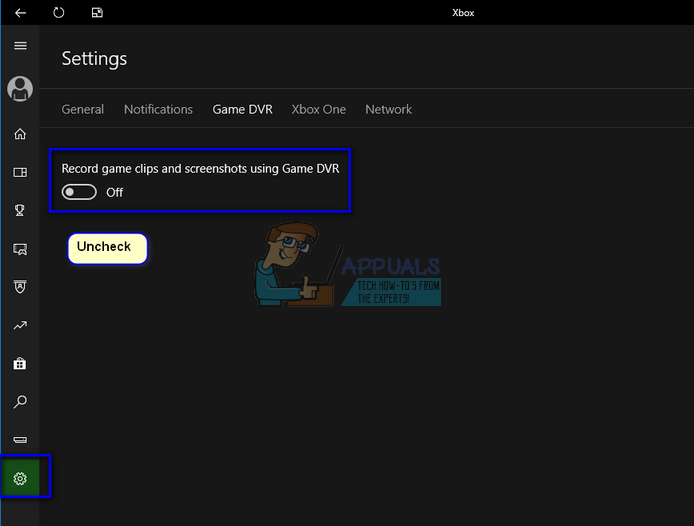
- Restart your computer for the changes to take place and check if the problem at hand got solved.
Solution 2: Disabling Game Bar using Registry Editor
If you are somehow unable to turn the Game Bar off using the Xbox application, we can try turning it off using the registry editor. Do note that the registry editor is a powerful tool and changing keys that you have no idea about can render your PC unusable. It is always wise to take a backup of the registry before performing any changes to it.
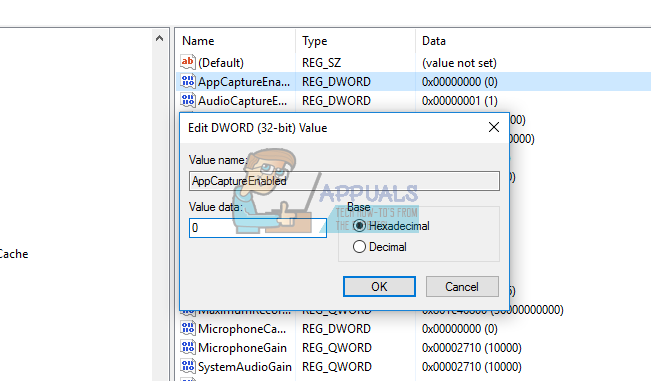
- Press Windows + R, type “regedit” in the dialogue box, and press Enter.
- Once in the registry editor, navigate to the following key:
HKEY_CURRENT_USER\SOFTWARE\Microsoft\Windows\CurrentVersion\GameDVR
- Search for the key “AppCaptureEnabled” and change its value to ‘0’. ‘0’ means off and ‘1’ means on.
- Now navigate to the following key:
HKEY_CURRENT_USER\System\GameConfigStore
- Look for the key “GameDVR_Enabled” and double-click it to open its properties. Change its value to ‘0’. ‘0’ means off and ‘1’ means on.
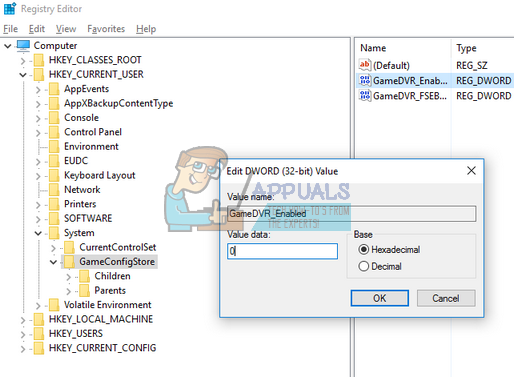
- Press OK to save changes and exit. Now restart your computer and check if the problem at hand got solved.
Solution 3: Disabling using Settings
If you are still unable to disable the features using the above two solutions, we can try disabling them using your default settings application. Do note that this feature was included in the settings after the Creators update. If you don’t have that version installed, you might not be able to execute the solution mentioned below.
- Press Windows + S, type “settings” in the dialogue box, and press Enter.
- Once in settings, click on Gaming and select “Game bar” using the navigation present at the right side of the screen.
- Uncheck the option “Record game clips, screenshots, and broadcast using Game bar”.
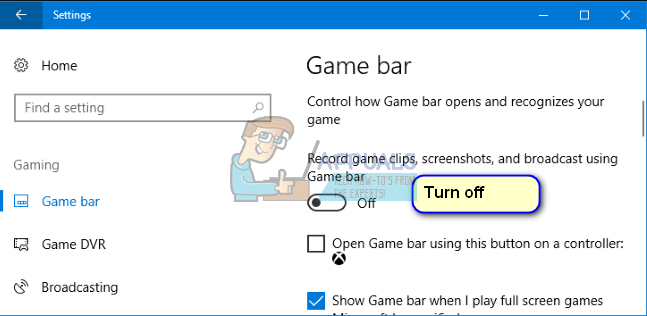
- Restart your computer and check if the problem at hand got solved.
Solution 4: Disabling Game Bar using the Pop-up Settings
If you have in any case uninstalled the Xbox application from your computer, you might not be able to change the settings and disable the Game Bar as explained earlier in the article. In this case, the fix is fairly simple; we will disable the Game Bar to launch whenever you launch a game using its own settings.
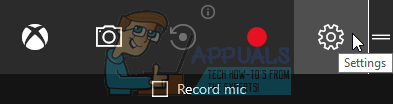
- Let the Game Bar spawn on your computer whenever you launch a game or if it doesn’t, press Windows + G to launch it.
- Once the Game Bar is launched, click on the “Settings” icon present at the right-side of the bar.
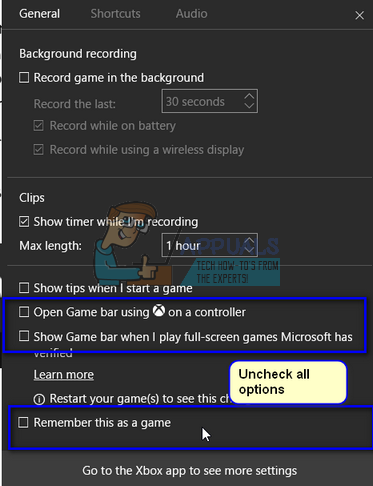
- Uncheck all the following options starting from the first one:
“Open Game bar when using (Xbox) on a controller”
“Show Game bar when I play full-screen games Microsoft has verified”
“Remember this as a game”
- After making the necessary changes, restart your computer and check if the problem at hand got solved.
Note: There are also other workarounds such as uninstalling the Xbox application, taking ownership of gamebarpresencewriter.exe, or taking ownership of the registry files. In some cases, they work but in other, they make the problem worse. That is why we restrained in listing these methods for the readers. If you still want to perform these workarounds, google is your best friend.
Solution 5: Through a Batch Script
If none of the above methods worked, we will try running a Batch script which will first elevate itself to Trusted Installed permissions and then execute the following command:
REG ADD "HKEY_LOCAL_MACHINE\SOFTWARE\Microsoft\WindowsRuntime\ActivatableClassId\Windows.Gaming.GameBar.PresenceServer.Internal.PresenceWriter" /v "ActivationType" /t REG_DWORD /d 0 /f
Make sure that you are logged in as an administrator before proceeding. You can always remove the key manually later on if you want to by navigating to the location through the Registry editor manually to the address that is mentioned above.
- Download the fix from here. Make sure that you extract the whole folder.
- Next, right-click on the batch script and select Run as administrator.
- After running, restart your computer and see if the issue is resolved.