Share Folders Between Windows 7/8 and Windows 10 (Step by Step)
In Windows 10, the File and Folder Settings option has changed. The reason behind this change is the removal of the HomeGroup Icon, which was available in Windows 7 and Windows 8. As a result, it has become difficult for users to navigate the correct sharing options for files and folders in Windows 10. Numerous options are available for sharing files and folders over a network in Windows 10.
However, sharing files and folders on Windows 8 is similar to sharing files and folders on or between Windows 7 computers, with one exception: the password-protected option located within the ‘File and Printer Sharing.’
To demonstrate file sharing between Windows 7 and Windows 8, I will be using one Windows 7 and one Windows 8, both running on my VMWare Workstation.
1. Setting Up Sharing in Windows 7
1. On your Windows 7 computer or laptop, go to Control Panel -> Network & Internet -> Network & Sharing Center -> Advanced Sharing Settings.
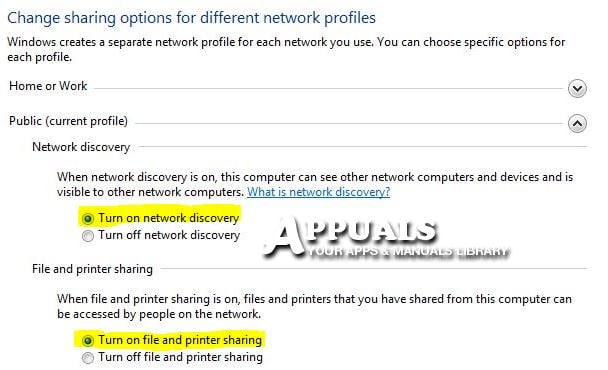
Enable ‘Turn on Network Discovery‘ and ‘Turn on File and Printer Sharing.’
If you want to password-protect your folders, then turn on Password-Protected Sharing, which is the last option within the Advanced Sharing Settings. Only users with access to this computer will be able to access the shared folders. When accessing files on other computers, you will need to use the username for the Windows 7 computer to access shared folders.
Now that we have enabled the required options, click on the ‘Save Changes’ button at the bottom.
2. Select a folder or folders to be shared from the Windows 7 computer.
Right-click on the folder you want to share, and select ‘Share With,‘ then choose ‘Specific People.’ You will find the Sharing option on all the folders you right-click.
You will now be given a field to type in the username or select one from the list available in the pane below. Either select a username here or create a username and assign a password to it. When you try to access the folder from another computer or computers, you will be prompted to provide this username and its password in order to access the folder.
Under the Permission Level, choose what permissions the user should have.
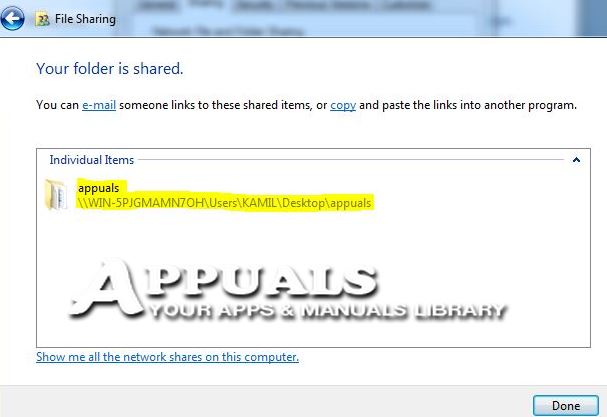
Copy the path shown here (e.g., \\computername\users\username\desktop\folder) and keep a note of it, as you will need this to access the folder on the other computer. Now that the folder is shared, click ‘Done’.
That’s it. You have now shared the folder on this computer.
2. Setting Up Sharing in Windows 8.
Sharing in Windows 8 is similar to sharing in Windows 7.
Go to the Control Panel > Network & Internet -> Network & Sharing Center -> Advanced Sharing Settings, and turn the sharing on as you did for Windows 7 above. This is required if you wish to share folders from Windows 8, but not if you wish to access shared folders from Windows 7.
You may also use a shortcut to skip steps and automatically locate other computers on the network, such as the Windows 7 device mentioned earlier, from which we shared the folder.
To do this, exit out of the Tiles mode and enter the Desktop mode on Windows 8. Hold the Windows key and press E.
Then, select Network from the left menu. You will see a notification at the top to turn on “Network Discovery and File Sharing;” click on it and turn it on.
Within 2-3 seconds, other computers connected to the network will appear. (See the screen below).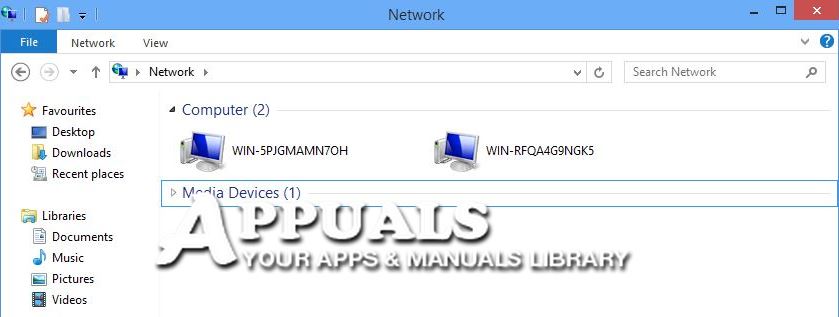
Now, simply double-click the computer name where the files are shared to view the shared files. If asked for the username and password for the PC where the files are shared, provide them. (This is the username for the PC where the folder is shared.) If there is no password set up for the user on Windows 7, then you will be required to set one up.
However, this will display everything that is shared. If you only want to access the shared folder, then copy the path from the folder which is shared by right-clicking on that folder and selecting ‘Properties’ -> ‘Sharing‘, and then copy the path from under ‘Network Path’. In this case, it is ‘\\WIN-5PJGMAMN7OH\Users\HIDDEN\Desktop\appuals’.
In the Windows 7 sharing tutorial, I also explained how you could copy the path immediately after the folder is shared.
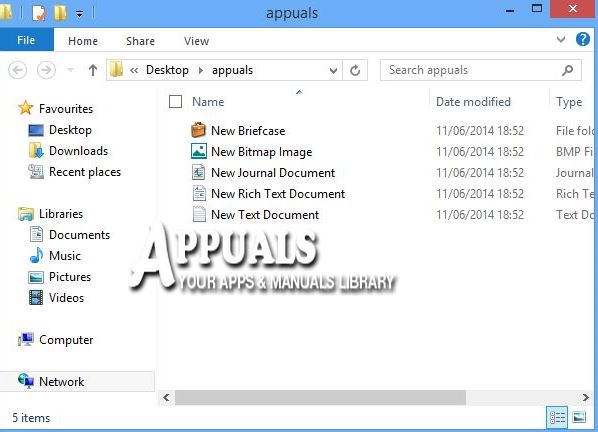
To access shared files on Windows 7, simply repeat the same steps as shown above for accessing folders on Windows 8.
3. Setting up Sharing in Windows 10
3.1 Sharing the Files using File Explorer
Windows 10 provides a built-in feature to share files. This is visible from the context menu; any file or folder you click will have the option to Share Files. You can also define read and write permissions when sharing files or folders. It is important that any devices within which files are being shared are on the same network, either Wired LAN or Wireless LAN.
- Open the File Explorer in Windows 10, and go to the folder that you want to share.
- Right-click on the folder and then select Properties.
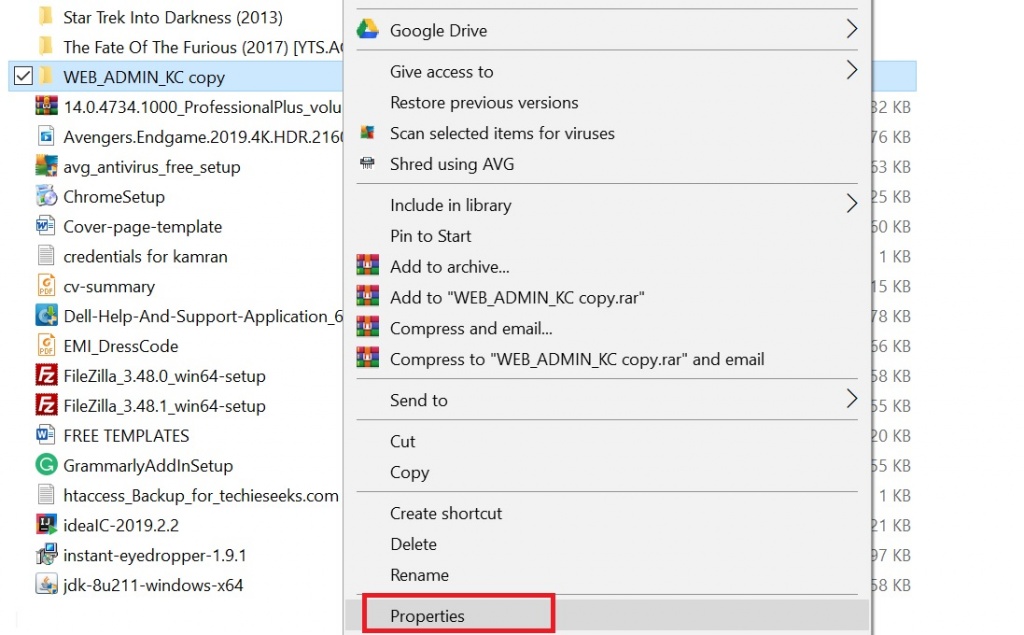
Properties option in Windows 10 - In the next step, click the “Sharing” tab.

Sharing Tab in Windows 10 - Click the share button

Share option in Windows 10 - You will receive a dropdown menu for selecting the user or group with whom to share the file or folder.
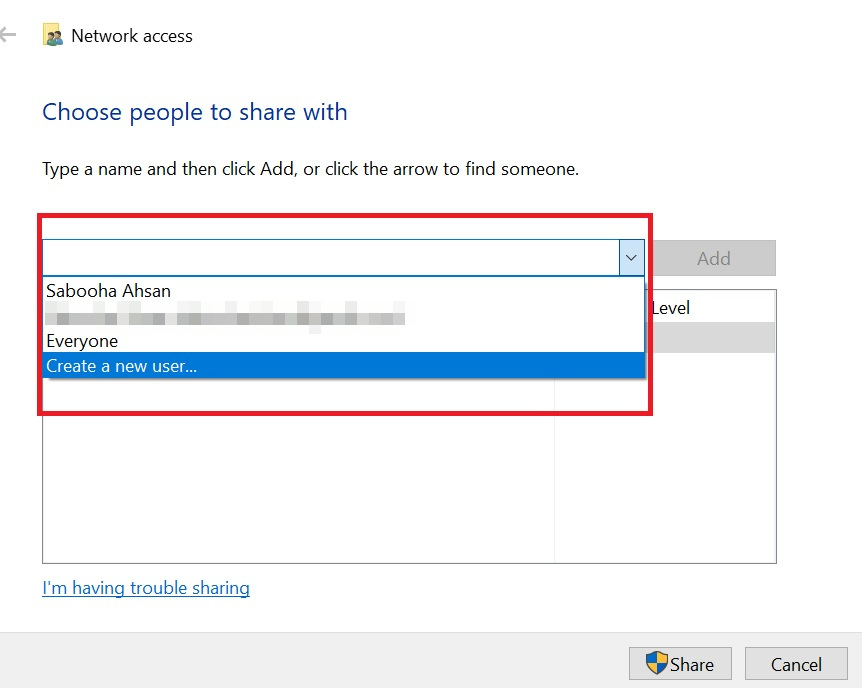
Selecting a user or group for sharing files - You can also add other users for sharing the folder by clicking the ‘Add’ button.
- By using the permission level section, you can select various types of sharing permissions. These sharing permissions include read, read and write, and remove options. Choose the appropriate option.
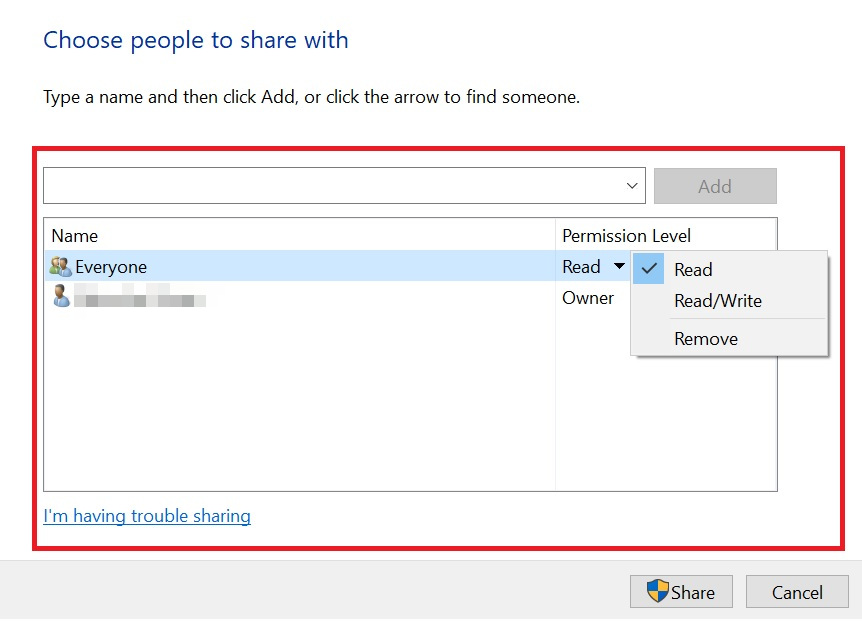
Customizing Sharing Permissions in Windows 10 - You have to remember the network path for the folder or file that you are sharing with the users.
- This network path is essential for other users to access the content using the network.
After following the points mentioned above, simply click the “Close” button, and your file will be shared with your target audience using File Explorer.
3.2 Using Advanced Settings for Sharing Files
Advanced settings in Windows 10 allow users to set custom permissions for any file or folder. To share files using the “Advanced settings,” follow these steps:
- Open File Explorer by holding the Windows Key and pressing E.
- Go to the file or folder that you want to share with other people
- Click on the item you want to share and select the Properties.
- Select the Sharing tab.

Sharing tab in Windows 10. - Select the option for Advanced Sharing

Advanced sharing option in Windows 10. - Click the “Share This Folder” option.

Folder Sharing Options in Windows 10. - In Windows 10, by default, the users with whom you share your content are given read-only access. This means that when you share your files or photos with other users, by default, they will only be able to read the document and will not be able to modify the content. If you want to grant certain permissions to other users, such as deleting or creating new documents, you must click the Permissions button.
- Utilizing the Permissions Options, you will observe various choices provided for customizing permissions with different users concerning shared folders and files. You will tailor permissions for distinct users or groups with whom you are sharing the file or folder. Based on your preference, you can grant specific permissions to other users, which include opening, deleting, creating new files, and editing files.
- Select the “Apply” button after finalizing the permissions
- Select the “OK” button to ensure that all the changes you made to the permission section are saved.
3.3 Sharing Files and Folders in Windows 10 with a Specific User
Sometimes, there is a need to share different files and folders not with a group, but with a particular user. Follow these steps if you want to share your files and folders with a specific user in Windows 10:
- All the initial steps are the same. These steps include opening the file or folder in File Explorer that you want to share, then going to the Properties section. After selecting the Sharing tab, follow the next steps to share the file or folder with a particular user.
- Select the ‘Add’ button to add a new user with whom you want to share the file or folder.

Creating a new User for Sharing Files or Folders. - Enter the name of the user with which you will share the file or folder.
- Click the “Check names” option.
- Select the permissions that you want to give to this user accordingly.

- Click the OK button at the end to save your choices.
3.4 Sharing Files over the Network Without Using a Password
In Windows 10, file-sharing is protected by the use of a username and password by default. Sometimes, if you wish to share a file on your local network without requiring people to use passwords for access, you can disable this option. To disable this option, follow these steps:
- Go to the Control Panel.
- Navigate to the Network and Sharing Center option.
- Select the Network and Sharing Center option.

Network and Sharing center in Windows 10. - Select the option “Change advanced sharing settings.

Advanced sharing options in Windows 10. - Navigate to the option for password protection sharing. Select the option that says, ‘Turn off password sharing protection.’

Customizing Password Protection Settings in Windows 10. - Select the “Save” button to save all the changes.
- After following the aforementioned steps, all the users with whom you share your files and folders will not require a password to access the necessary materials.
In this manner, by utilizing the various methods mentioned in this tutorial, you can effortlessly share your files and folders through a network in Windows 10.