How to Manage Security Groups of Amazon EC2 Instances?
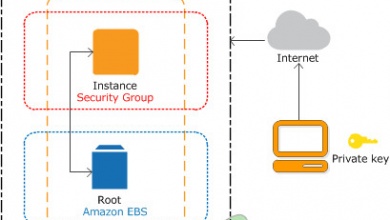
Security groups play a vital role in the security of your Amazon EC2 instances. Security groups are responsible for controlling the incoming and outgoing connections to your instance. They basically act as a virtual firewall for all of your EC2 instances. You are asked to specify a security group when you are launching an EC2 instance. In case you do not, the default security group is used. Once you have launched an instance, you can easily change the security group associated with it.
The security groups are actually associated with the network interfaces. So, when you change the security group of an instance, it changes the security groups that are connected to the primary network interface. Each security group contains a set of rules that are applied to all of the associated EC2 instances. These rules manage the inbound and outbound traffic. The default security group allows all outbound traffic. When creating a rule, you will have to specify details such as a name, the protocol to allow, the port range to be allowed and much more.
Thus, managing security groups becomes an essential task in order to keep unauthorized connections off of your instances. In this guide, we will be showing you how you can create a security group, view your existing security groups, add rules to a specific security group as well as deleting rules from a security group. To do this, you will need root access to the Amazon EC2 Console. With that being said, let’s get into it.
Creating a Security Group
As it turns out, Amazon uses its own default security group if you do not create one while launching the instance. The default security group is not entirely bad, however, you might want to create a new one for your instances for better control over your machines. Creating a security group is really and you can do it by following the steps given down below:
- First of all, open up the Amazon EC2 Console.
- Then, click on Security Groups on the left-hand side under Network and Security in the navigation pane.
- There, you will have to click Create security group on the top right-hand side.

Security Groups Tab - Under Basic Details, give the security group a name and a description.
- After that, choose a VPC for the security group. The security group can be then used only in the selected VPC.
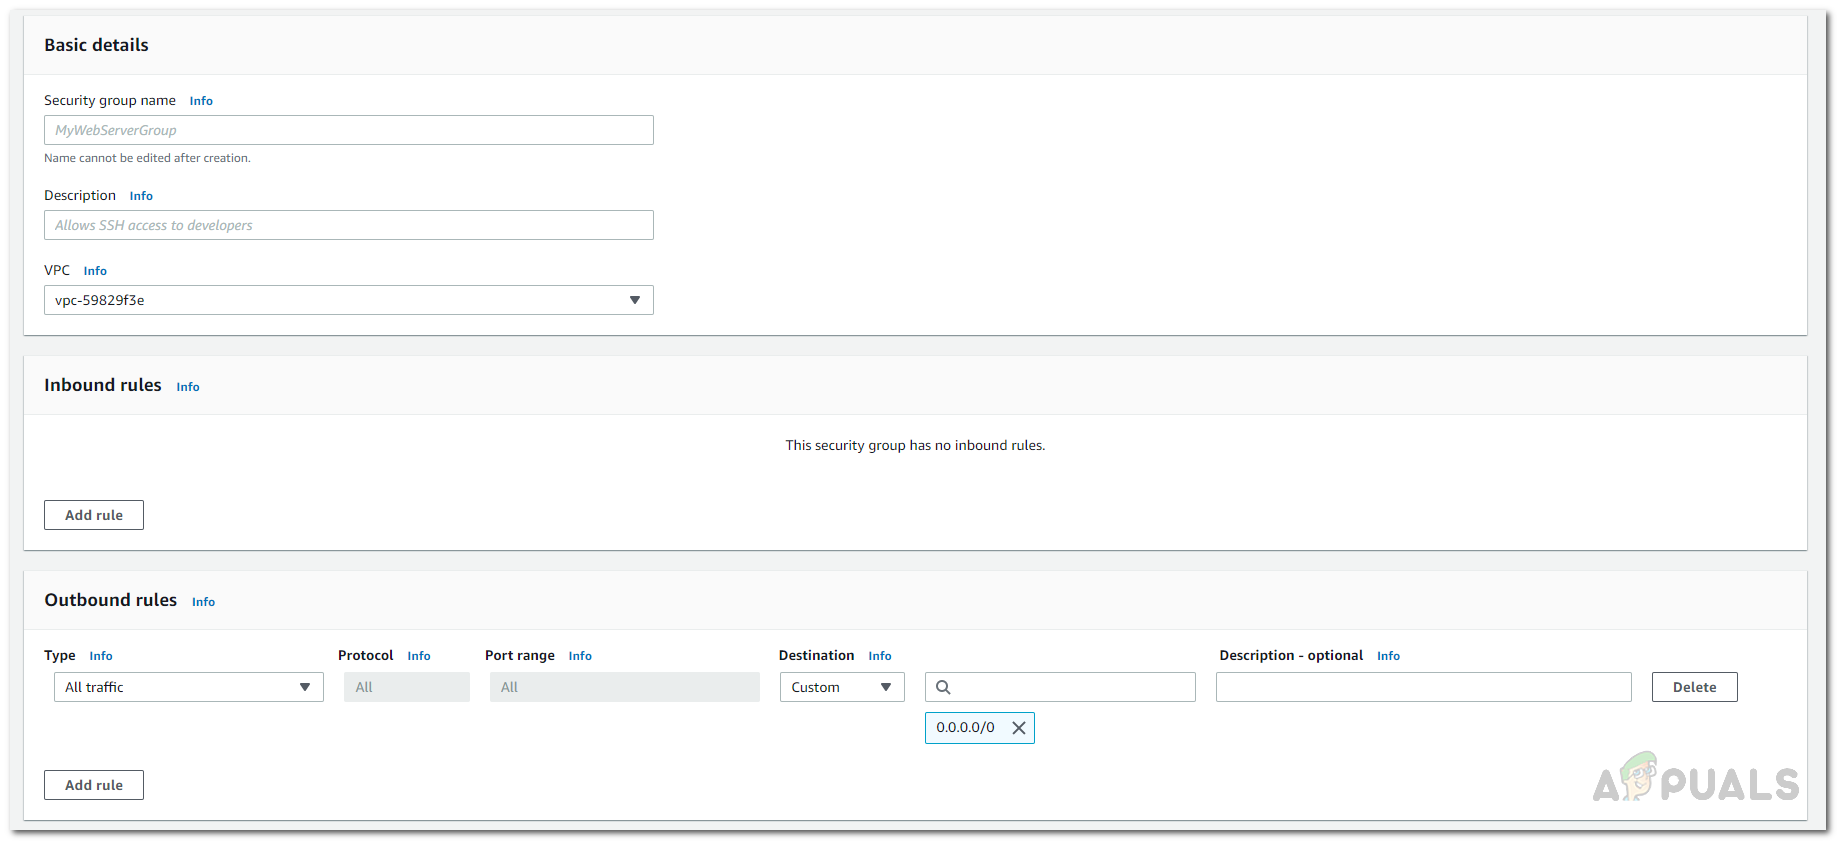
Creating a Security Group - Once done, you will have to add rules to the security group. To add a rule, click on the Add Rule button.
- Provide the information required and customize it per your requirements.
- Once you are done with all that, click on the Create security group button at the bottom to create the security group.
Viewing your Security Groups
If you have multiple security groups, you can view and keep track of them using the Security Groups tab. There, you will be shown the name of the security group, the ID of the security group along with more details. To do this, simply go to the Amazon EC2 console and then on the left-hand side in the navigation pane, scroll down to Network and Security. There, click on Security Groups to view your existing security groups.
Editing Rules of a Security Group
The EC2 console offers you complete control over your security groups. If you wish to add new rules or delete any of the existing rules, you can do so very easily. You are able to edit both the inbound rules of the security as well as the outbound rules. When you add new rules to a security group, they are automatically applied to the instances that are associated with that security group so you don’t have to worry about anything. However, there is a short delay before the rules are applied so don’t expect it to be instant. To edit the rules of a security group, follow the instructions provided below:
- On the Amazon EC2 console, make your way to the Security Groups tab by scrolling the navigation pane on the left-hand side.
- There, you will be shown all your existing security groups. To edit a specific one, choose the security group and then click on the Actions drop-down menu in the top-right corner.
- From the drop-down menu, choose the rules that you wish to edit i.e. Inbound Rules or Outbound rules.

Editing a Security Group - There, click on the Add rule button if you wish to add a new rule.
- In case you want to delete a rule, click on the Delete button in front of the rule on the right-hand side.
- Once you are done, click on the Save rules button to save your changes.
Deleting a Security Group
As it turns out, you can also choose to completely remove a security group instead of removing specific rules from it. However, there are some things that you have to keep in mind before you proceed with deleting a security group. First of all, you can’t delete a security group that is associated with an instance. If you wish to do so, you will have to provide a different security group for the associated instances so that the one you are about to delete isn’t belonging to any EC2 instances.
Furthermore, you cannot delete the default security group that exists. Finally, if a security group is referenced by a rule in a different security group in the same VPC, you cannot delete unless you delete the referencing rule first. These are some of the things that you have to keep in mind before you continue with the instructions provided below since the security group won’t be removed if any of the above mentioned cases is applicable to you. To delete the security group, follow the instructions provided:
- Login to the Amazon EC2 Console as root user.
- Then, go to the Security Groups tab listed under Network and Security in the navigation pane on the left-hand side.
- Once you are shown the list of security groups, click on the security group that you wish to delete. Make sure it is selected.
- After that, click on the Actions drop-down menu and scroll down to the bottom.
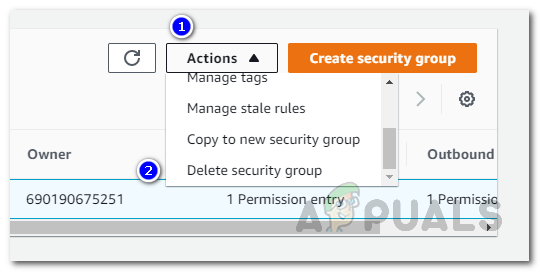
Deleting a Security Group - Click on the Delete security group option to delete the selected security group.