How to Change the Recycle Bin Icon on Windows 7, 8, 8.1 and 10
The Windows Operating System prides itself on offering a multitude of customization and personalization options to its users. From the wallpaper they see on their Desktop to the icon of a file or folder in Windows Explorer, there is a lot a Windows user can change and customize to their liking on their computer. Among the many personalization options, Windows users have is the ability to change the icons of all the elements they see on their Desktop – this includes the Computer, Documents, and, yes, the Recycle Bin.
Changing the Recycle Bin icon is possible on all versions of the Windows Operating System that are currently supported by Microsoft, and was also a feature on much older versions of Windows. In addition, Microsoft made a point of making sure customization on the Windows Operating System is a breeze, which is why changing the icon of your Recycle Bin on your Desktop is also pretty easy regardless of what version of Windows you have on your computer. However, it should be noted that the steps you need to go through to change the icon of the Recycle Bin on your Desktop vary slightly depending on what version of Windows you have.
Without further ado, here’s what you need to do to change the Recycle Bin icon on your Desktop on a Windows computer:
On Windows 7
If you’re using Windows 7, all you need to do to change the icon of the Recycle Bin on your Desktop is:
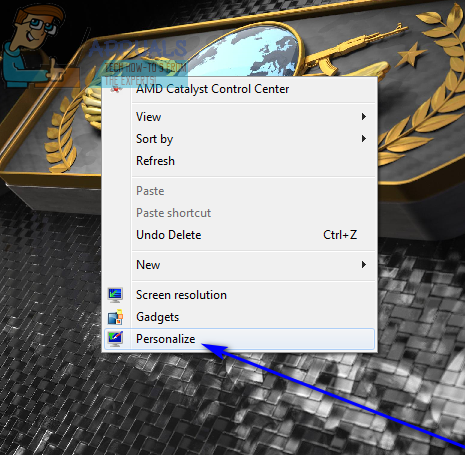
- Navigate to your Desktop.
- Right-click on a space on your Desktop, and click on Personalize.
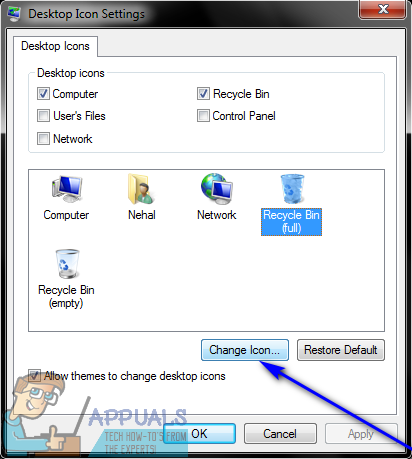
- In the left pane of the Personalization window, locate and click on Change desktop icons. This will cause the Desktop Icon Settings window to appear.

- Click on whichever Recycle Bin icon you want to change to select it (you have recycle (full) and recycle (empty) to choose from – these are the icons that your Recycle Bin is displayed as when it is full or when it is empty, respectively).
- Click on Change Icon…
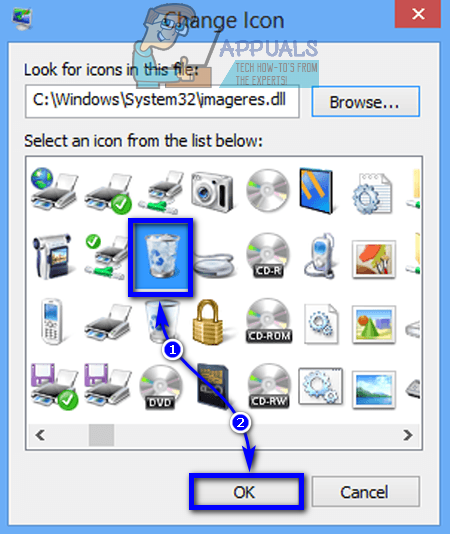
- Look through all of the available icons, locate whichever icon you want your Recycle Bin‘s icon changed to, click on it to select it, and click on OK. Alternatively, if you want to use a custom icon for your Recycle Bin, click on Browse…, navigate to the location on your computer where the custom icon is saved, click on the custom icon to select it, click on Open, click on the custom icon in the Change Icon dialog to select it and click on OK.
- Click on Apply and then on OK.
On Windows 8 and 8.1
If you are using Windows 8 or Windows 8.1, to change the Recycle Bin icon, you will need to:
- Press the Windows logo key + F to open the Search panel.
- Type “recycle bin” into the Search field, click on Settings and click on the search result titled Show or hide common icons on the Desktop. Doing so will cause the Desktop Icon Settings window to pop up.

- Click on recycle (full) or recycle (empty) depending on which state of the Recycle Bin you want to change the icon of to select it, and click on Change Icon…

- Look through all of the available icons, locate whichever icon you want your Recycle Bin‘s icon changed to, click on it to select it, and click on OK. Alternatively, if you want to use a custom icon for your Recycle Bin, click on Browse…, navigate to the location on your computer where the custom icon is saved, click on the custom icon to select it, click on Open, click on the custom icon in the Change Icon dialog to select it and click on OK.
- Click on Apply and then on OK.

On Windows 10
If your computer is running on the latest and greatest iteration of the Windows Operating System and you want to change the Recycle Bin icon, you will have to:
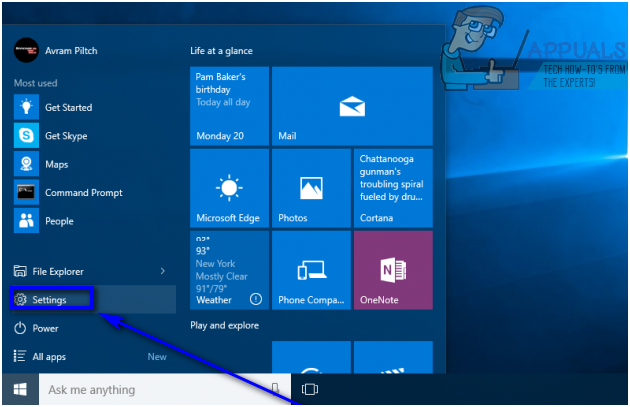
- Open the Start Menu.
- Click on Settings.
- Click on Personalization.

- In the left pane of the window, click on Themes.

- In the right pane of the window, locate and click on Desktop icon settings under the Related Settings section.

- Click on recycle (full) or recycle (empty) depending on which state of the Recycle Bin you want to change the icon of to select it.
- Click on Change Icon…
- Look through all of the available icons, locate whichever icon you want your Recycle Bin‘s icon changed to, click on it to select it, and click on OK. Alternatively, if you want to use a custom icon for your Recycle Bin, click on Browse…, navigate to the location on your computer where the custom icon is saved, click on the custom icon to select it, click on Open, click on the custom icon in the Change Icon dialog to select it and click on OK.
- Click on Apply and then on OK.
Changing the Icon through Regedit
If your Recycle bin Icon is not refreshing after you have applied the custom icons, there may be something wrong with this registry key that you will have to change manually to change the Recycle Bin’s icon. Follow these steps:-
- Press and hold the Windows key then press “R”, this should open the Run program.
- Once the run is opened, type “Regedit” then press enter.

Opening Regedit through Run - Now Navigate to the following Registry key:-
HKEY_CURRENT_USER/Software/Microsoft/Windows/CurrentVersion/Explorer/CLSID/{645FF040-5081-101B-9F08-00AA002F954E}/DefaultIcon - Now once you are in this registry key, double-click on the key named “Default”.
- Once you do that, you will have to add “,0” at the end of the Value. The Values after being modified should look like this:-
Default Value: %USERPROFILE%\Icons\youriconname.ico
Modified Value: %USERPROFILE%\Icons\youriconname.ico,0
Note: Keep in mind that this value should be the full path of your custom icon that you want to use as the default icon for Recycle Bin along with its full extension. For Example, if my icon contains in the Download folder my Value should be “C:\Users\*username*\Downloads\iconname.ico,0”
- Now we will have to modify the key named “Empty”, this represents the icon of your recycle bin when it’s empty. Simply copy and paste the same value that was in “Default”.
- Once that’s set, double-click on the key named “Full” now simply put the path to your custom icon for Recycle Bin (Full).
- Restart your computer and check to see if the issue persists.