Fix: Windows Defender error 0x8007139F on Windows 10
Error 0x8007139f usually appears with the following message: “The group or resource is not in the correct state to perform the requested operation.” This issue occurs when a Windows Update or Defender’s definition update corrupts the Windows Defender files during the update. Another major reason, which appears to be the ultimate cause of this problem with Windows Defender, is its conflict with other security software installed. This conflict causes the Defender program to stop its execution.
Solution to Fix Error 0x8007139f
A number of solutions can be used in order to get Windows Defender back to its working state. As I mentioned in the reasons behind this error message, disabling the third-party antivirus would be the best solution to resolve this issue. Follow the steps mentioned below.
1. Turn the firewall on and set Windows Defender to automatic.
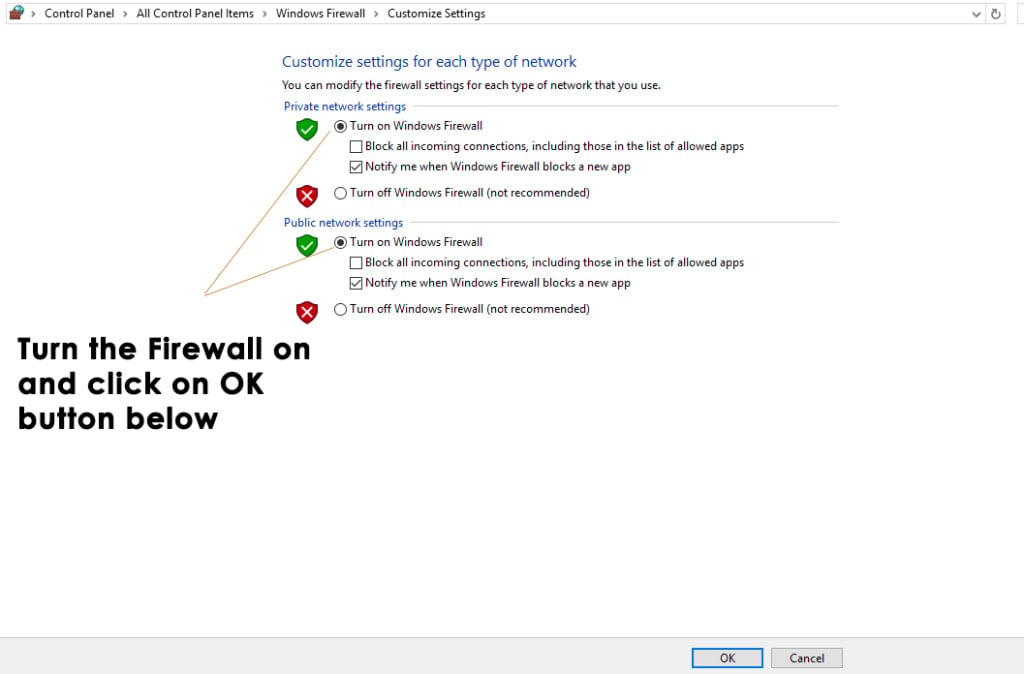
1. If you have third party antivirus as well as firewall installed, then you might need to disable You should also make sure that Windows firewall in turned-on. You can enable it inside the Control panel. For this, go to Control panel by pressing Win + X and select it from the list. Inside the control panel, click on Windows Firewall and click the Turn Windows Firewall on or off inside the left pane. In the next window, turn the firewall on and press OK thereafter.
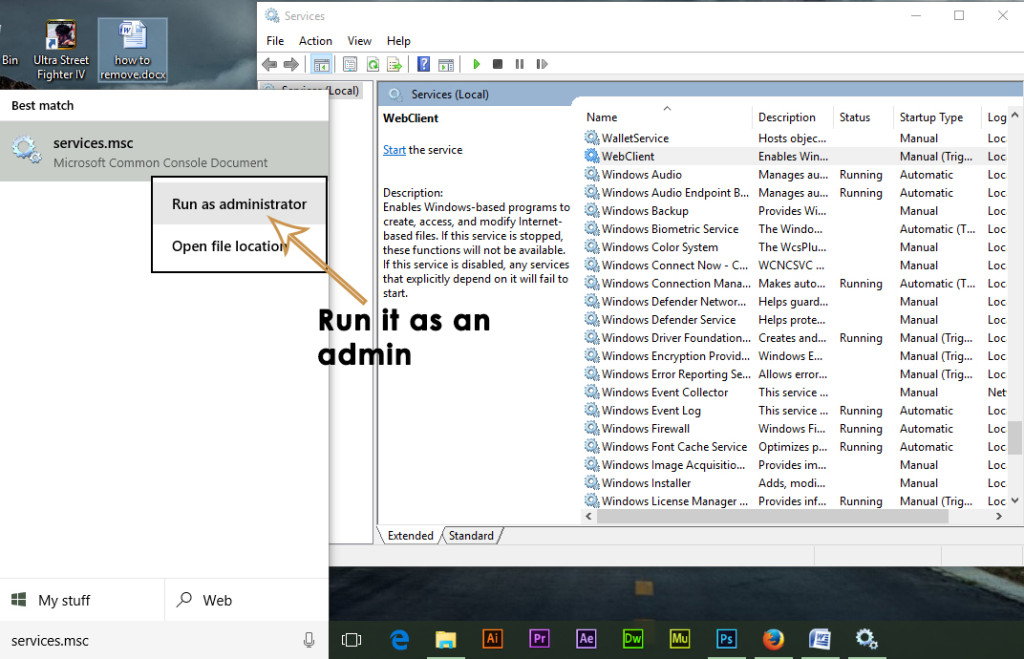
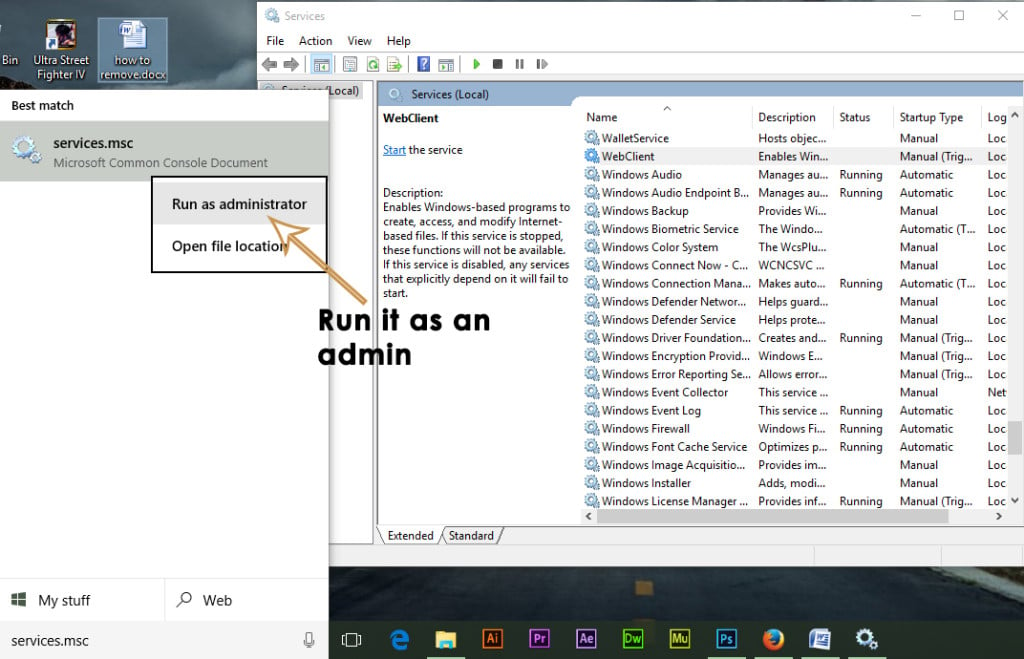
2. Now, search for the Windows Services panel by typing ‘msc‘ inside the Cortana search field. Right-click on the program listed in the search results and run it as an administrator.
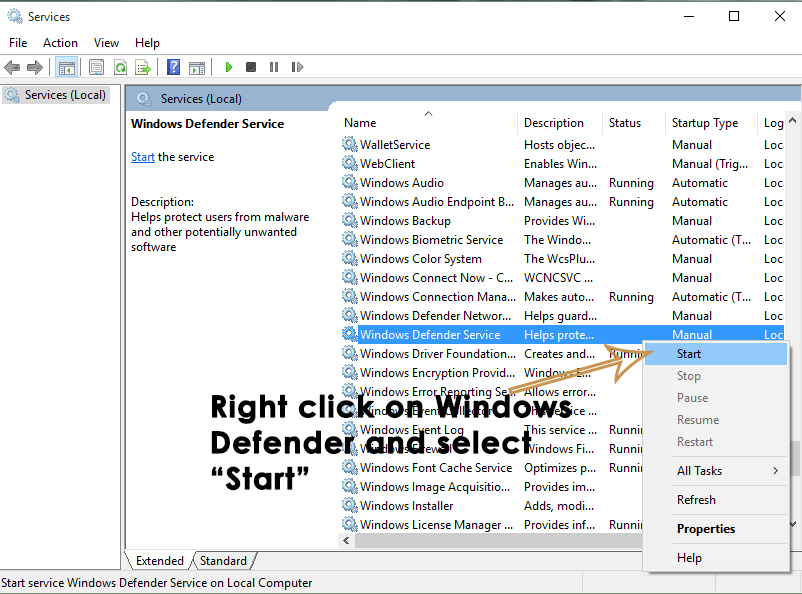
3. After opening Services, search for Windows Defender in the list and see whether the Status column is blank or not. If it is blank, right-click on Windows Defender and select Start. If it doesn’t start, change the startup to Automatic and restart the computer. Afterwards, check if the problem persists.

2. Check for the Windows Defender Service.
Sometimes, this error can arise due to the stoppage of Windows Defender Service, or this service may be missing from the Services within Windows. Therefore, in order to check for it, follow these instructions accordingly.
1. Search for the Windows Services panel by typing ‘msc‘ inside the Cortana search field. Right-click on the program listed in the search results and run it as an administrator.
2. After opening Services, search for Windows Defender in the list and check whether the Status column is blank or not. If it is blank, right-click on Windows Defender and select Start. If it doesn’t start, change the startup to Automatic and restart the computer. Check if the problem persists.
3. Fix the Windows Defender registry keys.
If the Windows Defender Service cannot be stopped or restarted, then you might need to fix the registry keys. Follow these steps in order to fix the registry keys related to Windows Defender.
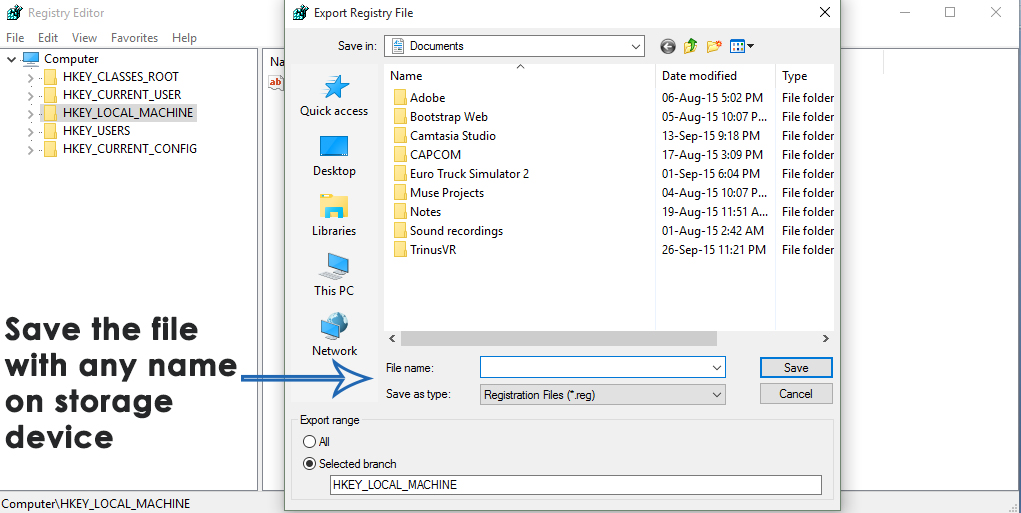
Note: Please make sure to back up the registry key before the fixation process. In order to back up a key, open the Registry Editor by typing ‘regedit‘ in the search box and open it as an administrator. Select the registry you want to back up and click on File > Export. Save this .reg file to any location on the hard drive or external storage, and you are good to go.
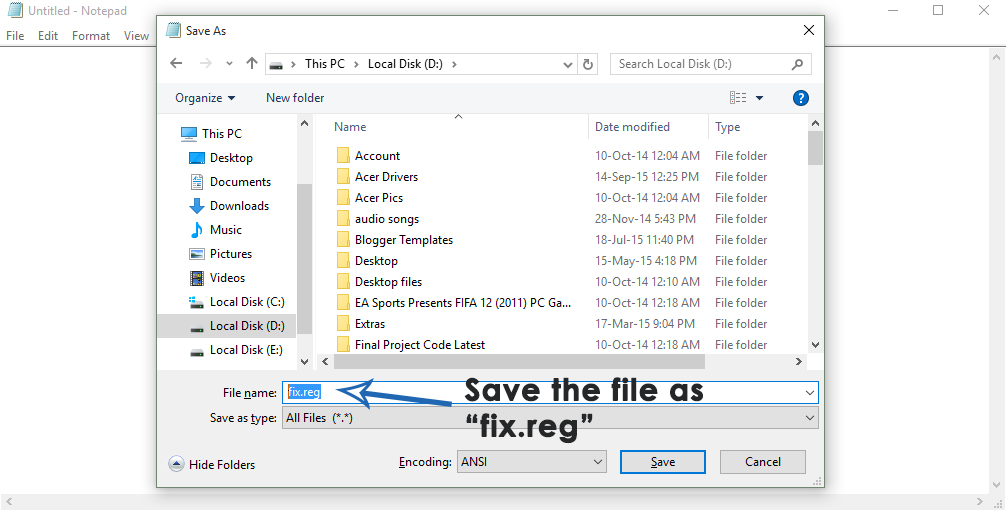
1. When the registry file is backed up, proceed to the following steps to fix this error. Open Notepad by searching for it using Cortana, and save this Notepad file as “reg” within any local drive on your hard drive. Make sure to select “All Files (*.*)” from the drop-down menu labeled “Save as type.” In my case, I am saving it in the D drive, as “D:\fix.reg“.
2. Copy the following lines of code and paste them inside the notepad file you created and saved previously.
Code:
Windows Registry Editor Version 5.00
[HKEY_LOCAL_MACHINE\SYSTEM\CurrentControlSet\Services\WinDefend]
“DisplayName”=”@%ProgramFiles%\\Windows Defender\\MsMpRes.dll,-103”
“ErrorControl”=dword:00000001
“Group”=”COM Infrastructure”
“ImagePath”=hex(2):25,00,53,00,79,00,73,00,74,00,65,00,6d,00,52,00,6f,00,6f,00,\
74,00,25,00,5c,00,53,00,79,00,73,00,74,00,65,00,6d,00,33,00,32,00,5c,00,73,\
00,76,00,63,00,68,00,6f,00,73,00,74,00,2e,00,65,00,78,00,65,00,20,00,2d,00,\
6b,00,20,00,73,00,65,00,63,00,73,00,76,00,63,00,73,00,00,00
“Start”=dword:00000002
“Type”=dword:00000020
“Description”=”@%ProgramFiles%\\Windows Defender\\MsMpRes.dll,-3068”
“DependOnService”=hex(7):52,00,70,00,63,00,53,00,73,00,00,00,00,00
“ObjectName”=”LocalSystem”
“ServiceSidType”=dword:00000001
“RequiredPrivileges”=hex(7):53,00,65,00,49,00,6d,00,70,00,65,00,72,00,73,00,6f,\
00,6e,00,61,00,74,00,65,00,50,00,72,00,69,00,76,00,69,00,6c,00,65,00,67,00,\
65,00,00,00,53,00,65,00,42,00,61,00,63,00,6b,00,75,00,70,00,50,00,72,00,69,\
00,76,00,69,00,6c,00,65,00,67,00,65,00,00,00,53,00,65,00,52,00,65,00,73,00,\
74,00,6f,00,72,00,65,00,50,00,72,00,69,00,76,00,69,00,6c,00,65,00,67,00,65,\
00,00,00,53,00,65,00,44,00,65,00,62,00,75,00,67,00,50,00,72,00,69,00,76,00,\
69,00,6c,00,65,00,67,00,65,00,00,00,53,00,65,00,43,00,68,00,61,00,6e,00,67,\
00,65,00,4e,00,6f,00,74,00,69,00,66,00,79,00,50,00,72,00,69,00,76,00,69,00,\
6c,00,65,00,67,00,65,00,00,00,53,00,65,00,53,00,65,00,63,00,75,00,72,00,69,\
00,74,00,79,00,50,00,72,00,69,00,76,00,69,00,6c,00,65,00,67,00,65,00,00,00,\
00,00
“FailureActions”=hex:80,51,01,00,00,00,00,00,00,00,00,00,03,00,00,00,14,00,00,\
00,01,00,00,00,60,ea,00,00,01,00,00,00,60,ea,00,00,00,00,00,00,00,00,00,00
[HKEY_LOCAL_MACHINE\SYSTEM\CurrentControlSet\Services\WinDefend\Parameters]
“ServiceDllUnloadOnStop”=dword:00000001
“ServiceDll”=hex(2):25,00,50,00,72,00,6f,00,67,00,72,00,61,00,6d,00,46,00,69,\
00,6c,00,65,00,73,00,25,00,5c,00,57,00,69,00,6e,00,64,00,6f,00,77,00,73,00,\
20,00,44,00,65,00,66,00,65,00,6e,00,64,00,65,00,72,00,5c,00,6d,00,70,00,73,\
00,76,00,63,00,2e,00,64,00,6c,00,6c,00,00,00
[HKEY_LOCAL_MACHINE\SYSTEM\CurrentControlSet\Services\WinDefend\Security]
“Security”=hex:01,00,14,80,04,01,00,00,10,01,00,00,14,00,00,00,30,00,00,00,02,\
00,1c,00,01,00,00,00,02,80,14,00,ff,01,0f,00,01,01,00,00,00,00,00,01,00,00,\
00,00,02,00,d4,00,07,00,00,00,00,00,28,00,ff,01,0f,00,01,06,00,00,00,00,00,\
05,50,00,00,00,b5,89,fb,38,19,84,c2,cb,5c,6c,23,6d,57,00,77,6e,c0,02,64,87,\
00,0b,28,00,00,00,00,10,01,06,00,00,00,00,00,05,50,00,00,00,b5,89,fb,38,19,\
84,c2,cb,5c,6c,23,6d,57,00,77,6e,c0,02,64,87,00,00,14,00,fd,01,02,00,01,01,\
00,00,00,00,00,05,12,00,00,00,00,00,18,00,ff,01,0f,00,01,02,00,00,00,00,00,\
05,20,00,00,00,20,02,00,00,00,00,14,00,9d,01,02,00,01,01,00,00,00,00,00,05,\
04,00,00,00,00,00,14,00,8d,01,02,00,01,01,00,00,00,00,00,05,06,00,00,00,00,\
00,28,00,15,00,00,00,01,06,00,00,00,00,00,05,50,00,00,00,49,59,9d,77,91,56,\
e5,55,dc,f4,e2,0e,a7,8b,eb,ca,7b,42,13,56,01,01,00,00,00,00,00,05,12,00,00,\
00,01,01,00,00,00,00,00,05,12,00,00,00
[HKEY_LOCAL_MACHINE\SYSTEM\CurrentControlSet\Services\WinDefend\Enum]
“0”=”Root\\LEGACY_WINDEFEND\\0000″
“Count”=dword:00000001
“NextInstance”=dword:00000001
3. After pasting the above code inside the Notepad file, save the file again with the name “reg” and close Notepad.
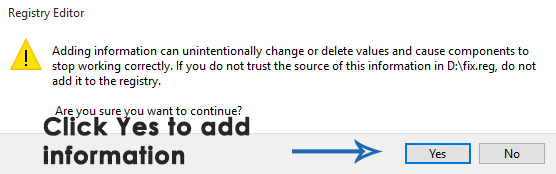
4. Now is the time to run this registry file to add information. Navigate to the directory where you saved the .reg file. In my case, it is D:\fix.reg. Double-click on this file to execute it. In the prompt box that appears afterward, click on ‘Yes‘, and it will enter the necessary information into the registry files.
5. After completing the whole process, reboot the PC and run Windows Defender again to check whether the issue has been resolved or not.
4. Run a Malwarebytes scan.
To remove infections from your system, run a comprehensive scanner software called Malwarebytes. Follow the steps to download and install Malwarebytes.
1. Download Malwarebytes software by clicking here. It is always recommended to use the Premium version of this software for extended real-time protection.
2. After running it, choose ‘Scan‘ from the top and select ‘Custom Scan.’ Click on the ‘Configure Scan‘ button, and it will move to the next screen.
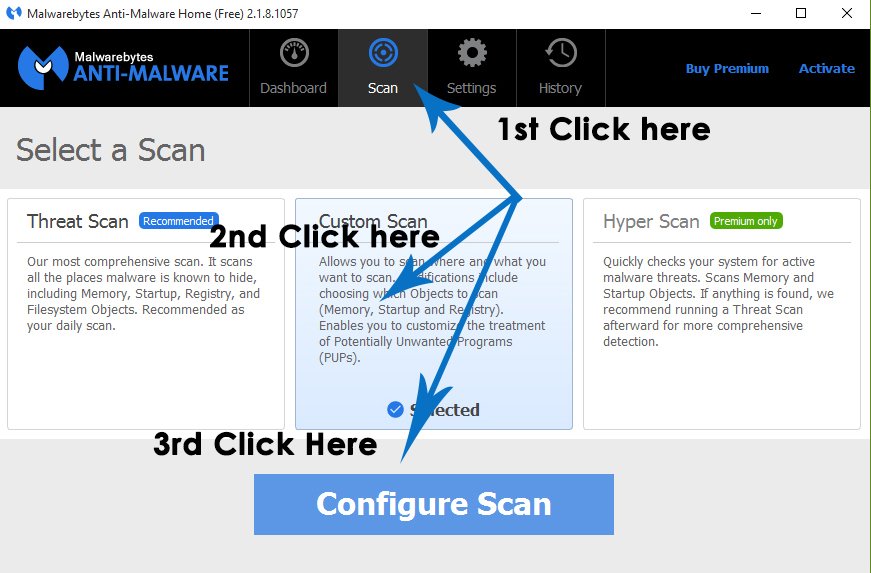
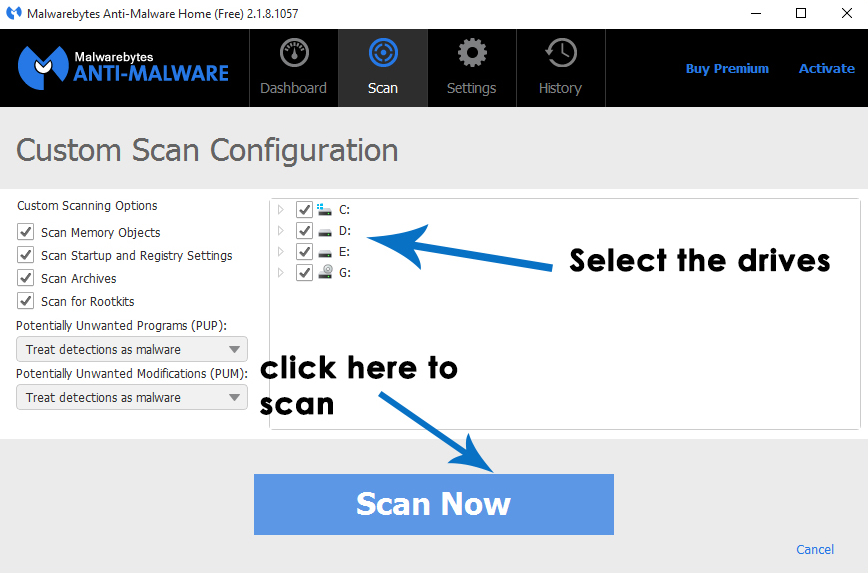
3. On the next screen, simply select all the local drives on your hard disk located in the right pane, and click on the large blue “Scan Now” button. This will initiate a scan of the entire PC, which may take up to several hours depending on the size of the hard disk.
4. After the scan has finished, choose the ‘Quarantine All‘ option and witness the magic.
5. Run a System File Checker scan.
If you can’t resolve the error using the above method, then you will need to run a System File Checker Scan in order to check for corrupted or missing system files and to fix them, restoring them to their normal state.
To run an SFC scan, click on the following link and follow the instructions. At the end of this process, you will be able to resolve this issue.