How to Fix Windows 7 Freezing Issues
Windows 7 can be considered one of the best OS from Microsoft since the launch of the legendary Windows XP. The unsuccessful reviews of Vista had Microsoft aiming to create an OS that had both, the visual appeal of the newer version and the functionality of the older, many efficient ones. There still have been some issues regarding Windows 7 and one of the most commonly mentioned is the shutdown screen getting stuck.
The most probable reason that this happens is due to some background programs that do not exit very easily when the shutdown sequence initiates, which causes your computer to wait till they respond and then continue to shut off. The solution that seems to be very popular among people is to hold down the power button and manually shut it off, but that is much like ignoring the real problem. Below are some methods that you can apply and see if the problem is fixed or not.

Solution 1: Check your malware and antivirus software
Antivirus programs such as Norton and McAfee can use up a lot of your RAM and may cause problems when it’s time to shut down.
Replace the software with other lighter and more efficient software such as Kaspersky, NOD32 or Avast.
For most of the people, the windows firewall serves well and there is no need to clog your computer memory by installing unnecessary software.
Solutions 2: Do away with virus/malware
Run a malware/virus check on your pc, and then try shutting down. There is a possibility that some malware programs might be using your RAM in the background.
Solution 3: Find specific problems
The shutdown screen does not indicate the specific problem causing the shutdown sequence to stop. If you turn the debugging on by making the following registry changes, you should be able to see what’s preventing your system from shutting down. Once you’ve identified the cause, you can then either disable the “service” or the “program” or repair/uninstall it (if it’s a program).
Open registry editor by pressing “Windows Key” and “R” and type in “regedit.”
- Follow the address:
HKEY_LOCAL_MACHINE\SOFTWARE\Microsoft\Windows\CurrentVersion\Policies\System
- Right-click the entry “VerboseStatus” and then click modify. Change its value to 1.
- If the entry is not showing up, right-click anywhere on the white space in the window,
- Select “New” and then “DWORD (32-bit) Value.“
- Create the “VerboseStatus” entry and change the value to 1.
- Your shutdown screen will now display messages indicating what program is being stopped at which moment.
- If a program takes too long, check it at the next startup.
Solution 4: Update Drivers
The shutdown sequence can sometimes be blocked due to outdated drivers.
- Press the “Windows key” then “R”, type “hdwwiz.cpl” and press enter.
- Right-click any hardware items such as “DVD-DR” and click “properties.”
- Go to the Driver tab and click update driver if needed.
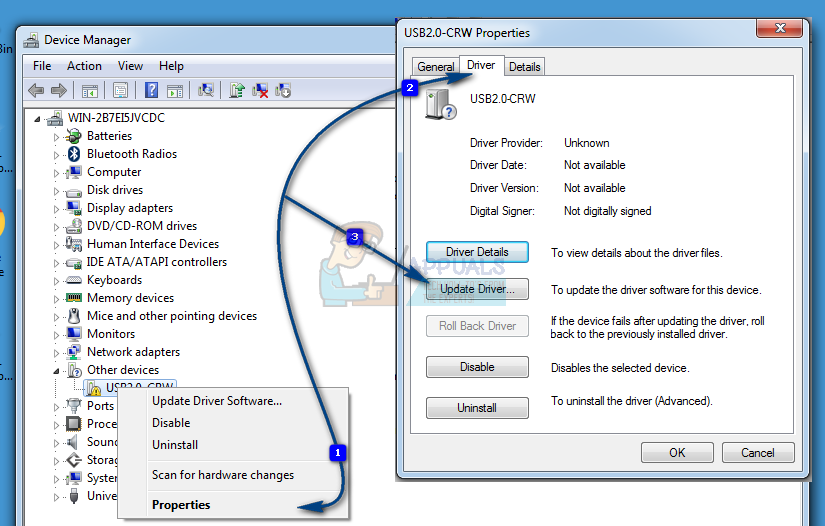
Do this for most of the hardware devices on your computer. Software drivers are usually updated by windows itself, but you can still check the software drivers to be sure they are not causing any problems.
Solution 5: Check hardware for errors
Hardware corruption can also cause your windows to slow down and ultimately leading to the shutdown freeze problem.
- Press the “Window Key” and “E” to open up your computer window.
- Right-click on the C:\ drive and choose Properties.
- Switch to the “Tools” tab and use the error check function to determine the health of your hard drive. Once you click Check Now, you will be able to schedule the scan upon restart. After the scan is scheduled, reboot your PC, let the chkdsk scan for errors. After the errors have been repaired, test to see if the issue has been resolved, if not then download Hard Disk Sentinel and use it to scan for errors.
- Fixing errors and ridding your hard drive of unnecessary files and software can also make your computer faster.
Solution 6: If you’re overclocking – stop
People who are overclocking their CPU, or GPU, or RAM, are fully aware of that, so if you aren’t, skip this method as it probably doesn’t concern you. However, for those who are, you can try returning your hardware to the stock operating frequencies, and trying to shut down. If this was the problem, Windows 7 should shut down without any delays.
Solution 7: Close Sticky Notes
Even though you might not think of it, leaving an open note on the desktop, which is made with Sticky Notes, can cause Windows to hang. Try closing all notes you have open on the desktop, and you can shut down your computer fast again.
Solution 8: Check for a corrupted page file
A corrupted page file can cause Windows to hang, and this is easily solved by disabling, and re-enabling paging.
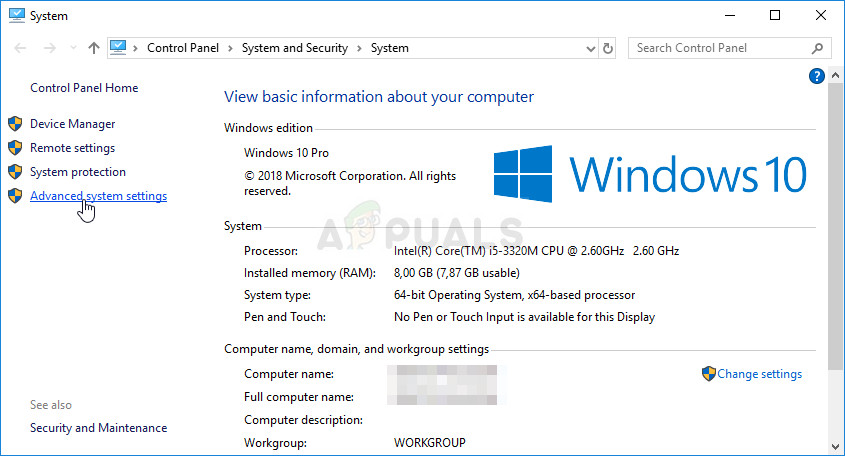
- Right-click My Computer and select Properties from the dropdown menu. Click the Advanced System Properties link in the left side navigation pane.
Advanced System Settings in This PC Properties - From the Performance header, select Settings.
- Within the Virtual Memory header, press Change.

Changing Virtual Memory settings - Select No paging file, and press Set. If the option is greyed out, uncheck Automatically manage paging file size for all drives. Then, re-enable paging by selecting System managed size. Reboot and Windows will be able to shutdown properly now.
Solution 9: Run sfc/scannow from an Elevated Command Prompt
Running a full system scan can indicate if there’s an issue with your operating system, and fix it if there is. If the previous methods didn’t work, try this one as it will also show if there is any other problem with your OS.
- Open the Start menu by pressing the Windows key on your keyboard, and type cmd. Right-click the result and select Run as administrator to open an Elevated Command Prompt.
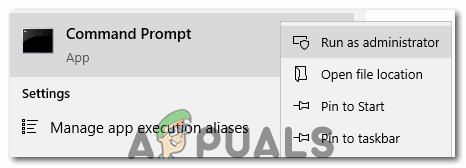
Running Command Prompt as an administrator - In the Elevated Command Prompt, type sfc/scannow and press Enter. Wait for the scan to finish, don’t interrupt it. Reboot your device when it’s done.
Solution 10: If it’s a laptop, drain it physically
This can be easily done and may very well fix your problem.
- Turn off your computer. Wait for it to shut down, don’t rush it, and give it as much time as it takes.
- Remove the battery. Batteries come with buttons that you can press to release them – take it out.
- Hold the on/off switch for about a minute. This will drain the computer. You can now return the battery and turn it on again, it will be working.
Note that this can only be done with laptops with removable batteries, and you shouldn’t physically disassemble your laptop to do this.
Solution 11: See whether you’ve made any significant changes
Doing things like installing new software or connecting a hardware device can have a big influence on your device. See whether you have installed something or have a device connected to it which may have caused this issue, and try uninstalling or removing it, to see if it helps. If it does, you can blame the device or software, and not your OS.
Even though some might not even find this an issue if they aren’t in a rush, it is something that isn’t supposed to be happening with your operating system. There are, fortunately, a lot of possible solutions and they’re all described above, so try and see which one works for you.
However, if the problem persists even after you have applied all these possible solutions, there is a possibility that your hardware might need replacement.
Solution 12: Tweaking Power Settings
In some cases, if you are using a laptop, the system might try to conserve battery power by lowering the performance and decreasing resource usage. Therefore, in this step, we will be tweaking some power settings to allow for a smoother experience while using Windows 7. For that:
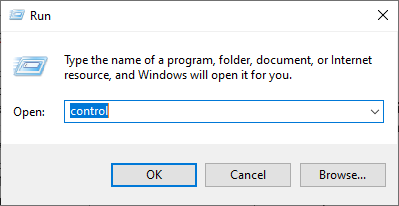
- Press “Windows” + “R” to open the “Run” prompt.
- Type in “Control Panel” and press “Enter.
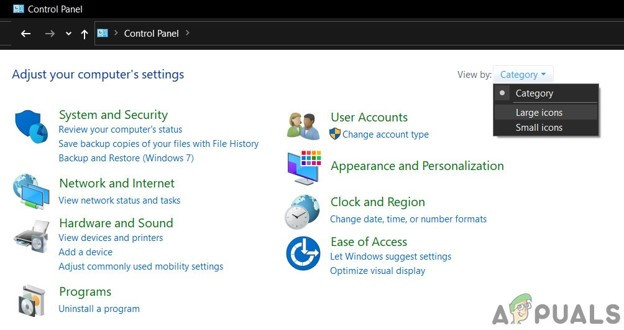
Accessing the Classic Control Panel interface - Set the “View By:” to “Large Icons”.
Change Category to Large Icons - Select the “Power Options” button from the list of available options.
- Click on the “Change Plan Settings” button and select “Change Advanced Power Settings” button.
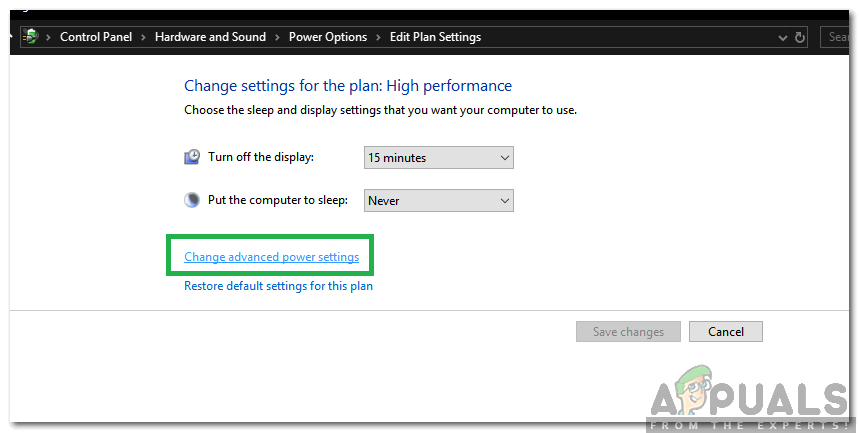
Clicking on the “Change Advanced Power Settings” option - Click on the “ATI Graphics Power Settings” dropdown and then on “ATI Powerplay Settings“.
- Change both the values to “Maximum Performance“.
- Now, click on the “PCI Express” dropdown and select “Maximum Performance” for it as well.
- Click on “Apply” and then on “OK”.
- Check to see if the issue persists.
Note: Also, when in these settings try to change the main dropdown from “Balanced” to “High Performance” and check if that does anything for you.