How to Use Phone as a Dedicated Microphone on PC?
Your phone is equipped with one of the best microphones in terms of quality and reliability. With streaming becoming more common along with fast transfer mechanisms between PCs and Smartphones, you can use your phone’s microphone as a dedicated microphone device for your PC.

There are 2 methods to achieve this, depending upon your requirements and available resources. These methods are through a cable or wireless/Bluetooth. Keep in mind the cable method always shows less latency/lag as compared to Wi-Fi/Bluetooth method.
Disclaimer
We have discussed many free and paid apps in this article but we are not affiliated with any of these apps and it is at your sole discretion to try them.
1. Use the Phone as a Microphone Through the Cable
If you have an audio extension/AUX cable (or a USB lightning cable of an iPhone) or easily arrange one, you can easily set up your phone to be used as a microphone with your system.
1.1 Use an Android Phone as a Wired Microphone
If you have an Android phone, then you can easily set it up as a wired microphone to your Windows PC, Mac, or Linux system.
On a Windows PC
- Launch the Google Play Store on your Android phone and search for Microphone.
- Now open Microphone (by the developer Wonder Grace) and tap on Install.

Install Microphone by Wonder Grace - Once installed, connect the audio cable to the phone and the microphone port on your system.
- If asked to, select Microphone in the menu shown by Windows.
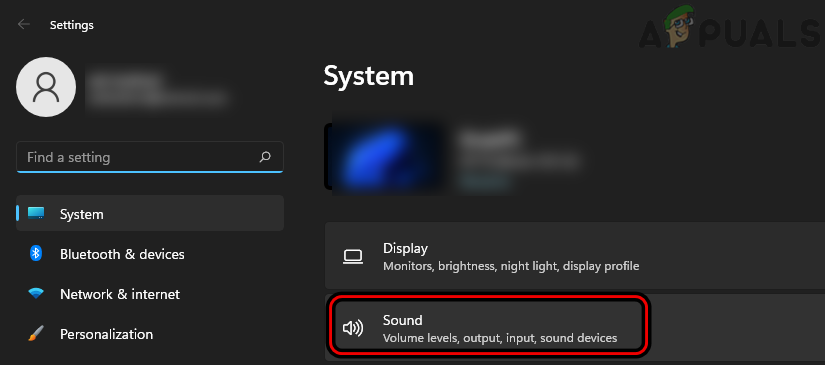
- Then right-click on Windows and select Settings.

Open Windows Settings Through the Quick Access Menu - Now, in the left pane, head to the System tab, and the right pane, open Sound.
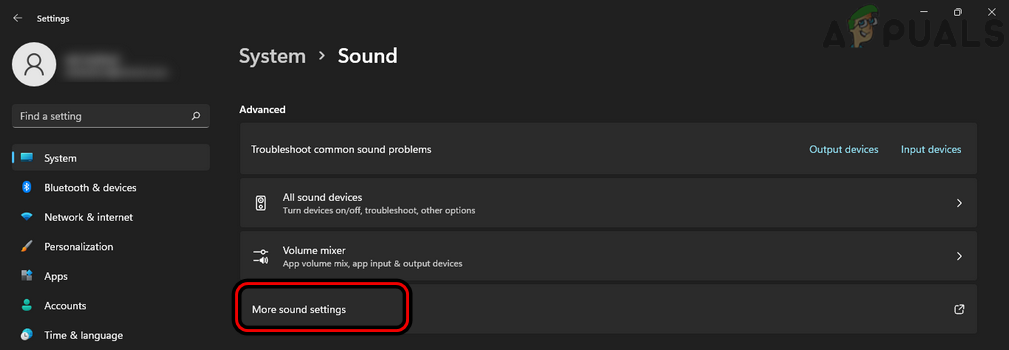
Open Sound in the System Tab of Windows Settings - Then scroll down till the end and then click on More Sound Settings.
Open More Sound Settings - Now, steer to the Recording tab and make sure the Microphone is set as the Default device.

Set Microphone as the Default Device in the Sound Control Panel of the System - Then launch the Microphone app on your phone and if asked to, give the app required permissions.
- Now tap on the Microphone icon to enable the Microphone and afterward, you can use your Android phone as a microphone for your PC. If you have any sound quality issues, you can use Gain, Phonic, and Equalizer in the Microphone App to adjust the sound quality as per your requirements.
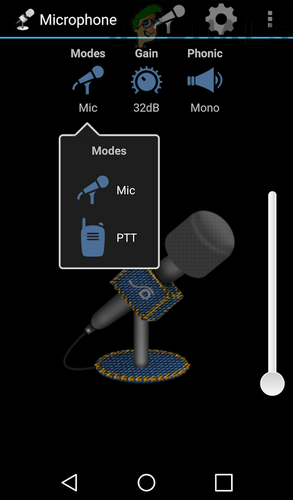
Push the Microphone Icon in the Microphone App
On a Mac
- Install the Microphone (by Wonder Grace) app on your Android phone and launch it. If it asks to, make sure to give it the required permissions.
- Then connect the Android phone through an audio cable to the Mac.
- Now tap on the Microphone icon in the Microphone app and then switch to your Mac.
- Afterward, launch the System Preferences of your Mac.
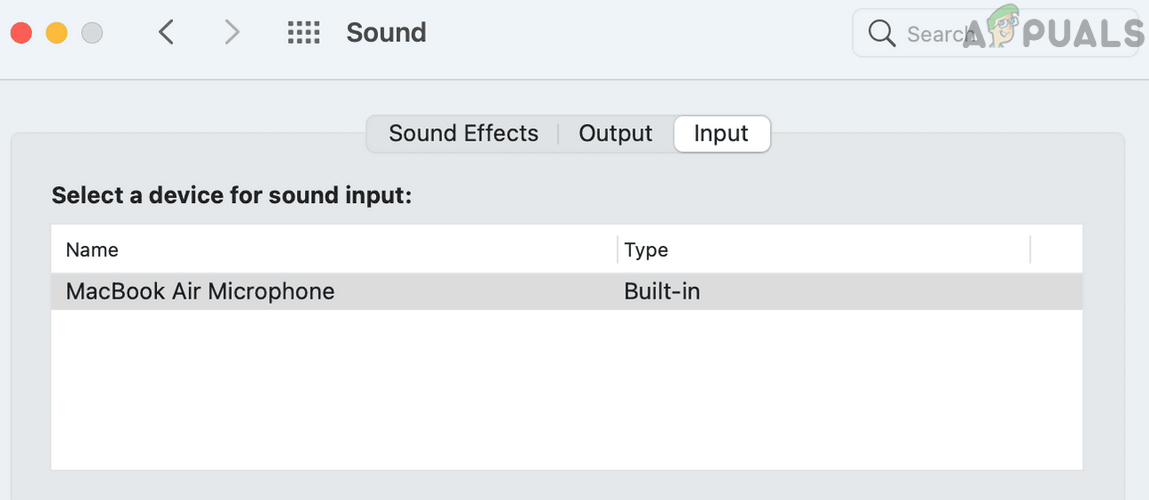
- Then, in the Hardware group, open Sound and head to the Input tab.
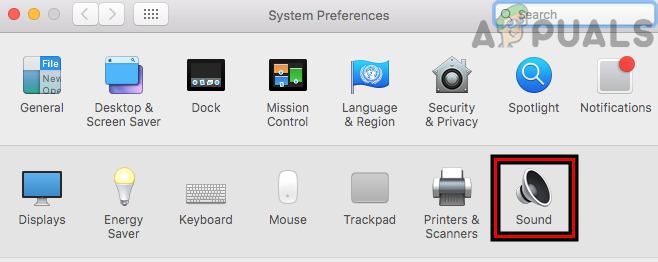
Open Sound in Mac’s System Preferences - Now make sure the correct Microphone is used and then you can use your Android phone as a microphone on a Mac.
Select the Proper Microphone in the Input Tab of Mac’s Sound Preferences
On a Linux System
- Launch the Google Play Store on your Android phone and install the Microphone (by the developer Wonder Grace) app.
- Once installed, connect the audio cable to the Android phone and the microphone port on your Linux system.
- Then, on the system’s Menu Bar, click on the Speaker icon and select Sound Settings.
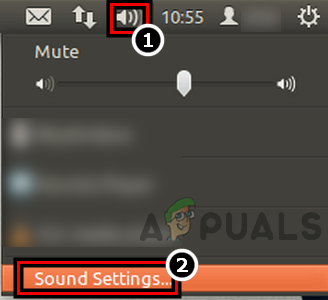
Open Sound Settings of the Linux PC - Now steer to the Input tab and in the Record Sound From section, choose the Microphone and unmute it (if muted).
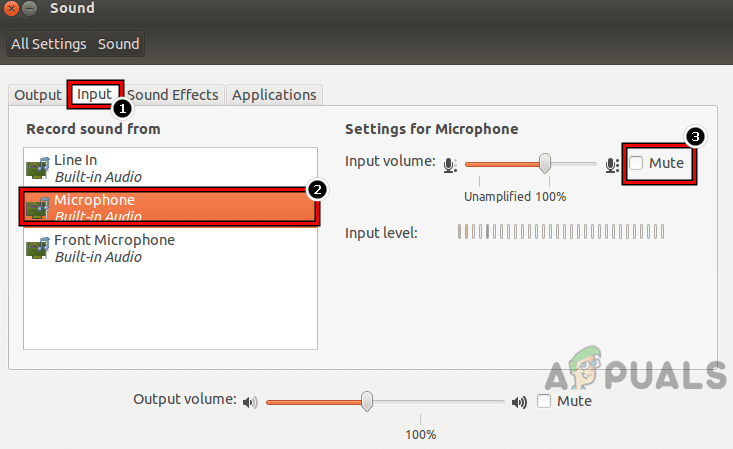
Unmute the Microphone in the Input Tab of the Linux Sound Settings - Then you can use the Android phone as a microphone on your Linux system.
1.2 Use an iPhone as a Wired Microphone
An iPhone can be easily configured as a wired microphone for a Windows PC, Mac, or Linux system.
On a Windows PC
- Launch the Apple App Store on your iPhone and install the Microphone Live app on your iPhone.
- Then launch the Microphone Live app and tap on the power icon to enable the Microphone.

Enable Microphone in the Microphone Live App - Now connect the Audio AUX cable to the Microphone jack of the PC and iPhone.
- Then launch to the Sound panel of the Windows PC (discussed earlier) and steer to its Recording tab.
- Now check if the Microphone bars are moving, if so, then you can use the iPhone as a microphone on your Windows PC. If the bars are not moving or the sound is not good, adjust the microphone’s sensitivity in the Microphone Live app.
On a Mac
- Connect your iPhone through the USB cable to the Mac and navigate to the Applications>> Utilities.
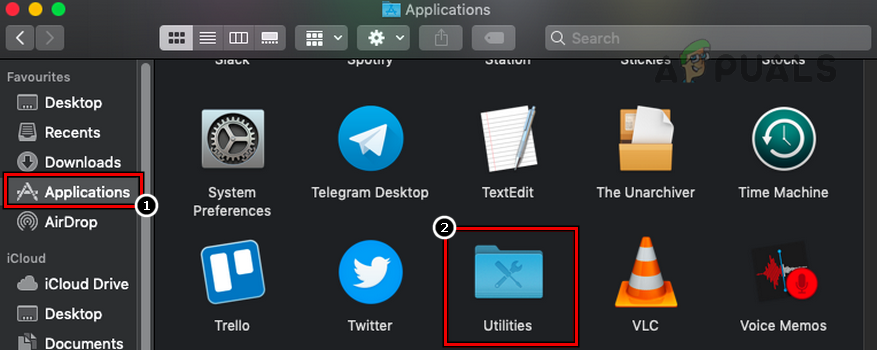
Open Utilities in the Mac’s Applications - Then open Audio MIDI Setup and in the left pane, click Enable (under iPhone).
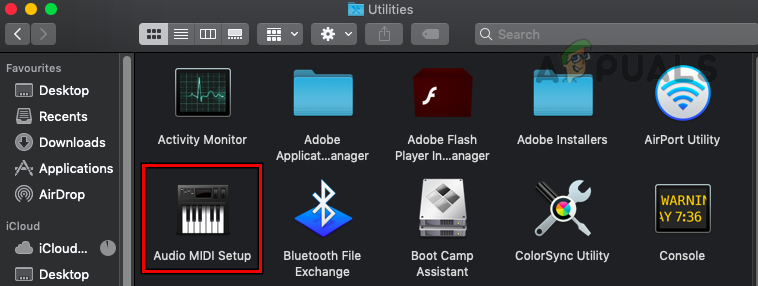
Open Audio MIDI Setup in the Mac’s Utilities - Now head to the Input tab of the Sound Preferences of the Mac.
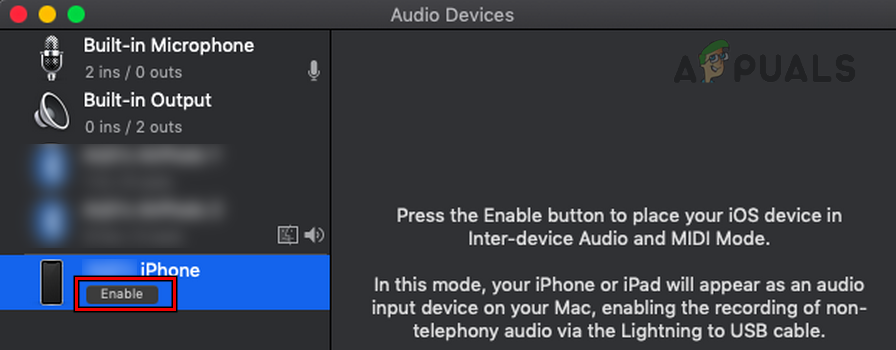
Click Enable Under iPhone in the Mac’s Audio Devices - Then set the iPhone as the input device to the Mac and afterward, install the Microphone Live app.
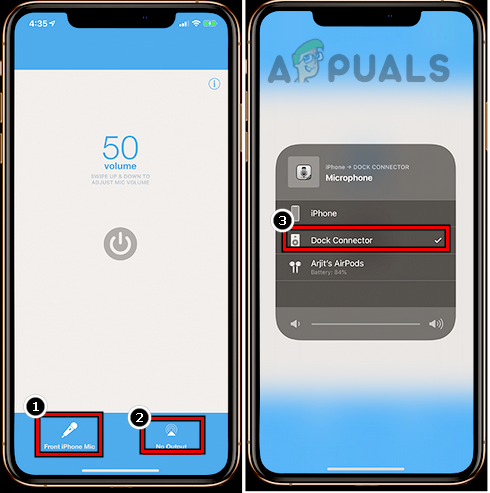
Select Dock Connector in the Microphone Pop Up of the Microphone Live App - Now launch the Microphone Live app and tap on the Power icon on the screen to enable Microphone.
- Then select Dock Connector and afterward, use iPhone as a Microphone for your MacBook.
On a Linux System
- Install the Microphone Live app on your iPhone and launch it.
- Now tap on the power icon to enable the Microphone.
- Then connect the Aux audio cable to the Linux PC and iPhone.
- Now, click on the Speaker icon on the Menu bar and select Sound Settings.
- Then switch to the Input tab and under Record Sound From, select the Microphone and make sure it is not muted.
Unmute the Microphone in the Input Tab of the Linux Sound Settings - Now you can use the iPhone as a microphone on your Linux system.
2. Use the Phone as a Wireless Microphone
In this modern era, many people do not like to use a wired microphone or they may require a wireless microphone due to their usage circumstances. No need to worry, you can easily configure your phone to be a wireless microphone to your PC.
2.1 Use an Android Phone as a Wireless Microphone
To use an Android phone as a wireless microphone, there are plenty of free and paid apps but we will discuss the process for the AudioRelay app. Keep in mind there may be some latency in the microphone’s output as compared to the cable connection method.
Install AudioRelay on Your Android Phone
First of all, you need to install AudioRelay on your Android phone. To do so:
- Download and install the Android version of the AudioRelay app on your phone.
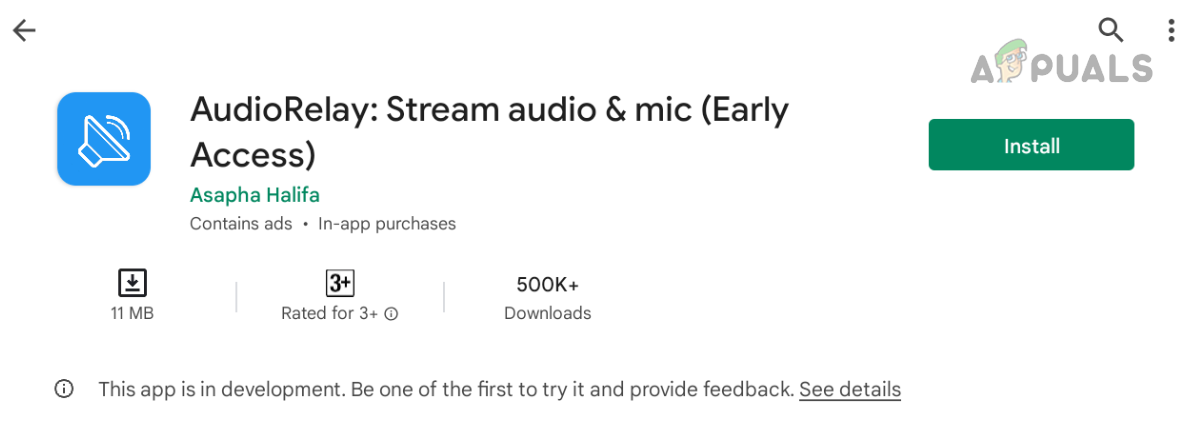
Install AudioRelay from the Google Play Store - Now launch it and give it the required permissions (if asks to).
Once the AudioRelay is installed on your Android, phone, you can use it to set up your Android phone as a wireless microphone to your PC.
On a Windows PC
Install AudioRelay on Your Windows PC
- Launch a web browser and download the Windows client from the Downloads page of the AudioRelay website.
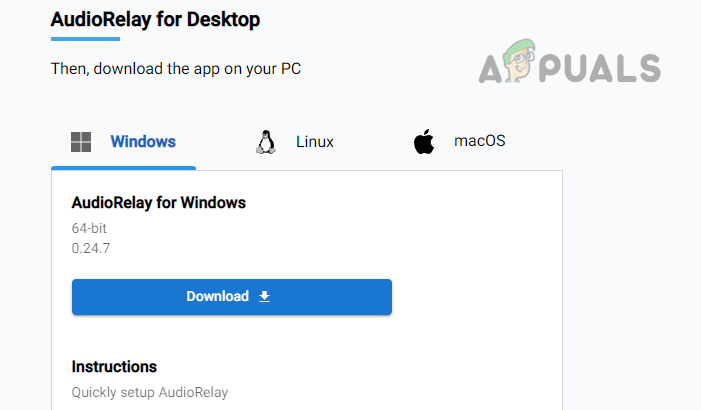
Download Windows Client of the AudioRelay - Now right-click on the downloaded file and select Run as Administrator.
- Then follow the prompts on the screen to install the AudioRelay Windows client.
Install a Virtual Audio Device
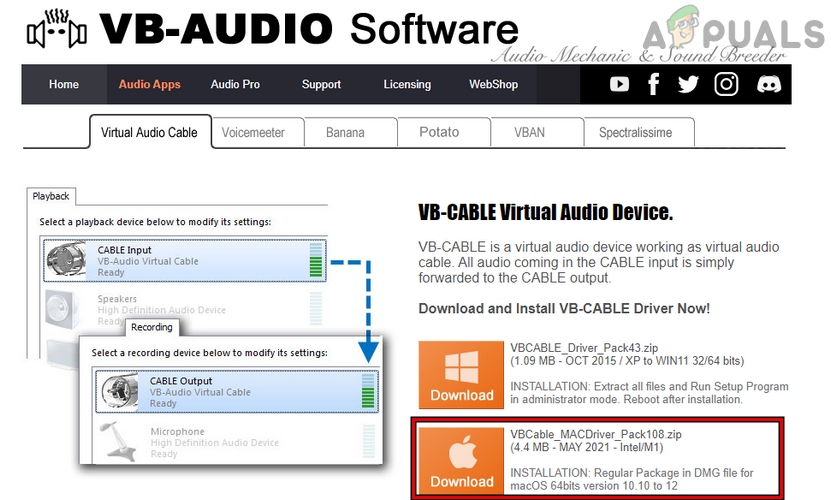
- Now download the VB-Cable Virtual Audio Device for Windows.
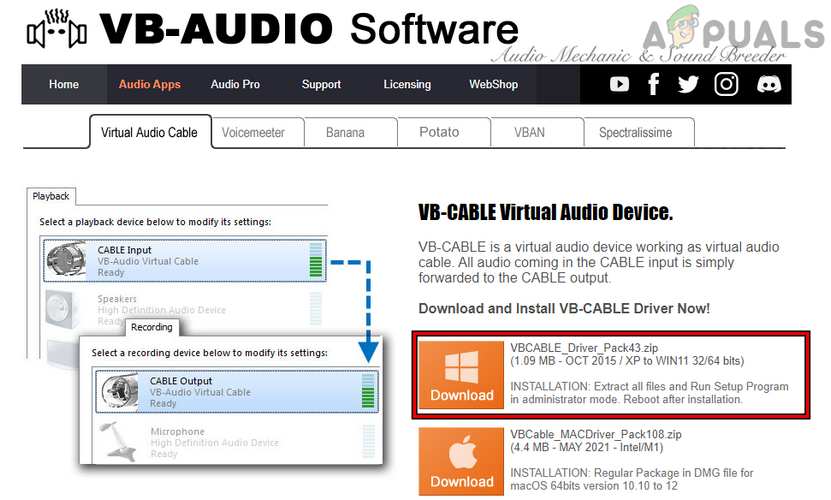
Download Windows Driver of VB-Cable Virtual Audio Device - Then, right-click on the downloaded ZIP file and select Extract All.
- Now choose the folder where you want to extract the files and then open the extracted directory.
- Then right-click on the VBCABLE_Setup_x64.exe and select Run as Administrator.
- Afterward, follow the prompts on your screen to add the virtual audio device to your system.
- Now right-click on Windows and select Settings.
- Then head to the System tab and open Sound.
- Now scroll down till the end and click on More Sound Settings.
- Then in the Playback tab, you will notice a Cable Input device and in the Recording tab, you will see a Cable Output device. Keep in mind that AudioRelay will forward audio from Cable Input to Cable Output and wherever you want to use Microphone (like Skype), simply select Cable Output as the input device in that application settings.
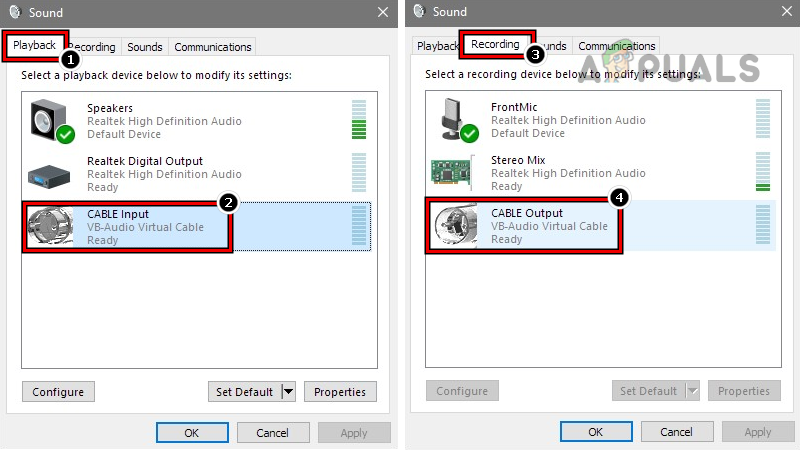
Cable Input Device in the Playback Tab and Cable Output in the Recording tab of the System’s Sound Panel
Use the Android Phone as a Microphone on the Windows PC Through the AudioRelay App
- Before proceeding, make sure the Android phone and PC are connected to the same Wi-Fi and the devices are allowed to communicate with each other on the network i.e., the Access Point Isolation is disabled on the router. In the case, your phone and the system fail to communicate, you may try your phone’s hotspot.
- Launch the AudioRelay app on your Android phone and switch to its Server tab.
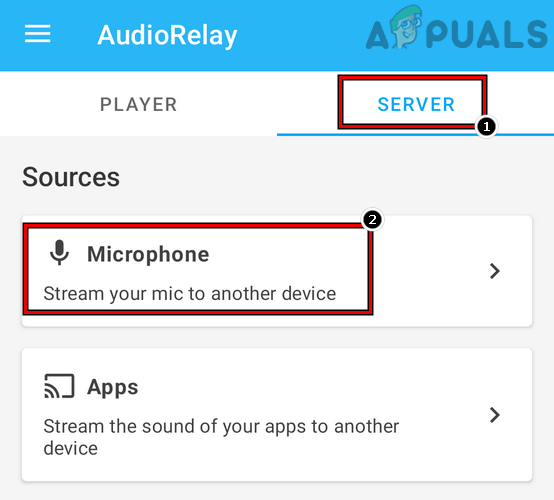
Select Microphone Under Sources in the Server Tab of AudioRelay - Now, under Resources, tap on Microphone and launch the AudioRelay on the Windows PC.
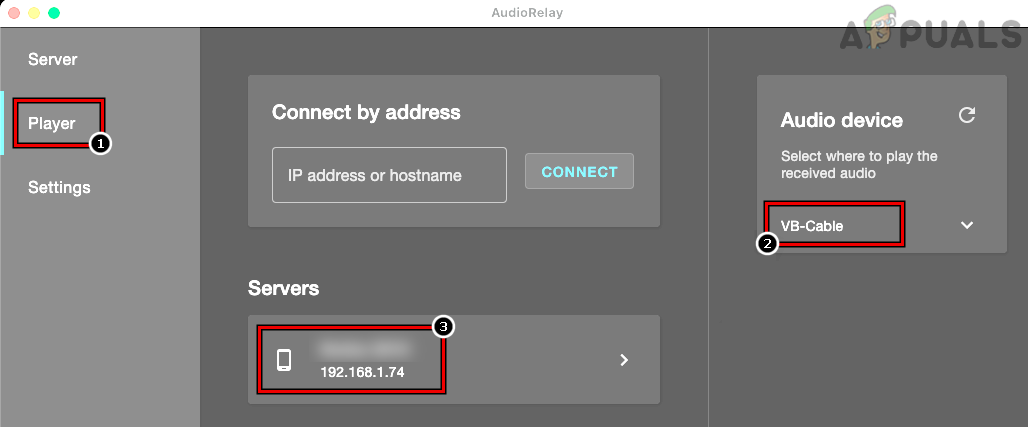
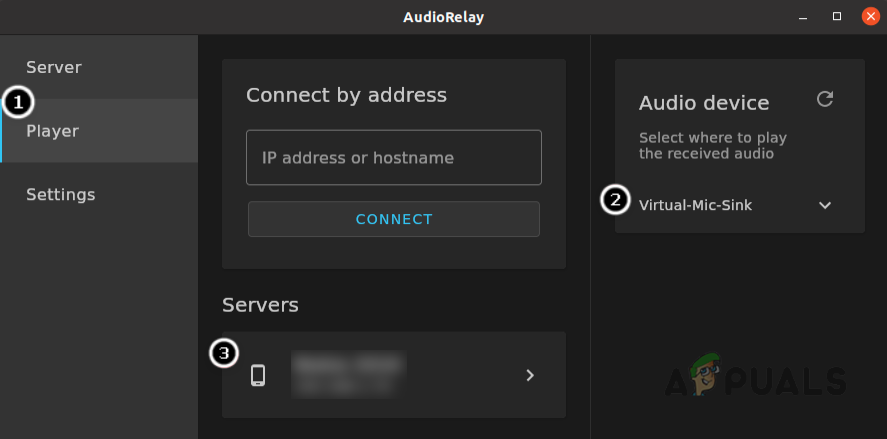
- Then, in the left pane, head to the Player tab, and afterward, select Cable Input under Audio Devices.
- Now under Servers, select your Android phone and launch the application (like Skype or Discord) where you want to use the Microphone.
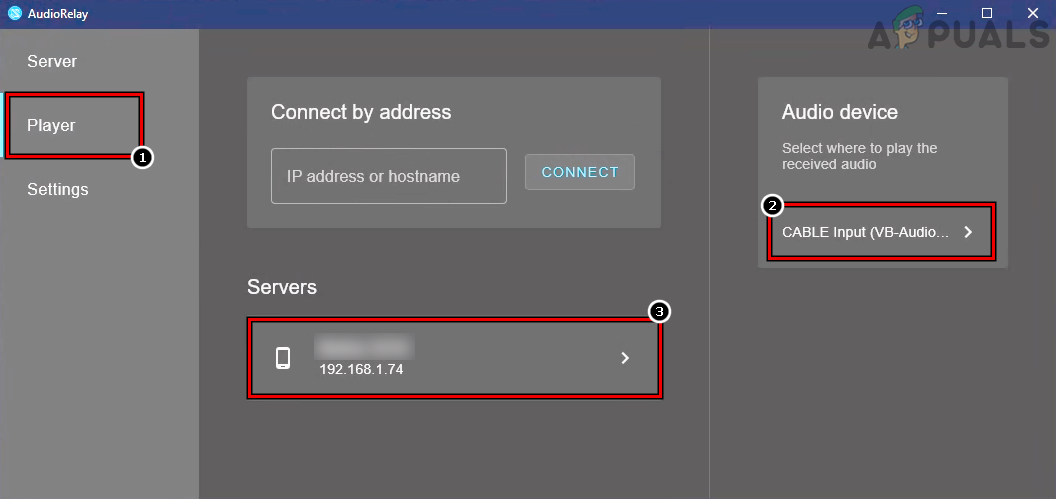
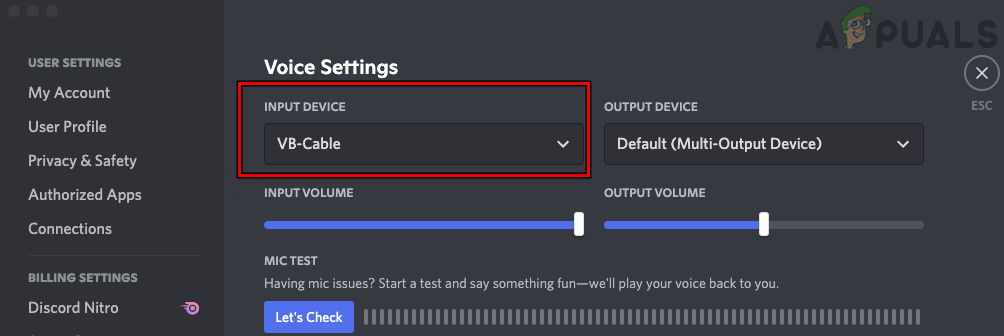
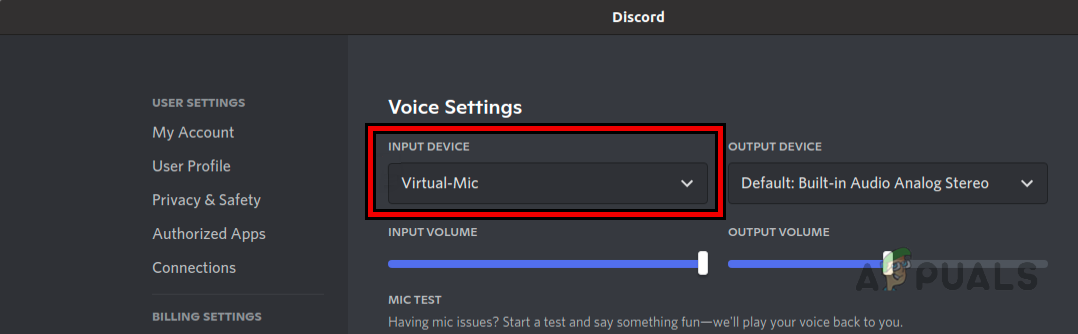
Set Audio Device to Cable Input and Select Your Phone Under Server in the Player Tab of the AudioRelay - Then, set the Input Device to Cable Output and now you can use your Android phone as a Microphone on a Windows PC.

Set Input Device to Cable Output in the Discord Settings
On a Mac
Install AudioRelay on the Mac
- Launch a web browser on your Mac and download the Mac Client from the AudioRelay website.

Download Mac Client of AudioRelay - Now open the downloaded file and follow the on-screen prompts to install AudioRelay on your Mac.
Install a Virtual Audio Device on the Mac
- Launch a web browser and download the Mac version of the VB-Cable Virtual Audio Device. You can use BlackHole (another virtual audio device app) that you can also be used to create a virtual device for your Mac.
Download Mac Driver of VB-Cable Virtual Audio Device - Now launch the downloaded VB-Cable file and use the on-screen instructions to install the VB-Cable Virtual Audio Device to your Mac.
Use the Android Phone as a Microphone on Your Mac Through the AudioRelay App
- Launch the AudioRelay app on your Android phone and head to its Server tab.
- Now, under sources, select Microphone and switch to your Mac.
Set Audio Device to VB-Cable and Select Your Mobile Phone Under Servers in the Players Tab of AudioRelay - Then, steer to the Player tab, and under Audio Device, select the VB Cable audio device.
- Now, under Servers, select your Android phone and launch the app where you want to use the Mic (like Discord).
Set Input Device of the Discord App to VB-Cable - Then set its Input Device to VB Cable and afterward, you can use an Android phone as a microphone on your Mac.
On a Linux PC
Install AudioRelay on a Linux PC
- Launch a web browser and download the Linux version of the AudioRelay.
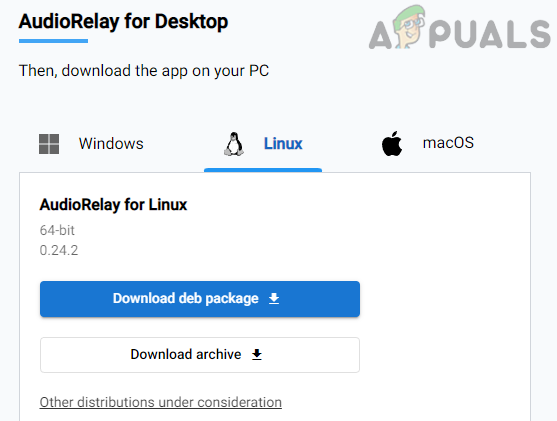
Download the Linux Client of the AudioRelay - Now launch the AudriodRelay installer and follow the prompts on the screen to install the AudioRelay on your Linux PC.
Install a Virtual Audio Device on the Linux PC
- Launch the Linux Terminal and execute the following:
pactl load-module module-null-sink \

sink_name=audiorelay-virtual-mic-sink \

sink_properties=device.description=Virtual-Mic-Sink
- Then execute the following:
pactl load-module module-remap-source \

master=audiorelay-virtual-mic-sink.monitor \

source_name=audiorelay-virtual-mic-sink \

source_properties=device.description=Virtual-Mic
- Now open the following file:
/etc/pulse/default.pa
- Then add the following lines at the end of the file:
# Creates a device where AudioRelay can stream audio into

load-module module-null-sink sink_name=audiorelay-virtual-mic-sink sink_properties=device.description=Virtual-Mic-Sink

# Creates a device usable by communications apps (e.g: skype)

load-module module-remap-source master=audiorelay-virtual-mic-sink.monitor source_name=audiorelay-virtual-mic-sink source_properties=device.description=Virtual-Mic
- Now open the Terminal window and execute the following:
pulseaudio -k
sudo apt install pavucontrol
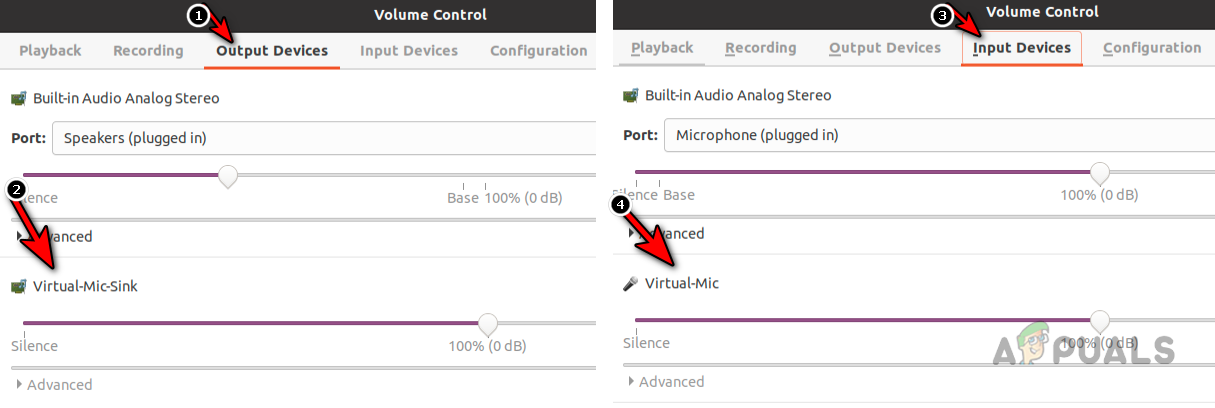
Virtual-Mic-Sink in the Output Devices and Virtual-Mic in the Input Devices in the Linux Volume Control
Use the Android Phone as a Wireless Microphone on the Linux PC Through the AudioRelay App
- Launch the AudioRelay app on your Android phone and select Microphone (under Sources).
- Now launch AudioRelay on your PC and steer to its Player tab.
- Then select Virtual-Mic-Sink in Audio Device and under servers, select your Android phone.
Set Audio Device to Virtual-Mic-Sink and Select Your Mobile Phone Under Server in the Player Tab of AudioRelay - Now launch the app where you want to use the Microphone (like Discord).
- Then set its input device to Virtual-Mic and you can use your Android phone as a Mic on the Linux system.
Set Input Device of Discord to Virtual Mic
2.2 Use an iPhone as a Wireless Microphone
If you want to use your iPhone as a wireless or Wi-Fi microphone with your Windows PC, Mac, or Linux system, then you may follow the steps below:
On a Windows PC
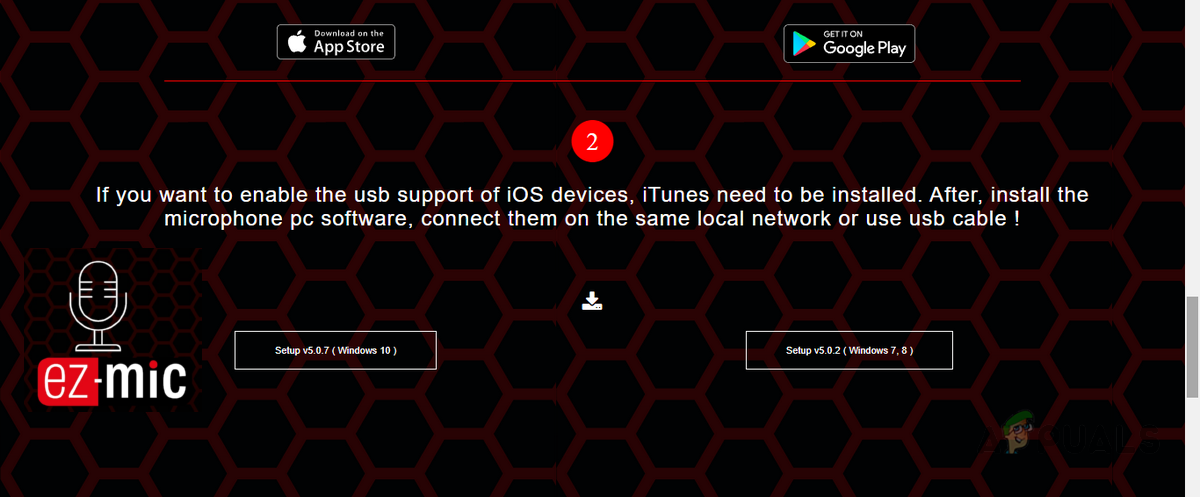
- Launch Apple App Store and install EZ-Mic on your iPhone. Keep in mind that in the free version, the app will disconnect after every 4 minutes and you will have to reconnect it or you can opt for a pro version of the app (if it fulfills your requirements).

Install EZ Mic on the iPhone - Now launch a web browser and download the EZ-Mic Windows client.
Download Windows Client of EZ-Mic - Then right-click on the downloaded installer and select Run as Administrator.
- Now follow the prompts on your screen to complete the installation and afterward, launch the desktop client of the EZ-Mic as an administrator.
- Then switch to iPhone and launch the EZ-Mic app.
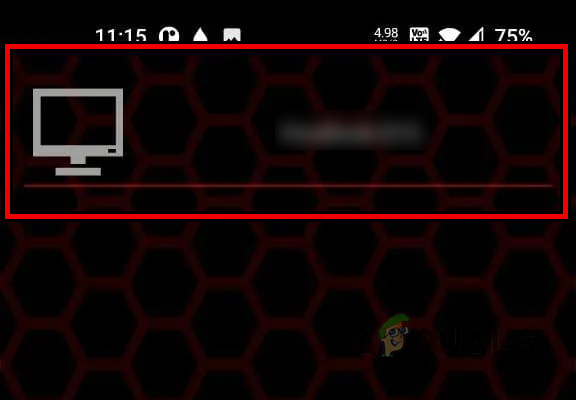
- Now tap on Find and wait till the app searches for the PC.

Tap on Find for in the EZ Mic App - Once shown, tap on the PC name and if asked to, allow the app the required permissions.
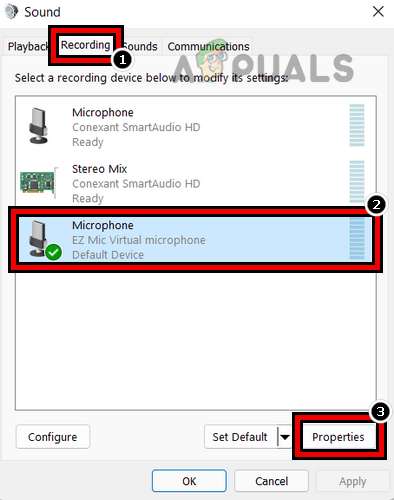
Tap on Your PC Name in the EZ Mic App - Now open the Sound panel on the system (as discussed earlier) and switch to its Recording tab.

Wait Till the Microphone is Connected to Your PC in the EZ Mic App - Then select the EZ-Mic Microphone and click on Properties.
Open Properties of the EZ Virtual Mic in the Windows Sound Panel - Now steer to the Listen tab and tick the checkbox Listen to This Device.
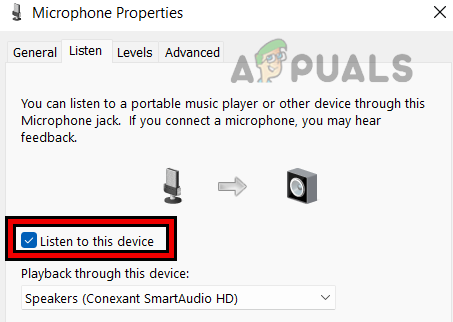
Enable Listen to This Device for the EZ Virtual Mic - Then click on Apply and speak on your iPhone to listen to its output on your Windows PC. If all is working well, uncheck Listen to This Device and click Apply.
- Afterward, you can use iPhone as a microphone on your Windows PC.
On a Mac
- Download and install PocketAudio on your iPhone through the Apple App Store.
- Then download and install PocketControl on your Mac.
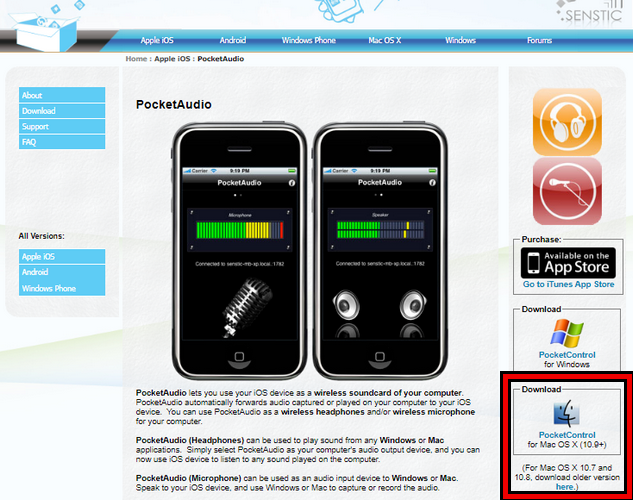
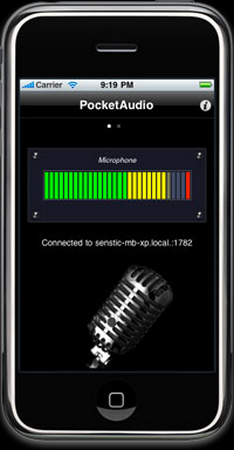
Download PocketControl from the PocketAudio Website - Now launch PocketControl on the Mac and afterward, launch PocketAudio on your iPhone.
- Then tap on the Microphone in the PocketAudio app and on the PacketContorl on your Mac, switch to the Audio tab.
- Now confirm that PacketControl is receiving input from the PocketAudio.
Use the PocketAudio to Make Your iPhone a Microphone on a Mac - Then select the PocketAudio as the default microphone in Mac System Preferences>> Sound>> Input and afterward, you can use your iPhone as a wireless Mic to your Mac.
On a Linux PC (Ubuntu)
- Launch Linux Terminal and execute the following to install Mumble + Murmur:
sudo apt install mumble mumble-server

sudo systemctl stop mumble-server.service

sudo systemctl disable mumble-server.service
- Then execute the following to enable Autodiscovery:
sudo apt install avahi-daemon

sudo systemctl start avahi-daemon.service
- Now execute the following to show your IP on the startup:
sudo apt install iproute2 jq
- Then download the mic_over_mumble script from GitHub.
- Now unzip the downloaded file and copy mic_over_mumble to anywhere, remember that it will use ~/.mic_over_Mumble as its configuration directory. Make sure to make it executable (chmod +x mic_over_mumble)
- Then launch mic_over_mumble and if it asks for a nickname, enter any name (except SuperUser).
- Now, on your iPhone, install the Mumble app through the Apple App Store.

Download the Mumble App from the Apple App Store - Then manually connect the iPhone to the LAN server and launch the application where you want to use the microphone like OBS.
- Now, set its input device to “Monitor_of_Mumble” or “VirtualMic” and this way, you can use your iPhone as a microphone on a Linux system.
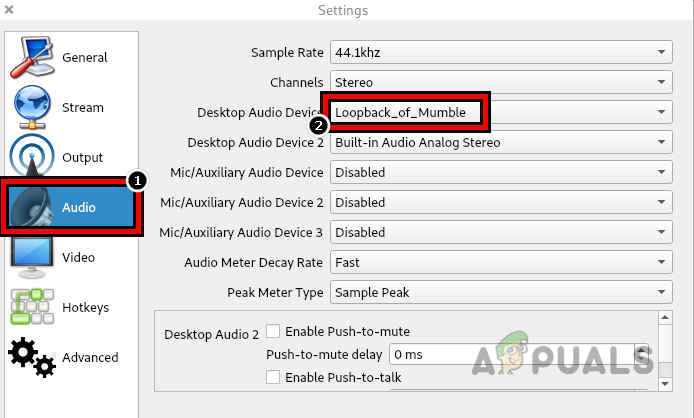
Set Desktop Audio Device in OBS to Loopback_of_Mumble
Hopefully, the above steps have worked for you to convert your phone into a dedicated microphone for your PC. If you want to use Bluetooth connectivity, then many of the above-mentioned apps also support it. Just connect your PC with the phone through Bluetooth and start using the phone as a Bluetooth microphone to your PC through the above-mentioned apps.