[FIX] System Restore ‘STATUS_WAIT_2’ Error Code
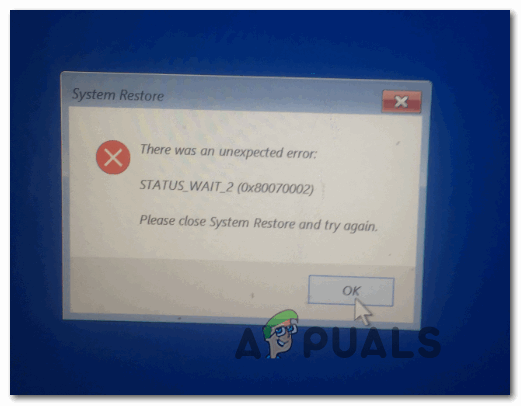
The ‘STATUS_WAIT_2‘ error appears when some Windows users attempt to create a System Image Backup using System Restore. In some cases, this error is accompanied by the error code 0x80070002. This issue is reported to occur on Windows 7, Windows 8.1, and Windows 10.
As it turns out, there are several different causes that might end up triggering the STATUS_WAIT_2 Error:
- Low-tier File Corruption – Corruption affecting the System Restore utility is by far the most common cause that will spawn this error code. Some users that were previously dealing with this issue have reported that they were finally able to fix the issue by using a couple of built-in utilities (DISM and SFC) to clear the inconsistencies and allow the backup procedure to complete.
- System Restore inconsistency – Keep in mind that System Restore is no longer being maintained or developed for Windows 10, and Microsoft is probably not going to feature this utility on future releases simply because the competition has better products. Because of this, the simplest and most efficient way to get around this error code is to migrate over to a 3rd party backup utility.
- Windows 10 glitch – As it turns out, you can also see this error due to a weird Windows 10 glitch that ends up creating a persistent guest account (DefaultUser0) that the backup utility ends up using instead of the active one (the one with admin access). In this case, you need to delete this guest account completely while in Safe Mode before retrying the procedure.
- OS Corruption – In certain circumstances, you’ll end up seeing this error message due to a serious OS corruption issue that you will not be able to fix with the provided utilities. In this case, the only way forward is to re-initiate every Windows component with procedures like clean install or repair install.
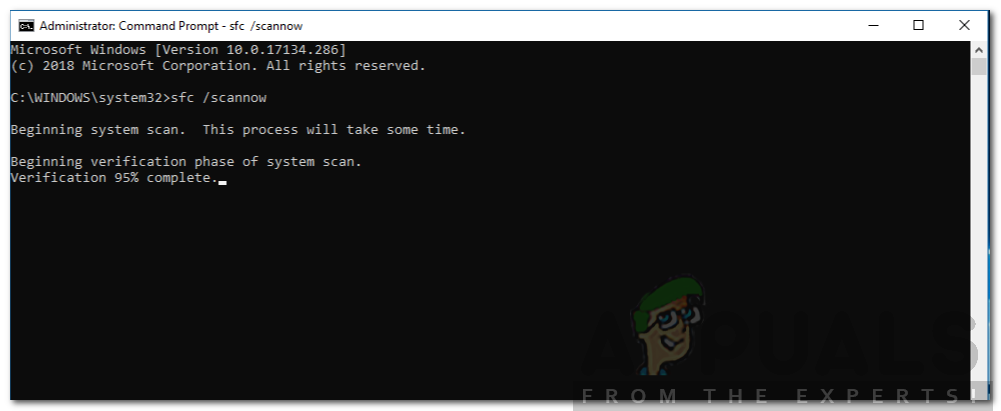
Performing an SFC and DISM scans
If you tried to repeat the operation multiple times and every attempt fails with the same STATUS_WAIT_2 Error, it’s quite possible that you’re actually dealing with some type of system file corruption. Fortunately, there are a couple of utilities that every Windows version comes bundled by default that should allow you to fix this issue.
SFC (System File Checker) and DISM (Deployment Image Servicing and Management) are two solid utilities that will and up fixing the majority of low and medium tier instances of corruption. Some users that were previously struggling with this error message have confirmed that the STATUS_WAIT_2 error was fixed after they ran both scans in quick succession.
If you want to repeat this process, start with a simple SFC scan – Every dependency of this tool is stored locally so you can run it without an internet connection. But be careful that after you start it, interrupting the utility forcibly (by closing the CMD window) might produce additional logical errors.
Once the SFC scan is complete, restart your computer and wait for the next startup to complete.
After the next booting sequence is complete, go ahead and start a DISM scan.
Note: Keep in mind that this operation will require a stable Internet connection – DISM uses a sub-component of Windows Update to download healthy copies of the files that are affected by system file corruption.
Once the DISM scan is complete, do a final system reboot and repeat the action that was previously triggering the ‘STATUS_WAIT_2‘ error once the next startup is complete.
In case the same problem is still active, move down to the next potential fix below.
Using a 3rd party Backup equivalent
If the method above wasn’t effective for you and you don’t want to do anything too radical like resetting your Windows components, there are certainly some 3rd party alternatives that you might consider.
Keep in mind that System Restore, File History, System Image, and Backup are utilities that Microsoft is not actively maintaining and developing on Windows 10. It’s entirely possible that future Windows releases will no longer include System Restore since 3rd party equivalents are way better than the built-in solution.
If you’re looking for a 3rd program capable of doing the same thing as System restore, consider one of these free alternatives:
- Macrium Reflect
- Acronis True Image
- Clonezilla
- MiniTool Partition Wizard
- Solarwinds Backup
Note: All of the options presented above are either free or include a trial version.
In case you don’t want to use a 3rd party solution to create a backup of your Windows version, move down to the next potential fix below.
Deleting the DefaultUser0 Account (if applicable)
If you’re seeing this issue on a Windows 10 computer, it’s likely that the backup process fails due because of a known bug that ends up creating a ghost account (defaultuser0) that Windows keeps trying to get a hold of even though it no longer exists. This is even more likely if the logs of the error reveal a reference like this:
Backup encountered a problem while backing up file C:\Users\defaultuser0\Contacts. Error STATUS_WAIT_2
If this scenario is applicable, you should be able to fix the issue entirely by following a set of instructions that will guide you through the process of removing the DefaultUser0 account. Here’s what you need to do:
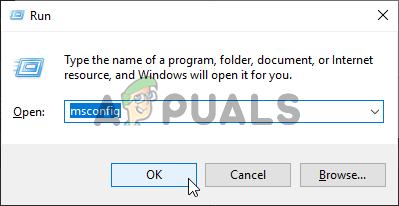
- Press Windows key + R to open up a Run dialog box. Next, type ‘msconfig’ inside the Run box and press Enter to open up the Startup Options screen.
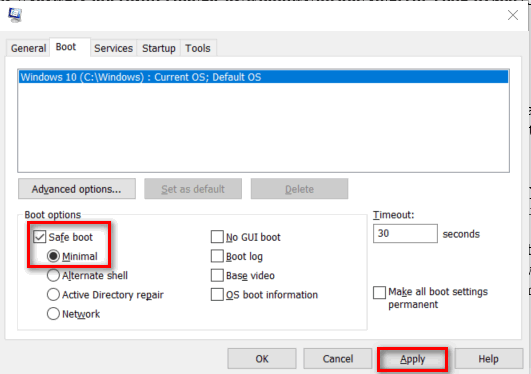
Opening System Configuration - Once you’re inside the Startup Options screen, select the Boot tab and check the box associated with Safe boot (under Boot options). Next, set the associated toggle to minimal and click Apply to save the changes.
Saving the changes - Restart your computer and wait until your OS boots back up into Safe Mode.
- Once your computer boots back up, press Windows key + R to open up another Run dialog box. Next, type ‘control’ in the text box and press Enter to open up the Classic Control Panel interface.
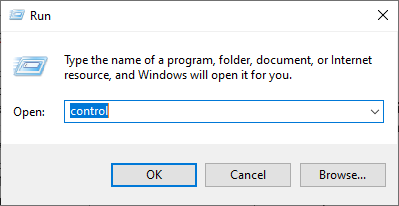
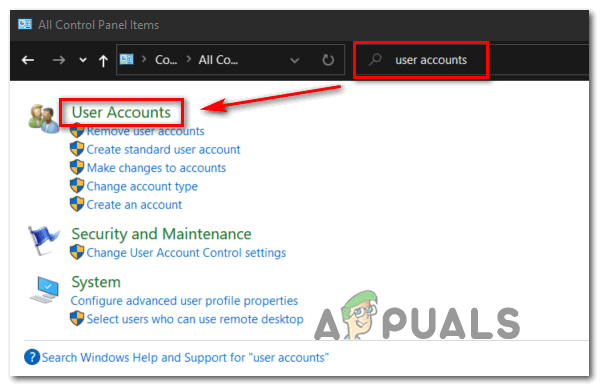
Accessing the Classic Control Panel interface - When you’re inside the Classic Control Panel interface, use the search function in the top-right corner to search for ‘user accounts‘ and press Enter to see the results.
- From the list of results, click on Remove User accounts (under User Accounts).
Accessing the User Accounts menu in the classic Control Panel interface - If you’re prompted by the UAC (User Account Control) prompt, click Yes to grant administrative privileges.
- Once you’re inside the Manage Accounts window, click on the DefaultUser0 account to select it, then click on Delete the account from the next menu.
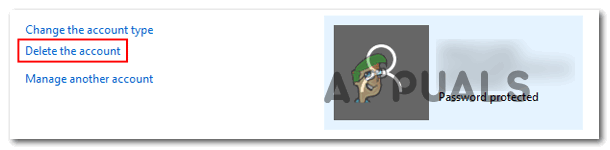
Deleting the DefaultUser0 account - When asked whether you want to keep or delete the files belonging to DefaultUser0, click on Delete files.
- At the final confirmation prompt, click on Delete Account to confirm the operation.
- Next, open File Explorer (My Computer) and navigate to C:\Users to see if the DefaultUser0 folder is still there. If it is, go ahead and right-click it and choose Delete to get rid of it.
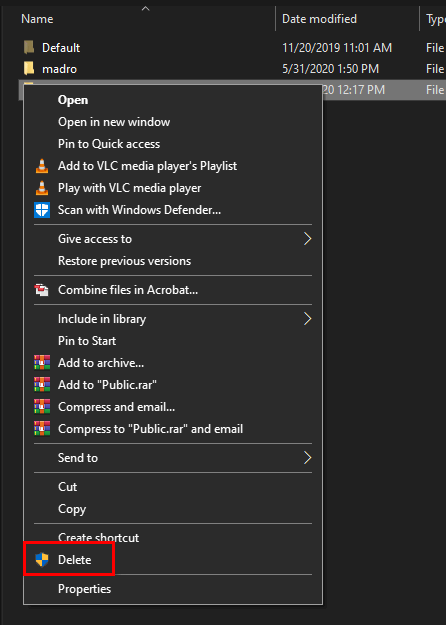
Deleting the DefaultUser0 folder Note: If you’re prompted to grant admin access, click Yes at the User Account Control Prompt.
- Once that folder is deleted, close the File Explorer (My Computer) window and open up another Run box (Windows key + R). Inside the Run dialog box, type ‘regedit’ and press Enter to open up the Registry Editor. At the UAC (User Account Control), click Yes to grant admin access.
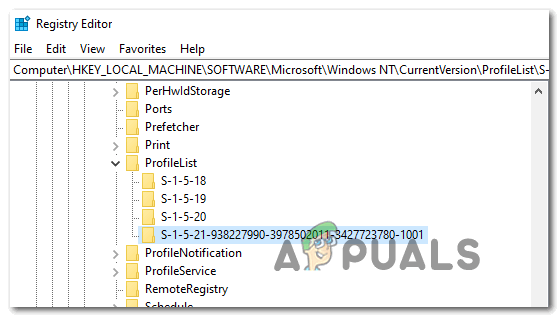
- Once you’re inside the Registry Editor, use the left-hand section to navigate to the following location:
Computer\HKEY_LOCAL_MACHINE\SOFTWARE\Microsoft\Windows NT\CurrentVersion\ProfileList
Note: You can either navigate there manually or you can paste the location directly into the navigation bar to get there instantly.
- When you get to the correct location, select the sub-key that begins with S-1-5-21 and then move over to the right-hand pane.
Selecting the correct sub-key from ProfileList key - Once you’ve selected the correct sub-key, move over to the right-hand side section and double-click on ProfileImagepath. If that path points towards C:\Users\DefaultUser0, change it to point towards the primary profile that you’re using.

Modifying the location of ProfileImagePath - Close Registry Editor, reboot your computer, and attempt to create a backup once again with System Restore and see if the problem is fixed.
In case you’re still encountering the same ‘STATUS_WAIT_2‘ error, move down to the next potential fix below.
Resetting every Windows Component
If none of the fixes above have worked for you, it’s likely that you’re dealing with some kind of serious system file corruption that you won’t be able to fix conventionally. If this scenario is applicable, you should simply go ahead and reset every relevant Windows component that might end up affecting the System Restore component.
You can do this either by going for a complete wipe of your OS drive or by targeting ONLY the files belonging to your operating system:
- Clean Install – This is the easier operation out of the two since you can do it directly from the menus of your Windows version and it doesn’t require you to use a compatible installation media. However, this is only recommended if you don’t really care about what happens with the personal data you’re currently storing on the drive.
- Repair install – This operation is also known as an in-place repair and is the recommended approach if the OS drive (C:\) currently stores data that you can’t afford to lose. But keep in mind that you need to use a compatible installation media to pull this through. However, the main advantage of this method is that all your applications, games, user preferences, and personal media will remain intact.


