How to Root Snapdragon Samsung Galaxy S8 and S8 Plus
We previously posted a guide for rooting the international Exynos version of the Samsung Galaxy S8 and S8 Plus, but no known root methods for the USA Snapdragon variant existed at that time. However, a method of rooting the Samsung S8 Snapdragon variant has finally surfaced, and we are sharing it with you now.
A few notes to consider before following this guide:
- It is absolutely possible to return to 100% stock ROM, if you have full stock 4 firmwares of your choice.
- This root method does not bypass SafetyNet. Magisk and SuHide will not work, because the bootloader is still locked in this root method. Those root hide methods modify the boot.img, which is currently not possible.
- There seems to be a bug with this root method where the battery only charges to 80%, but some are claiming it is just a visual bug, as they are getting 100% battery performance.
A brief explanation of this root process:
We will be flashing a modified 4 file firmware package in ODIN, and this will allow us to utilize a few binaries together with SU binary, and a permissive kernel. Then we will run some ADB commands, so you should have ADB properly configured on your computer. Please see Appual’s guide for “How to Install ADB on Windows” for that process.
Requirements:
- SystemRoot + ADB packaged .zip
- Initial ODIN 4 Files Firmware
- Normal + Comsey ODIN
- img.ext4
- CSC Systemroot
- To begin, download all of the required files and save them on your desktop.
- Extract the ODIN 4 files firmware package, and the ODIN softwares if you don’t have them already.
- Now open the Comsey ODIN, and select each partition, and the files from the 4 file firmware package. For the ODIN options, you should select F. Reset Time, Auto Reboot, Re-Partition, Nand Erase All, and Update Bootloader.
- Now turn off your Samsung S8, and boot into Download Mode. To do this, hold Bixby button + Volume Down, and press the power button.
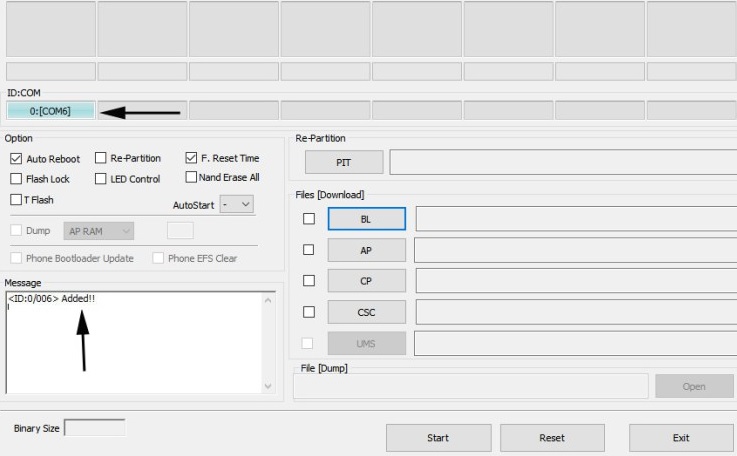
- Now press “Start” in ODIN, and wait for it to finish. Once it finishes, if it boots into stock recovery just choose “Reboot System”.
- Now you will need to setup your phone and enable USB Debugging. Go into Settings > About Phone > tap ‘Build Number’ 7 times until Developer Mode is activated. Then go to Settings > Developer Options > enable USB Debugging.
- Now we’re ready for the ADB commands. Go inside your main ADB folder on your computer, hold Shift + right click, and choose “Open a command window here”.
- When the terminal screen opens, check the ADB connection with your device by typing ‘adb devices’. It should display your phone’s serial number.
- Now we need to start entering the ADB commands to achieve root.
adb push systemroot /data/local/tmp
adb shell chmod -R 7777 /data/local/tmp
adb shell setsid su
id
echo /data/local/tmp/systemroot/remount2.sh > /sys/kernel/uevent_helper
- Now wait about 30 seconds before entering this next command: mount
- Once you see the /system has been mounted as RW, type: sh /data/local/tmp/systemroot/root.sh
- If you followed everything exactly as given, your device should reboot and SuperSU will be installed.
- At this point, you now need to install Flashfire from Google Play Store.
- Now you need to extract the System.img.ext4.zip and place the actual system.img.ext4 file onto your device’s internal storage, not SD card.
- Also place the entire CSC Systemroot.zip onto the internal storage as well, but do not unzip it, just put the entire .zip in there.
- Open Flashfire app on your device and grant it root access. Now press the + sign and choose “Flash Firmware Package”, and then navigate to the system.img.ext4 file and choose it.

- Also press the + sign and select “Flash ZIP or OTA” and choose the CSC Systemroot.zip file, and select Mount System as R/W.
- Press the + sign and choose “Wipe”, then select System Data, 3rd party apps, Dalvik cache, Cache partition, and Cache Partition format.
- Now long press “Wipe” and drag it to the top. So the process order in Flashfire should be Wipe > Flash Firmware Package > Flash ZIP or OTA.
- Make absolutely certain that “Everoot” is disabled, and flash.
- When everything is finished, you should be completely updated to QD2 and rooted with BusyBox. Enjoy!