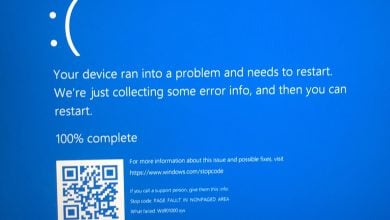
How to Fix ‘Kmode Exception Not Handled’ Error on Windows 11
The KMODE_EXCEPTION_NOT_HANDLED error is typically encountered during the installation of Windows 11 (or immediately after). Some users that managed to install Windows 11 are reporting that they can’t get their PC running for more than 2 minutes before getting this error. This problem seems to be much more common with insider builds of Windows 11 (Development, Beta, and Preview).
After attempting to replicate the issue on our own devices and investigating various user reports, we got a pretty clear idea of why this error is so prevalent among Windows 11 early adopters.
We’ve made a list of scenarios that are most likely to be responsible for the KMODE_EXCEPTION_NOT_HANDLED error. See if any of them could be applicable to your particular scenario:
- The crash is caused by conflicting graphic card drivers – If you got this type of error when trying to upgrade to Windows 11, there’s a big chance you’re dealing with conflicting drivers that interfere with the installation of the new OS. Other users finding themselves in a similar situation have confirmed that they’ve been able to fix the issue by uninstalling the current drivers with DDU and performing the upgrade while the generic updates are installed.
- Faulty RAM stick – It’s not uncommon to face this issue a few minutes into your session due to a faulty RAM stick that’s part of a Dual Channel setup. The issue is typically related to the faulty RAM stick’s inability to keep up with the assigned voltage. In this case, the only option to stop the crashes is to take out the faulty RAM stick and go for a replacement or utilize the Windows computer with a single RAM stick.
- The conflict is facilitated by 3rd party AV – There’s one confirmed AV suite that’s causing this issue (McAfee), but there might be others that have yet to be discovered. To check if your antivirus is actually causing this issue, you will need to disable the early launch anti-malware protection and see if the crash returns. If it doesn’t return, you can uninstall the conflicting AV to get rid of the issue permanently.
- The conflict caused by EspoDriver.sys – As it turns out, there’s one esports anti-cheating driver called EspoDRIVER.sys that’s also singled out for causing this type of crash on Windows 11. In order to be able to delete it and resolve the conflict, you’ll first need to uninstall the parent app that uses it (Esportal).
- Outdated BIOS version – Another reason why you can expect to see this issue is a scenario with older BIOS firmware versions of your motherboard that triggered this error due to a bug that was since resolved with a BIOS update. In this case, updating your BIOS version to the latest should fix the issue in your case.
- System File corruption – Under certain circumstances, system file corruption can also be responsible for the general system instability leading to this error code. In this case, you can either clean install or repair install your current OS to ensure that you replace every potentially corrupted system file with a healthy equivalent.
Now that you are familiar with every potential cause, let’s go over the actual fixes that have already helped so many Windows 11 users get around the KMODE EXCEPTION NOT HANDLED error:
Uninstall Graphics card drivers with DDU
In case you get the KMODE_EXCEPTION_NOT_HANDLED error when attempting to install the Insider update that will upgrade your PC to Windows 11 (or when trying to install from compatible installation media or ISO), the first thing you should do is ensure that you’re not dealing with a conflicting driver.
We know now that both Nvidia and AMD (but mostly AMD) graphic drivers can be responsible for a blue screen during the process of upgrading to Windows 11.
There is no official explanation on why this occurs, but affected users are speculating that it has something to do with a kernel file that is hard-stopped by a security check.
Fortunately for you if this scenario looks like it could be applicable, the solution is simple – you’ll need to use the DDU (Display Driver Uninstaller) to completely remove any dedicated driver and supporting file and make the switch to a generic equivalent.
Once you’ve made the switch to a generic equivalent, you should be able to install Windows 11 without receiving the same KMODE_EXCEPTION_NOT_HANDLED error.
Follow the instructions below for the complete steps that will guide you through this process:
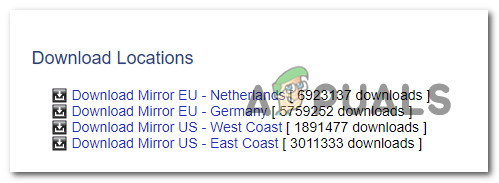
- Open your default browser and visit the Download page of the Display Driver Uninstaller.
- Once you’re inside the correct page, scroll down to the Download Locations section and click on the mirror that’s closest to your physical location.
Downloading the DDU tools - Once the download is finally complete, use the native extraction utility (or a third-party equivalent like 7Zip, WinZip, or others) to extract the contents of the DDU archive.
- After the extraction process is complete, navigate to the location where you extracted the DDU archive and double-click on the Display Driver Uninstaller executable.
- When you’re prompted by the User Account Control window, click Yes to grant admin access.
- Once you’re inside the main Display Driver Uninstalling window, choose GPU from the drop-down menu named Select device type.
- Next, click on Clean and restart to begin the cleanup process.
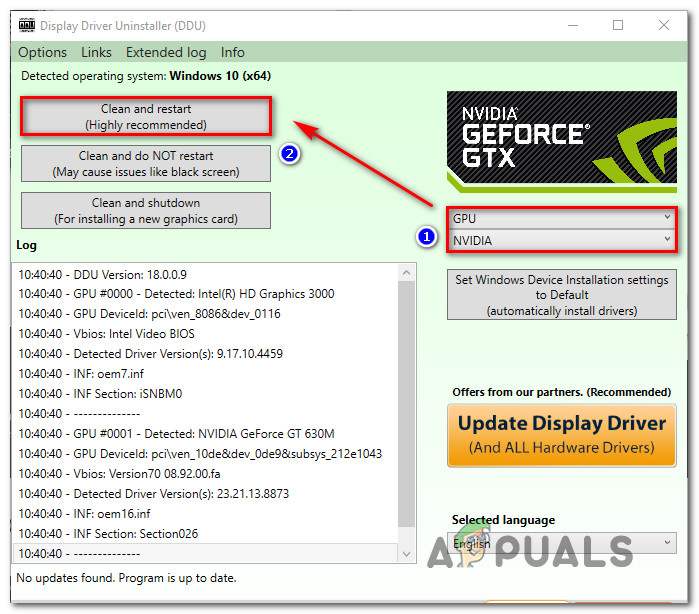
Cleaning up the GPU drivers - After you confirm the operation, wait until every relevant driver and its dependencies are removed from your computer
- Once this operation is complete, it’s important not to try and reinstall the AMD or Nvidia dedicated supporting drivers once again – this will likely contribute to the apparition of the same error.
- Instead, attempt to perform the upgrade to Windows 11 once again and see if the problem is now fixed.
If this method was not applicable in your particular scenario or you already followed the instructions above to no improvement, move down to the next potential fix below.
Remove the Faulty RAM stick (if applicable)
As it turns out, this issue can also be caused by faulty RAM in those situations where a dual-channel kit is used.
We’ve managed to identify several reports where users dealing with the KMODE_EXCEPTION_NOT_HANDLED error have managed to fix it indefinitely by simply removing the faulty stick and botting it up with just the remaining one.
PRO TIP: If removing one stick produces the same error, try putting it back and removing the other one before trying to boot again.
Of course, even if this works, this is not an ideal scenario since it will affect your performance. But it’s definitely a proven way to continue using your Windows 11 computer normally, at least until you can order a replacement RAM stick.
Note: RAM sticks are especially phones to go bad in those situations where you’re overclocking them with a custom frequency and voltage. If you discover that you’re actually dealing with a faulty RAM, you can evaluate the damage by performing stress tests and evaluations with utilities like HWmonitor and Memtest.
In case this method was not applicable or you removed both of the potentially faulty RAM sticks and have seen no improvement to the frequency of the KMODE_EXCEPTION_NOT_HANDLED error, move down to the next potential fix below.
Disable early launch anti-malware protection (if applicable)
Windows 11 is still in the incipient phase, and as with every new operating system, unexpected conflicts between kernel processes and 3rd party processes are to be expected while Windows 11 is stabilizing.
As of now, one of the most common causes that will produce the KMODE_EXCEPTION_NOT_HANDLED error is a scenario in which a third-party suite is causing these green-screen errors due to a kernel conflict.
Most of the time, security solutions from McAfee are signaled out for being responsible for this conflict.
But because there might be other unidentified conflicts, if you’re using a 3rd party antivirus, our recommendation is to boot with ‘early launch anti-malware protection’ disabled’ and see if the error code still occurs.
In case the KMODE_EXCEPTION_NOT_HANDLED error no longer occurs after you’ve disabled the early launch anti-malware protection, it’s clear that your AV is causing the conflict – In this case, the only solution is to get rid of the 3rd party AV and replace it with a non-conflicting 3rd party equivalent or just revert to Windows Defender.
IMPORTANT: If you don’t use a 3rd party antivirus, skip the instructions below and move directly to the next method.
Follow the instructions below for the complete steps of disabling the early launch anti-malware protection and then move to uninstall your 3rd party suite if the kernel conflict is confirmed:
- Press Windows key + I to open up the Settings app.
- Once you’re inside the Settings app, click on System from the vertical menu on the left.
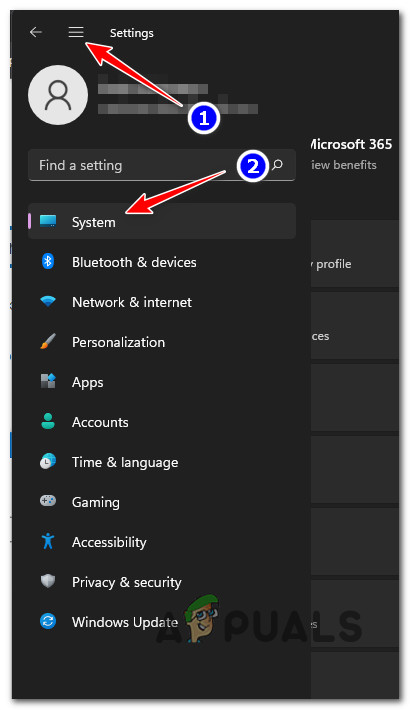
Accessing the System menu Note: If the vertical menu is not visible by default, click on the action button in the top-left corner of the Settings app screen.
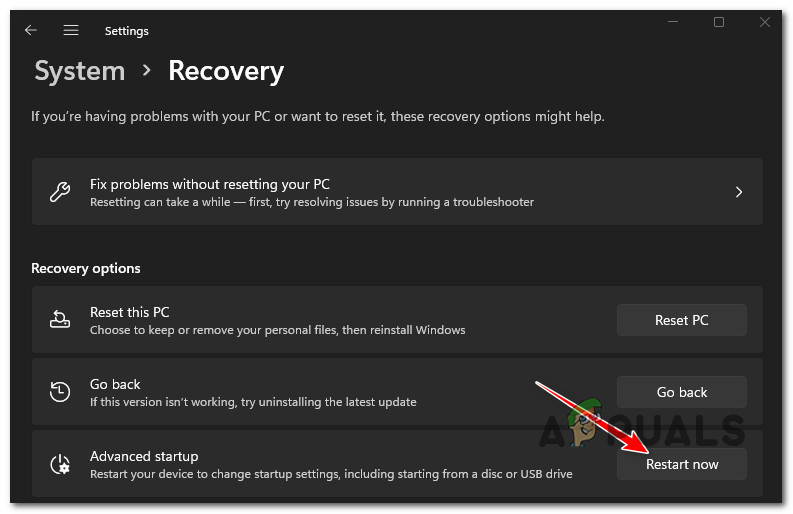
- Once you’re inside the System menu, scroll down through the list of available options and click on Recovery.
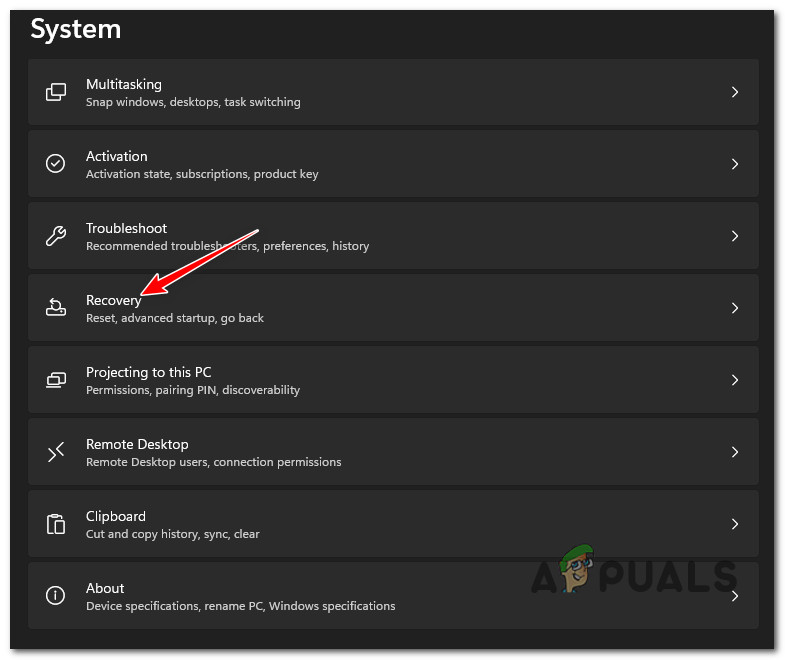
Opening up the Recovery menu - Once you’re inside the dedicated Recovery menu, go ahead and click on the Restart now button associated with Advanced Startup to restart directly into the Advanced Startup menu.
Restart into the Advanced Startup menu Note: In case your Windows 11 installation crashes with the KMODE EXCEPTION NOT HANDLED error before you get the chance to get to this menu, you can also force your PC to boot directly into the advanced startup menu by forcing 3 unexpected system interruptions during the startup process.
- After you do this and confirm your choice, your PC will restart directly into the Advanced startup menu.
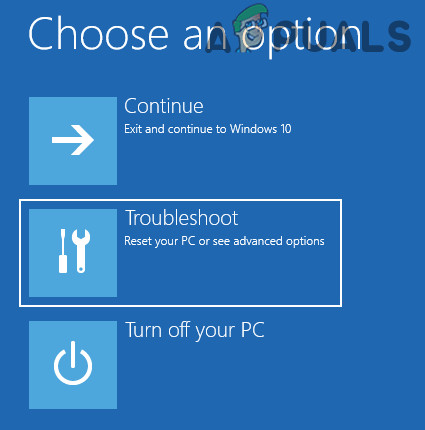
- Once you’re inside the Advanced Startup menu, click on Troubleshoot from the list of available options.
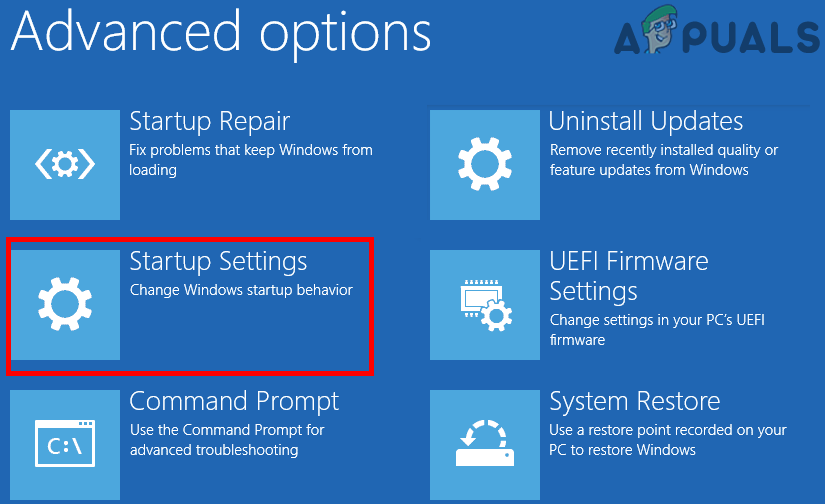
Open the troubleshoot tab - Inside the Troubleshoot menu, click on Startup Settings from the list of options, then hit the Restart button to force your PC to boot into the Startup settings window.
Boot into the Startup settings window - After your computer boots into the Startup Settings menu and you are presented with the list of options, press the 8 key or the F8 key (on your keyboard) to Disable early-launch anti-malware protection.
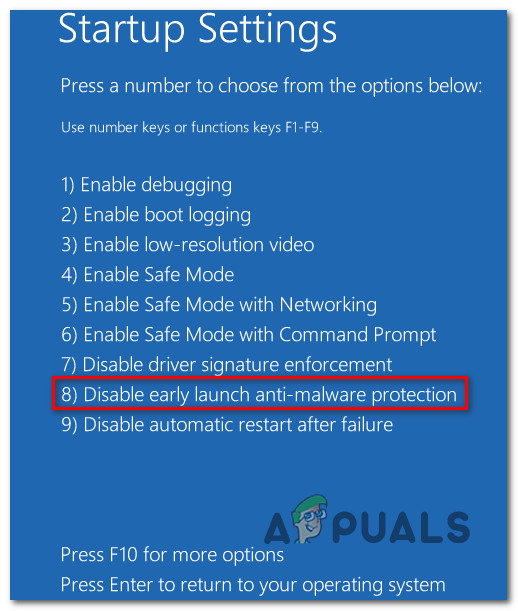
Disable the Anti Malware protection mechanism - After you do so, your Windows 11 installation will start with the early-launch anti-malware protection disabled.
Note: The next time you restart your computer, the early-launch anti-malware protection will automatically be re-enabled again. - Once your computer boots back up, utilize it normally to see if the same KMODE_EXCEPTION_NOT_HANDLED error is still occurring.
- In case the error is not occurring, you’ve just identified that there’s a conflict with your third-party antivirus – in which case, follow the next steps to deal with it.
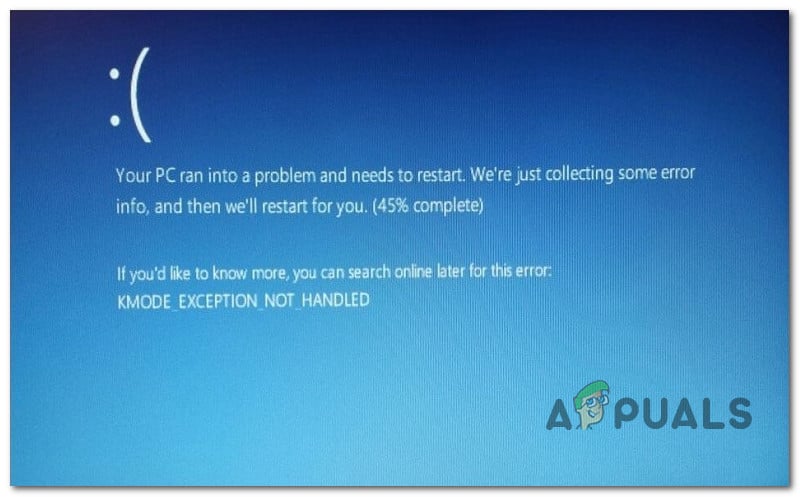
Kmode Exception Not Handled Error on Windows 11 Note: If this error still occurs even after you booted with the early launch anti-malware protection disabled, skip the remaining steps and move directly to the next method below.
- Press Windows key + R to open up a Run dialog box. Next, type ‘appwiz.cpl’ and press Enter to the Programs and Features menu.

Opening up the Programs and Features menu Note: If you’re prompted by the User Account Control prompt, click Yes to grant admin access.
- Once you’re inside the Programs and Features screen, scroll down through the list of installed programs and locate the 3rd party antivirus suite that’s causing the error.
- After you locate your culprit, simply right-click on it and choose Uninstall from the context menu.
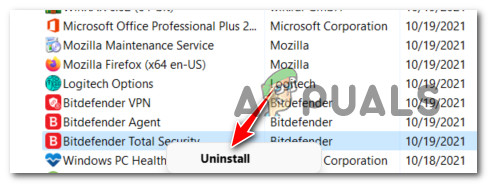
Uninstall the conflicting antivirus Note: If you have multiple supporting software products belonging to the 3rd party Antivirus (like the example above) uninstall them all before proceeding.
- Follow the remaining uninstallation screens, then reboot your computer to allow your PC to boot without the early launch anti-malware protection and see if the problem is now resolved.
If the same KMODE_EXCEPTION_NOT_HANDLED error is still popping up, move down to the next method below.
Delete the EspoDRIVER.sys driver & uninstall Esportal (if applicable)
If you have Counter Strike Global Offensive installed on your PC, there’s a big chance that you’re seeing these unexpected crashes with the KMODE_EXCEPTION_NOT_HANDLED error due to a system file (EspoDRIVER.sys) belonging to the e-sports platform Esportal.
This conflict is signaled by dozens of CS: GO players that have already migrated towards Windows 11.
So far, the only viable fix at your disposal (if this scenario is applicable) is to get rid of the system file causing this issue and uninstall the parent app (Esportal).
Note: Deleting the system file first will likely not be successful since the driver is still actively in use. You will instead need to uninstall Esportal first, then get rid of the driver.
For step by step instructions on dealing with this particular incompatibility on Windows 11, follow the instructions below:
- Press Windows key + R to open up a Run dialog box. Next, type ‘appwiz.cpl’ inside the text box and press Enter to open up the Programs and Features menu on Windows 11.
Opening up the Programs and Features menu - When you’re prompted by the User Account Control, click Yes to grant admin access.
- Once you’re inside the Programs and Features menu, scroll down through the list of installed programs and locate the entry named Esportal.
- After you manage to locate it, right-click on Esportal and click on Uninstall from the context menu.
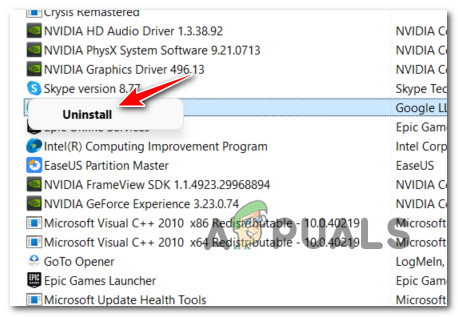
Uninstall the Esportal suite - Follow the remaining instructions to complete the uninstallation of Esportal.
- Now that Esportal is uninstalled and no longer uses the EspoDRIVER.sys driver, we can safely delete it. To do this, simply navigate to the following location and right-click > Delete the file:
C:\WINDOWS\System32\drivers\EspoDriver.sys
Note: You will need an administrator account to be able to delete this driver from the drivers directory.
- Do one final restart before testing to see if the KMODE_EXCEPTION_NOT_HANDLED error has been resolved.
In case you’re still dealing with the same kind of problem, move down to the next method below.
Update BIOS version to the latest
Another reason why you can expect to see the KMODE_EXCEPTION_NOT_HANDLED error is a scenario in which one of the essential driver fleets crashes in kernel mode. This is not that uncommon with pre-release versions of Windows 11.
Fortunately, most of the major motherboard manufacturers have already released fixes to deal with this kind of issue by now. The only way to take advantage of them is to update your BIOS version to the latest firmware available for your particular motherboard version.
Note: It’s important to understand that BIOS interfaces are vastly different across various motherboard manufacturers, so it’s not possible to provide a step-by-step guide that will help you update your BIOS version.
What we can do is provide a series of generic steps that will provide a general guide through this process.
But before you go through it, it’s important to take the time and ream the official documentation detailing the BIOS updating process of your motherboard. Here are some useful links:
Note: If your manufacturer is not in the list above, do a Google search query on ‘BIOS Update + motherboard model‘ to find the documentation applicable to your current situation.
Here’s the general guideline that should guide you through the process of updating your current BIOS version:
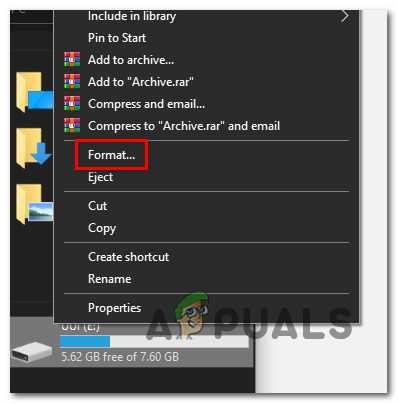
- Start by ensuring that you have a blank USB flash drive at the ready.
Note: in case it’s already filled with data, back it up first, then right-click on it and choose Format from the context menu that just appeared.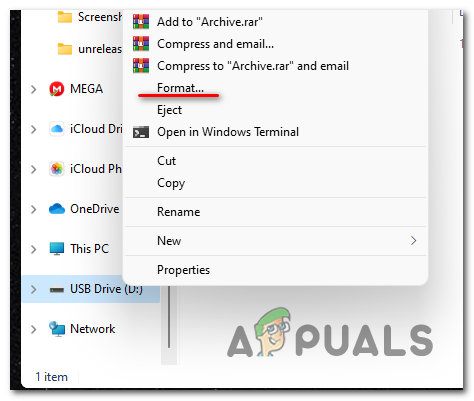
Formatting the drive - Once you’re inside the Format screen, choose FAT32 as the file system, then click on Quick Format and hit Start to format the drive.
Formatting the removable drive - Once the formatting operation is finally complete, visit the website of your motherboard manufacturer and consult the official BIOS update documentation.
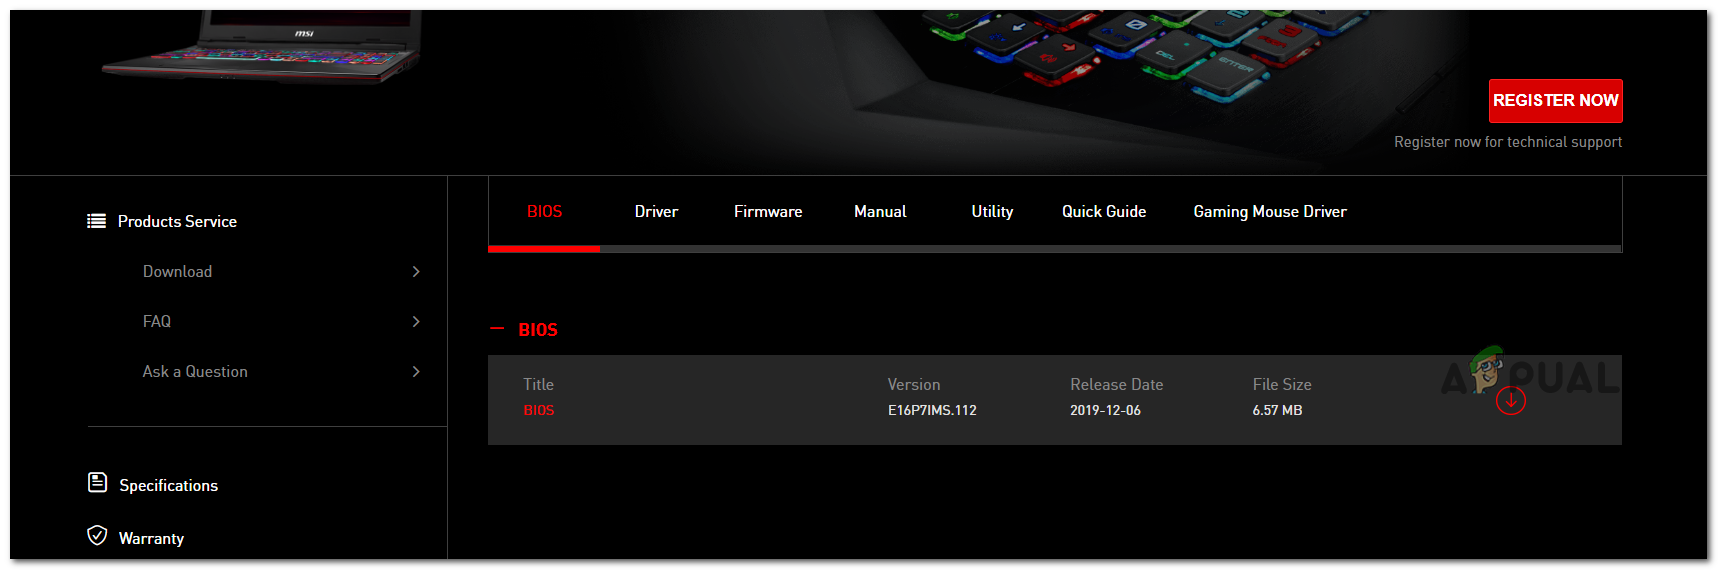
Downloading the latest BIOS version Note: Typically, you will need to download the latest BIOS firmware version, then copy the file to the USB flash drive that you’ve just formatted. Depending on the manufacturer, you might also be required to make additional changes to the files used for the BIOS upgrade (this is why it’s important to read the documentation thoroughly)
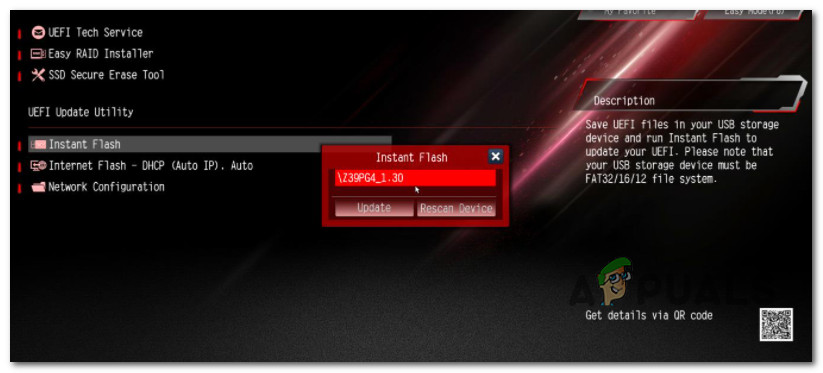
- Once you manage to copy the BIOS files on the USB flash drive, reboot your PC and hit the Setup key to access the BIOS Settings menu.
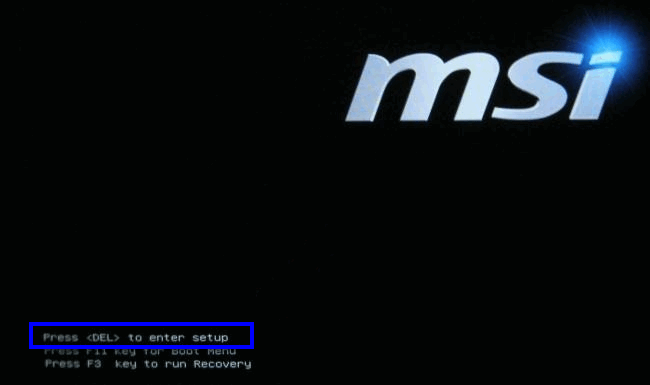
Accessing the Setup screen Note: In case the Setup key doesn’t appear on screen, try pressing the Esc, Del, or one of the following F keys – F2, F4, F6, F8, and F12. Additionally, search online for specific instructions for accessing your BIOS settings according to your motherboard model.
- Inside the BIOS Settings menu, look for the Advanced (Expert) settings and see if you have an option similar to Update System BIOS (or similar).

Updating the System BIOS firmware - Follow the instructions to complete the BIOS update, then reboot your PC normally and see if the error is now fixed.
In case your PC still suffers crashes pointing towards the KMODE_EXCEPTION_NOT_HANDLED error, move down to the final potential fix below.
Repair install or Clean install Windows 10
In case none of the methods above have proven to be effective in your case, the only solution at your disposal (as of now) is to ensure that every potentially corrupted dependency (system files and supporting files) is replaced with a healthy equivalent.
An operation of this scale can only be achieved in two ways:
- Clean installing – Removes any system files, supporting OS files, and personal files from your OS drive.
- Repair Installing – Only removes system files and supporting files while leaving your personal files intact.
Note: Our recommendation is to go for a repair install procedure since you get to keep personal files, applications, games, and even user settings. Basically, a repair install procedure will only touch the system files and their dependencies, while leaving everything else intact.