How to Import Videos from Your PC to Instagram
When Instagram was first introduced to the world, it only allowed users to upload images and nothing more. However, Instagram has matured a lot since its initial release, and around approximately version 4.1 of the now extremely popular social networking application, the ability to upload videos was introduced. The ability to upload videos recorded using a phone’s camera wasn’t really special, but the ability to upload videos that have been captured using another medium and then transferred to a phone certainly was.
This little feature unlocked a whole new world of opportunities – users could now upload videos of superior qualities captured using professional video-capturing devices and then edited on computers using their cute little phones. Although Instagram put a lot of restrictions on the nature and specifications of the videos that users could upload, this feature was, to say the least, a welcome addition to the social network.
Even though Instagram users are capable of importing videos stored on their PCs to Instagram through their phones, most of them don’t know how. Well, the following are all of the steps you need to complete in order to import a video on your PC to Instagram:
Step 1: Ensure that the video has the right specifications
The first thing you need to do is make sure that the video you want to import to Instagram complies with all of Instagram’s requirements pertaining to videos. Since Instagram now supports the uploading of images and videos that are not perfectly square (or, for the technical-minded, 640 x 640 pixels) – which all Instagram users thank the heavens for, all you need to do is make sure that the video you want to import to Instagram from your PC is no longer than 15 seconds. Instagram does not support the uploading of videos that are in excess of 15 seconds in duration. For those of you who like technical jargon, the frame rate per second of the video should be set at 25, the video should be exported using the H264 codec and the video file’s bit rate should be less than 35,000 Hz.
Step 2: Import the video to your phone
Next, you need to import the video to your phone so that it can then be imported to Instagram. To do so, go through one of the following sets of steps depending on the device you are using:
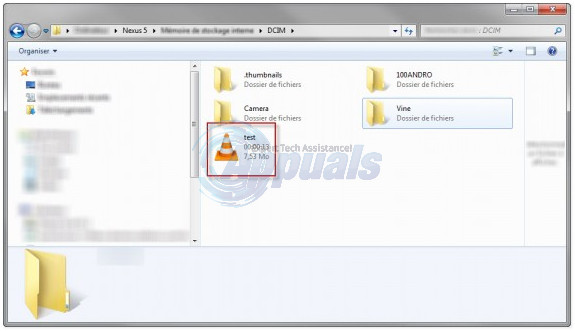
On Android or Windows Phone:
Connect the phone to your computer via USB.
Unlock the phone to allow your computer to access the phone’s storage via the File Explorer.
Copy the video you want to import to Instagram.
Paste the video in the DCIM folder (on Android) or the Camera Roll folder (on Windows Phone).
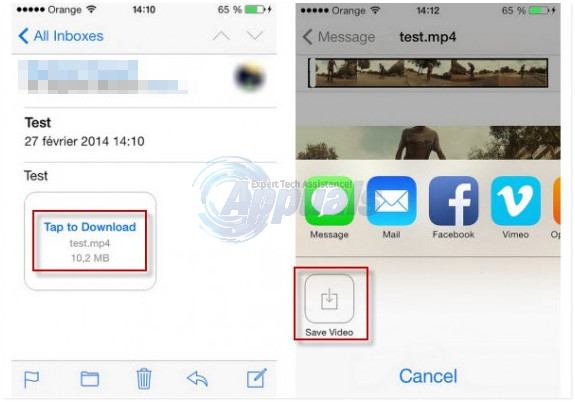
On iOS:
On iOS, it would be much easier for you to simply mail yourself the video and then save it to your device rather than sync the video to your device via iTunes. To do so, you need to:
Send an email to yourself with the video you want to import to Instagram as an attachment.
On the iOS device, open the Mail
Open the email you just sent to yourself.
Tap on Tap to Download.
Tap on Save Video.
Once the video has been downloaded, it will be saved to your device’s Camera Roll.
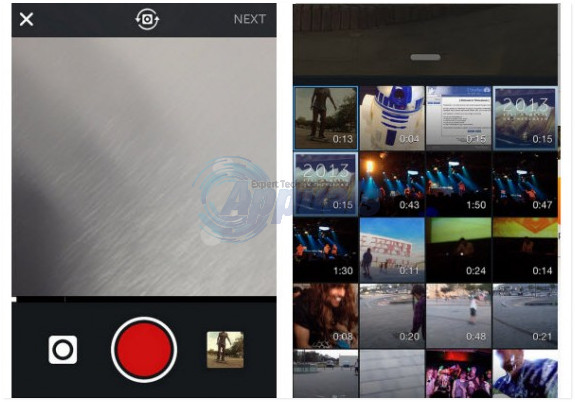
Step 3: Upload the video to Instagram using your phone
Launch Instagram on your phone.
If the video’s specifications are in accordance with Instagram’s requirements, it will appear in your Gallery or Camera Roll when you choose to upload a photo or video to Instagram from the app. If it doesn’t appear, recheck to make sure that its specifications are correct.
Select the video from the Gallery or Camera Roll by tapping on it.
Once you have selected the video, go through the normal Instagram media publishing process and upload the video to your Instagram for all of your followers to see.
Once you have uploaded the video to Instagram, you can share it to your Facebook, Twitter and even Tumblr! Using this method, you can upload high quality videos to your Instagram even if you don’t have a Smartphone that is equipped with the most state of the art in mobile camera technology.