How to Update Gateway Desktop or Laptop BIOS
BIOS stands for Basic Input Output System. This is a set of coded statements that reside on a chip within your system’s motherboard. When a computer boots up, it retrieves instructions from the BIOS located in this chip regarding the location of the operating system, among other things. Moreover, the BIOS is responsible for facilitating communication between the core operating system and the hardware.

BIOS updates are released less frequently by Gateway. Unless you are facing a specific issue, such as compatibility problems when installing new hardware that can be resolved through a BIOS update, you should choose to update your BIOS only then.
Before updating the BIOS, it is highly recommended that you back up the data from your system.
Method 1: Through a Windows Operating System
To update your BIOS on your Gateway computer/laptop, you will first have to check which is the current version of BIOS on your system.
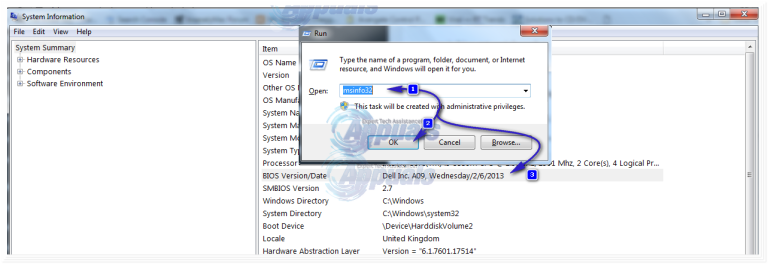
- Press the Windows key + R. In the run window dialog box, type msinfo32 and press Enter. A System Information window will open.
- In that window, make sure the title “System Summary” is selected in the left pane. In the larger right pane, locate BIOS Version/Date. The value against it will be your BIOS version. Value against OS will be your Operating system. Value against System type will be it’s bitness. If its x64, you have a 64 bit windows. If its x86, you have a 32 bit windows. Value against “System Mode” will be your exact system model. Note all of this exactly the way it can be seen, you’ll need it in further steps.
- You can use your serial number to search for drivers on Gateway’s website. To find your serial number, press the Windows key + R. In the Run dialogue box that appears, type ‘cmd’ and press the Enter key.
- In the black cmd window, type the following command:”.
- Get the serial number of the BIOS using WMIC.
- Press Enter to run the command. Note all the characters under ‘Serial Number,’ as this is your serial number.
- Now to check for BIOS updates, go here on your internet browser.
- Enter your serial number in the field below ‘Search by Serial Number or SNID,’ or, input your system’s model (e.g. PX9480M) under ‘Search by Product Model.’ Alternatively, you can manually search for your model under ‘See my product from a list’. To do so, first select the type, then the model, then the series, and finally your exact system model.
- Now select your exact system’s model in the search results.
- Your model’s support page will open below. Make sure “Latest” is selected on the left.
- Select the operating system you noted down before, next to ‘Operating System:’.
- Now click BIOS in the category row.
- Check for an updated BIOS in the version and date column. If a newer version exists, press the “Download” button to the far right of it. If there is no updated version file available or no BIOS update file at all, then you already have the latest version. If your operating system is not listed, you cannot install the BIOS update through this method on your current operating system. However, you can use the downloaded file in Method 2.
- The downloaded item will be an application (e.g., Q5WV1113.exe). Make sure all running applications in the background are closed, and when you are ready, run it. Now, follow the on-screen instructions to update your BIOS.
- If the downloaded file is in a zip format, such as BIOS_Gateway_1.13_A_A.zip, double-click to open it. There should be a single folder within it to open. You should find a file named winphlash.exe in this folder. Run this file and then click the ‘Flash BIOS’ button located at the bottom.
- Follow the on-screen instructions to the letter. Do not turn off your computer or laptop under any circumstances until the updating process is 100% complete. In the case of a laptop, ensure the battery is installed in the laptop and the AC adapter is connected the entire time the BIOS update takes place.
Method 2: Through a Bootable Flash Drive.
Your system model will be written on your system’s body, and the serial number will be printed on a sticker at the bottom of your laptop or on the bottom right of your CPU’s right panel.
- To know the current BIOS version, access the BIOS setup by pressing F1 repeatedly while powering on your system. On some older models, it’s F2. Once in the BIOS setup, you can easily see which BIOS version you have.
- Download the latest BIOS version now from the page shown in Method 1.
- Connect the flash drive that you’re going to make bootable with your system. Press the Windows key + E to open Windows Explorer. Back up any data from the flash drive.
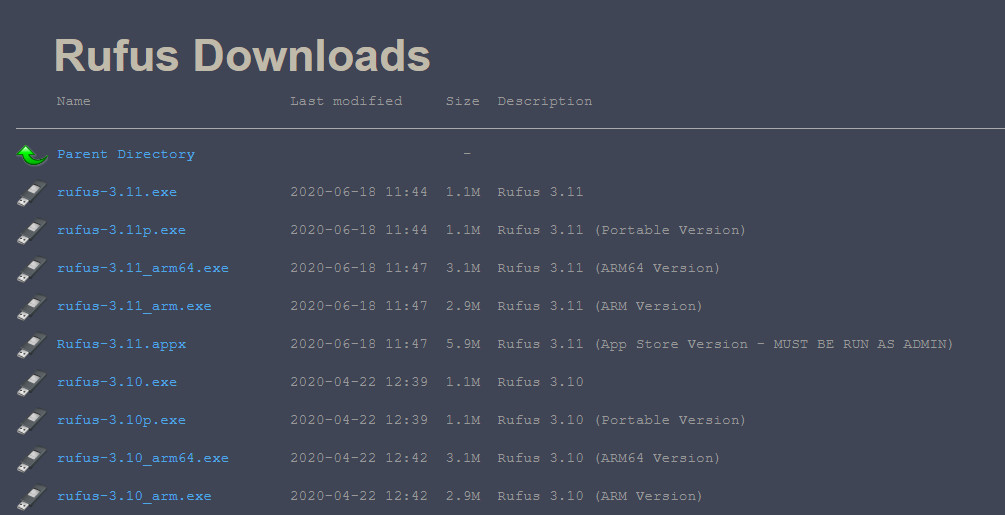
- Download Rufus from this link. We will use it to make the Flash drive bootable. Open the downloaded file.
Rufus - Firstly, select your Flash drive under ‘Device’. Secondly, select ‘FAT32’ from the drop-down menu under ‘File system’. Lastly, choose ‘FreeDOS’ next to the option ‘Create a bootable disk using’, and then click ‘Start’.
- Click close when the process is complete.
- If the downloaded BIOS update file is an application (e.g. Q5WV1113.exe), then simply copy it to the Flash drive. Note down the exact name of the file.
- If the file is a zip folder, (for example, BIOS_Gateway_1.13_A_A.zip), double-click to open it. Then, open the single folder contained within. After that, locate and open the folder named ‘DOS’. Copy all of its content to the flash drive you have recently made bootable
- Now, connect the flash drive to the target system whose BIOS you want to flash/update. Power it on. Press the ESC or F10 key (or F12 in some models) while the Gateway screen is flashing during the startup process. This action will give you access to the boot menu.
- In some models, you may have to enable the boot options by entering the BIOS setup through F2 or F1. Afterward, proceed to the Main tab and navigate to the F12 Boot Menu. Ensure that it’s enabled, save the changes, and restart your system.
- Now in the boot menu, highlight your Flash drive/USB from the boot menu. Press Enter to boot from it.
- A command prompt window will appear. Type C: and press Enter.
- Type dir to list the files on the flash drive.
- Now, type the exact filename of the BIOS update executable file that you copied, for example, Q5WV1113.exe, then press ‘Enter’. If you copied the contents of the zip folder, then type ‘autoexec.bat’ and press ‘Enter’.
- However, to improve clarity, consider the following revision: “Follow the on-screen instructions and avoid turning off your computer or laptop under any circumstances during the update process. If you’re using a laptop, ensure the battery is installed and connected to the AC adapter throughout the duration of the update.
This guide covers the BIOS flashing for the most common models. If the methods described here didn’t work for you, please tell us your exact model. We will provide the specific method for BIOS flashing related to your model in our next guide.