How to Fix ‘Start menu/ms-settings’ not Working Windows?
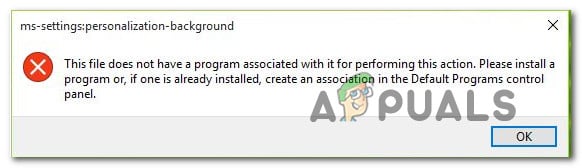
Several Windows 10 users are reporting that they are suddenly unable to open the main Settings app. Upon trying to open the Settings app (via Start menu or Run command) affected users see the “This file does not have a program associated with it for performing this action”. In most user reported cases, this problem started occurring after they’ve upgraded from Windows 7 or Windows 7 to Windows 10.
What’s causing the ‘Start menu/ms-settings’ to stop working?
We investigated this particular issue by looking at various and trying out different repair strategies that are commonly recommended by other users that faced the same problem. As it turns out, several different scenarios might lead to the apparition of this issue. Here’s a quick rundown of scenarios that might trigger this problem:
- Unregistered Settings application – As it turns out, this particular issue can occur due to a sudden de-registering of the Settings app. This is commonly reported to occur after a security scan reveals some inconsistencies with the suite of UWP applications. If this scenario is applicable, you should be able to resolve the issue by reinstalling and re-registering all UWP applications active on that user account.
- Settings app is blocked due to security reasons – Under certain circumstances, the default security option might facilitate the malfunctioning of the Settings app by blocking the menu due to security reasons. If the user is frequently deploying scripts that involve adjustments in the Settings app, Windows Security (former Windows Defender) might block this procedure on accounts without a password. Whenever this happens, you can resolve the issue by adding a password to the affected Windows account.
- System File corruption – As various users have reported, this issue can also occur due to some underlying file corruption instances that are preventing the Settings app menus from opening properly. In this case, you can resolve the issue by running DISM or SFC commands or by restoring your system to a healthy point in time using the System Restore utility.
- Corrupted OS files – In more severe cases, you might need to reset the whole suite of Windows components to resolve this problem. According to affected users that were struggling with an underlying selection of corrupted OS files, you can treat the symptoms of this problem by either performing a repair install or a clean install.
If you’re currently struggling to resolve the same issue, this article will provide you with several applicable fixes that might end up resolving the issue for you. Down below, you’ll find a collection of methods that other users in a similar place have successfully used to resolve the issue. Each potential fix has been confirmed to work by at least one affected user.
For the best results, we advise you to follow the methods below in the same order that we arranged them in (via their efficiency and difficulty). Eventually, you should find a potential fix that will resolve the issue regardless of the culprit that’s causing it the problem.
Method 1: Reinstall and Re-register all UWP applications
Before you explore any other repair strategies, you should start by ensuring that the issue is not solely occurring due to a corrupted item or because the Settings app is not properly registered.
Several affected users have reported that they managed to resolve the issue after they reinstalled and re-registered all built-in Windows apps under the Windows account that was encountering the issue.
Here’s a quick guide on reinstalling and re-registering all built-in UWP applications including the Settings app. Here’s a quick guide on doing this:
- Press Windows key + R to open up a Run dialog box. Then, type “PowerShell” and press Ctrl + Shift + Enter to open up an elevated Power shell window. When you’re prompted by the UAC (User Account Control) prompt, click Yes to grant administrative privileges.
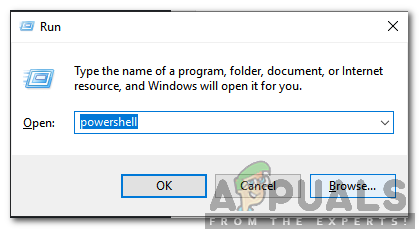
Typing in “Powershell” and pressing “Shift” + “Alt” + “Enter” - Once you’re inside the elevated Powershell window, type the following command and press Enter to reinstall and re-register all Windows built-in apps for this account:
Get-AppXPackage | Foreach {Add-AppxPackage -DisableDevelopmentMode -Register "$($_.InstallLocation)\AppXManifest.xml"}
- Keep in mind that in case you’re encountering the issue on multiple accounts, you need to repeat this procedure with all of them.
If you’ve performed the instructions above and you’re still encountering the same issue, move down to the next potential fix below.
Method 2: Adding a password to the Windows account (if applicable)
As it turns out, one popular fix for this particular issue is to use an elevated Command Prompt to add a password to the windows account. This might seem like weird fix, but a lot of affected users have confirmed that they were suddenly able to open the Settings app and any other app that was previously showing the “This file does not have a program associated with it for performing this action” after they added a password using an elevated CMD prompt.
Here’s a quick guide on resolving the issue ‘Start menu/ms-settings’ Not Working issue by adding a password to the Windows account using an elevated CMD:
- Open up a Run dialog box by pressing Windows key + R. Next, type “cmd” inside the newly appeared text box and press Ctrl + Shift + Enter to open up an elevated Command Prompt. When you’re prompted by the UAC (User Account Prompt), click Yes to grant admin access.

Running Command Prompt - Once you’re inside the elevated Command Prompt, type the following command and press Enter to add a password to your user account:
net user username password /add
Note: Keep in mind that “username’ is only a placeholder. Replace it with the account that you’re encountering the issue on.
- Next, press Windows key + R to open up another Run dialog box. Then, type “control.exe /name Microsoft.UserAccounts‘ and press Enter to open up the User Accounts menu.
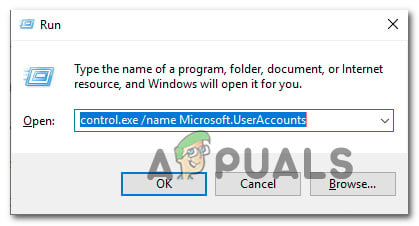
User accounts menu - Once you’re inside the User Accounts menu, click on Manage another account from the right-hand menu.

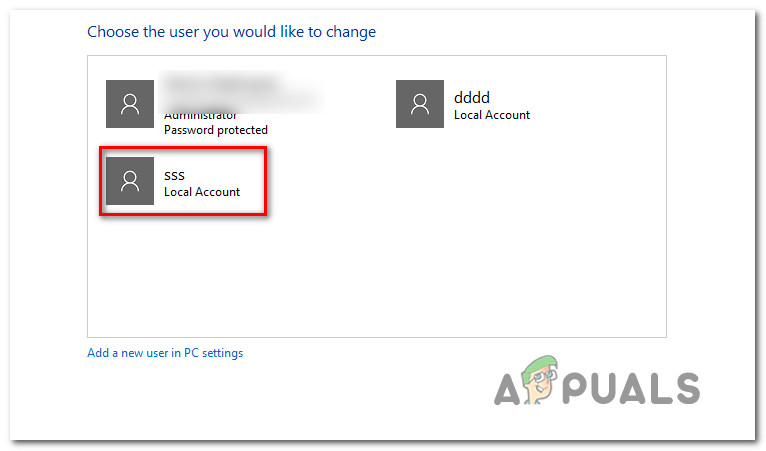
Accessing the account that we previously modified - From the Manage Accounts screen, click on the account that you previously added a password to.
Accessing the account that you previously added the password to - Next, from the Change, an Account menu, click on Change the account type.
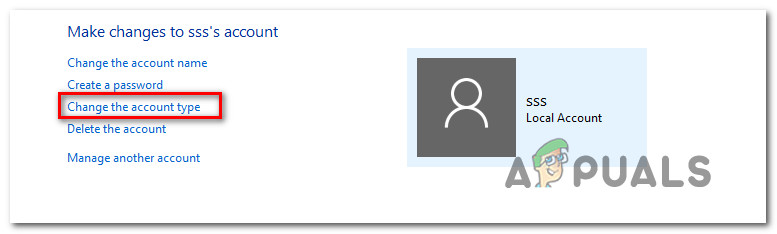
Changing the account type - Once you’re inside the Change Account Type menu, change the account type to Administrator and click on Change Account type to save the change.

Changing the account type to administrator - Ensure that you’re logged into the account that you previously modified, then repeat the action that was previously causing the problem and see if the issue is resolved.
if you’re still encountering the “This file does not have a program associated with it for performing this action” when you try to open up a Settings sub-app, move down to the next method below.
Method 3: Deploying DISM and SFC commands
In most cases, this particular error will occur due to some corrupted system files that ended up affecting the functionality of your computer. If several built-in apps (Settings app, Notepad, etc.) are all showing this error, you’ll need to start by fixing your system files.
Several affected users have reported that they managed to resolve the issue by running a couple of built-in utilities capable of resolving system file corruption – SFC (System File Checker) and DISM (Deployment Image Servicing and Management)
But keep in mind that even if both utilities are capable of resolving system file corruption, the two built-in scanners have different approaches. SFC is better at fixing logical errors and relies on a locally stored cache to replace corrupted files with healthy copies. DISM, on the other hand, uses WU (Windows Update) to replace corrupted files and is way better at repairing built-in utilities.
Here’s a quick guide on performing DISM & SFC scans:
- Press Windows key + R to open up a Run dialog box. Once you’re inside the Run window, type “cmd” inside the text box and press Ctrl + Shift + Enter to open up an elevated CMD prompt.
Running Command Prompt Note: If you’re prompted by the UAC (User Account Control), click Yes to grant administrative privileges to the CMD window.
- Once you’re inside the elevated Command Prompt, type the following command and press Enter to open up an SFC scan:
sfc /scannow
Note: Ensure that you have enough time on your hands before starting this process. Interrupting the SFC scan before the process is finished by produce additional logical errors. And keep in mind the SFC is notoriously known for fixing errors without reporting them. So even if the final report doesn’t mention any corrupted files that have been fixed, proceed with the next steps below normally.
- As soon as the scan is finished, restart your computer and see if the issue is resolved at the next system startup. Once the next boot sequence is complete, follow step 1 again to open up another elevated command prompt.
- Once you’re inside the CMD prompt once again, type the following command again and press Enter to initiate a DISM scan:
DISM /Online /Cleanup-Image /RestoreHealth
Note: DISM relies heavily on Windows Update to replace file corruption, so ensure you are working with a stable internet before initiating this scan.
- After the scan is complete, restart your computer once again and see if the issue is resolved at the next system startup.
If you’re still unable to open any Settings tab and you see the “This file does not have a program associated with it for performing this action”, move down to the next method below.
Method 4: Performing a System Restore
If none of the methods above have allowed you to resolve the issue, chances are you’re dealing with an underlying system corruption issue. In situations like this, you can still avoid the radical approach (clean install) by going for a damage-controller approach.
System Restore will revert your computer to a previous point in time by using a previously created snapshot that will restore your computer state to an older point in time. By default, Windows is configured to save new snapshots regularly (after every important system change like a critical update installation or a driver update). With this being said, unless you modified the default behavior, you should have plenty of restore snapshots to choose from.
But before you start using System restore to bring back your computer to a healthy state by using a snapshot, keep in mind that any change you made after the snapshot will be a list. This includes any installed apps and drivers, 3rd party or Windows native apps.
If you are aware of the data loss risks and you’re still prepared to use System restore to bring fix issues related to Start menu/ms-settings, move down to the next method below:
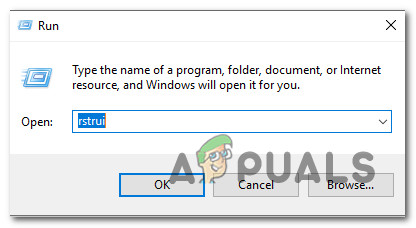
- Open up a Run dialog box by pressing Windows key + R. Next, type “rstrui” inside the text box and press Enter to open up the System Restore menu.
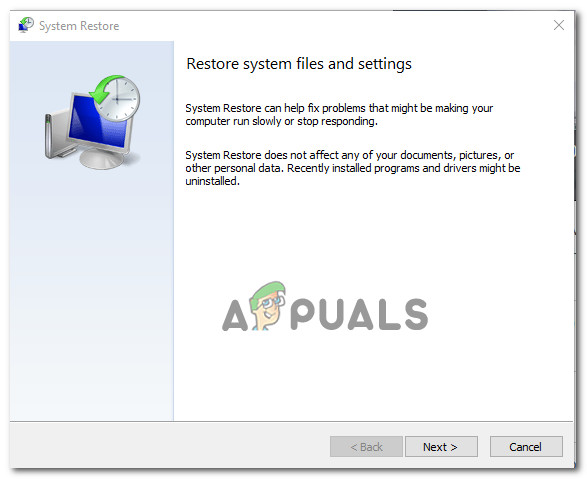
Opening the System Restore wizard via Run box - Once you’re at the initial System Restore screen, click on Next to advance to the next menu.
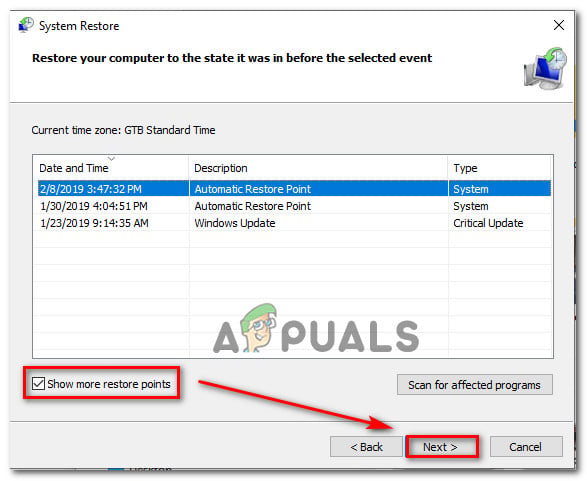
Using System Restore - Once you’re at the next screen, start by checking the box associated with Show More Restore points. After you do this, start comparing the dates of each saved snapshot and see which one is closer to a date before the apparition of the error. After you decide on the appropriate snapshot, ensure that the restore point is selected, then click on Next to advance to the next menu.
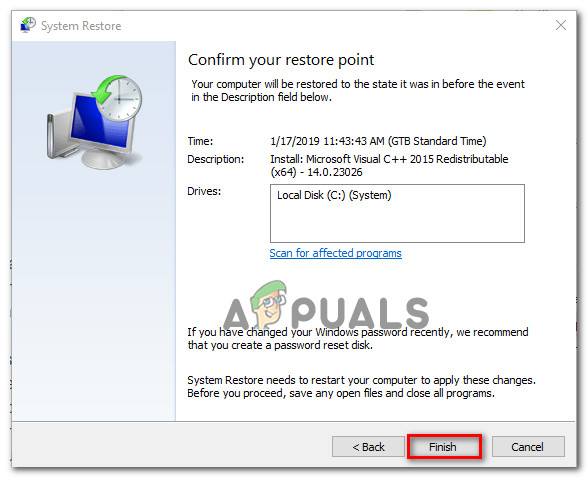
Restoring your system to a previous point in time - Once you get to this point, the utility is configured and ready to go. All that’s left to do now to initiate the restoring process is to click on Finish. After you do this, your machine will restart and the older state will be enforced.
Starting the System Restore process - At the next system startup, once the older state is enforced, repeat the action that was triggering the Start menu/ms-settings issues and see if the issue is now resolved.
Method 5: Performing a repair\clean install
If none of the methods below have allowed you to resolve the issue, you can safely conclude that you’re dealing with a corruption issue that can’t be resolved conventionally. If you’ve come this far without a result, one last resort that will resolve the issue is to refresh every Windows component.
Several affected users facing this exact problem have reported that the issue stopped occurring after they refreshed every Windows component – either by performing a repair install or via a clean install.
A clean install is easier to perform, but keep in mind that it won’t allow you to keep all your data. Applications, games, personal media and all user preferences will be lost along with this process.
If you’re looking for a better approach, consider a repair install instead. Although it’s a little more tedious, a repair install (in-place upgrade) will allow you to keep your applications, games, personal media and some user preferences.


