How to Fix Equalizer APO not Working on Windows?
Having complete control over sound coming out of your PC is something plenty of users crave for but they don’t seem to be satisfied with options provided by Microsoft. Instead, many users use third-party equalizers for the purpose. Equalizer APO is a prime example of this but users have reported that it simply won’t work.
Equalizer APO opens and appears to be working properly but it simply doesn’t affect the audio coming out of your computer. There are several methods other people used to resolve this problem so make sure you check them out!
What Causes Equalizer APO not to Work on Windows 10?
Here is a list of a couple of causes which can make Equalizer APO not work on Windows 10. Determining the correct cause to the problem is one of the most important steps in resolving it. Check out the shortlist below!
- Device enhancements disabled – If enhancements are disabled for the problematic device in its properties, Equalizer APO might not work properly with the device. Make sure you fix this to resolve the problem!
- Hardware acceleration of audio – If hardware acceleration of audio is enabled in the device’s properties, certain issues may appear and Equalizer APO might not work with the device. Disable hardware acceleration and check to see if the problem persists.
- Blocked by antivirus – Antivirus tools may recognize Equalizer APO as malicious and some of its features may be blocked without you being aware of it. Make sure you add an exception for its main executable.
Solution 1: Install as SFX/EFX
Even though this is listed as an experimental feature in the Configurator window, installing as SFX/EFX managed to resolve the problem completely for many users and we hope it will do you good as well. It’s very easy to perform and it costs nothing to try. Check it out below!
- Open the Configurator program for Equalizer APO by searching for it in the Start menu. Click the Start menu button and start typing. Click the first available result.
- Under the Playback devices tab, select all devices you want to use with the equalizer by checking the boxes right next to them.
- Make sure that both the “Use Original APO” boxes are unchecked.
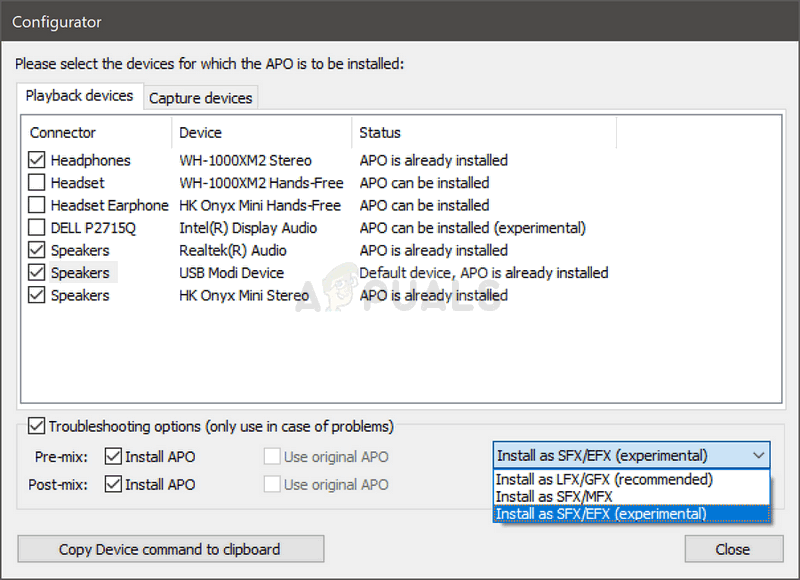
- Check the box next to the Troubleshooting options (only use in case of problems), click the arrow to open the dropdown menu and choose the Install as SFX/EFX (experimental) option from the menu.
- Apply the changes, close the Configurator, and reopen Equalizer APO to see it it works now!
Note: If that doesn’t work, make sure you try to uncheck the boxes next to two Use original APO entries in Troubleshooting options. This has helped other users so make sure you try it out!
Solution 2: Make Sure Enhancements are not Disabled
It’s possible to disable all enhancements for the specific playback device. This prevents you from using Equalizer APO to enhance the audio for the device and you can see that no matter what you do, nothing happens with the audio on your computer. Make sure you enable enhancements in your device’s properties window!
- Right-click on the Volume icon located at the bottom right part of your screen and choose Sounds option. An alternative way would be to open the Control Panel on your PC and set the View by option to Large icons. After that, locate and click on the Sounds option to open the same window.
- Navigate to the Playback tab of the Sounds window which just opened up.

Playback devices - Left-click your device and click the Properties button. Navigate to the Enhancements tab in the Properties window and uncheck the box next to the Disable all enhancements option. Click the OK button and check to see if Equalizer APO works now!
Solution 3: Disable Hardware Acceleration of Audio
This option is not available to everyone. The people who have it in their audio output device’s properties should consider disabling it for the sake of Equalizer APO working again. Several users claim that this is all it took for them to resolve the problem so make sure you check it out!
- Right-click on the Volume icon located at the bottom right part of your screen and choose Sounds An alternative way would be to open the Control Panel on your PC and set the View by option to Large icons. After that, locate and click on the Sounds option to open the same window.
- Navigate to the Playback tab of the Sounds window which just opened up.
Playback devices - Left-click on your headset and click the Properties Navigate to the Advanced tab in the Microphone Properties window and check the Hardware acceleration section.

Disabling audio hardware acceleration - Uncheck the box next to the Allow hardware acceleration of audio with this device option. Check to see if Equalizer APO works properly now!
Solution 4: Make an Exception for it in Your Antivirus
Many programs fail to work properly if they are recognized as a threat to your antivirus program. Creating an exception for Equalizer APO is the right thing to do when troubleshooting this issue so make sure you follow the steps explained in Solution 5.
However, make sure you add the Equalizer APO executable in the box which will appear prompting you to navigate to the installation folder. It should be in the same folder where you decided to install Equalizer APO in. By default it’s:
C:\Program Files (x86)\Equalizer APO
Check to see if you are now able to use Equalizer APO properly. If it still won’t work, try restarting your computer and try again. The last step would be to uninstall the antivirus and try a different one if the same issue persists.
Solution 5: Delete a Registry Key
This is probably the most advanced method you can use to resolve issues with Equalizer APO. It involves taking ownership and deleting a registry key. This method was suggested by a user on an internet forum and it has since helped countless users deal with this problem. Check it out below!
Please back up your registry keys before proceeding with this method using these (steps).
- First, you need to find out the name of the registry value you need to delete. This can be done using the Configurator. Open Configurator by searching for it in the Start menu. Click the Start menu button and start typing. Click the first available result.
- Under the Playback devices tab, select the device you want to use with the equalizer and click the Copy Device command to clipboard button at the bottom.
- Paste the command somewhere. The text you copied should look something like this:
Device: High Definition Audio Device Headphones {64e620cf-acc0-4d70-ac8f-c569b893ff4d}- The bolded part is very important so take note of it as it represents the name of they you will need to delete.
- Since you are going to edit a registry key, we recommend you check out this article we have published for you to safely backup your registry to prevent other problems. Still, nothing wrong will occur if you follow the steps carefully and correctly.
- Open the Registry Editor window by typing “regedit” in the search bar, the Start menu, or the Run dialog box which can be accessed with the Windows Key + R key combination. Navigate to the following key in your registry by navigating at the left pane:
HKEY_LOCAL_MACHINE\SOFTWARE\Microsoft\Windows\CurrentVersion\MMDevices\Audio\Render
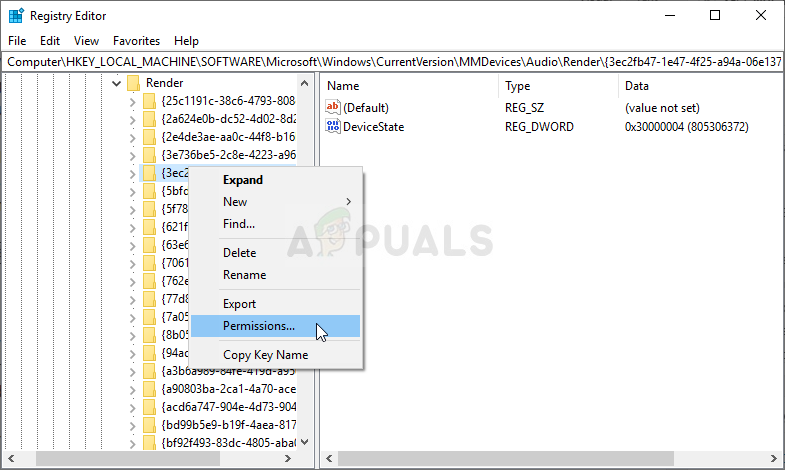
- Expand the last key, locate a key named like the bolded part above, right-click on it, and choose the Permissions option from the context menu which will appear.
- Click the Advanced The “Advanced Security Settings” window will appear. Here you need to change the Owner of the key.
- Click the Change link next to the “Owner:” label The Select User or Group window will appear.

- Select the user account via the Advanced button or just type your user account in the area which says ‘Enter the object name to select’ and click OK. Add the Everyone
- Optionally, to change the owner of all subfolders and files inside the folder, select the checkbox “Replace owner on subcontainers and objects” in the “Advanced Security Settings” window.

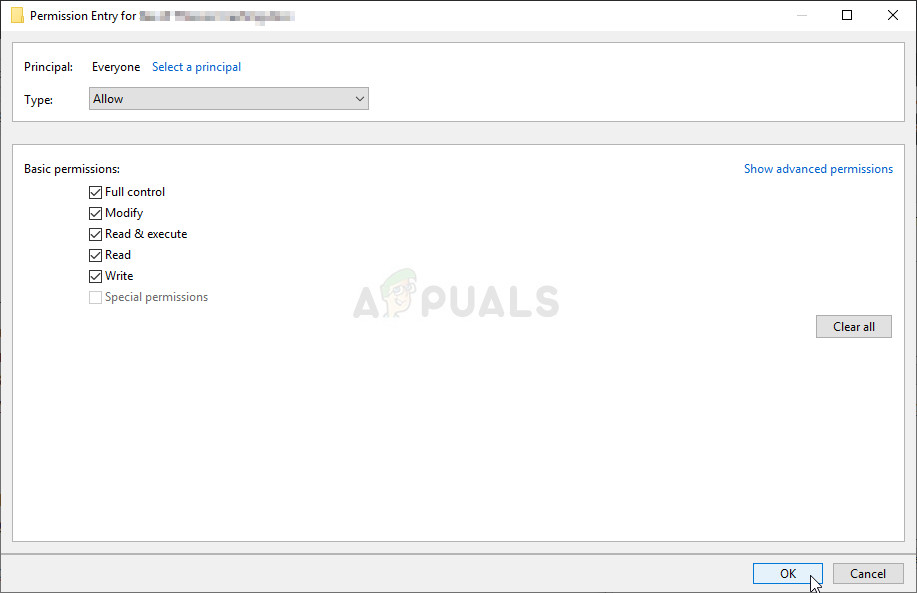
- Click the Add button below and follow it up by clicking the Select a principal button at the top. Select the user account via the Advanced button or just type your user account in the area which says ‘Enter the object name to select‘ and click OK. Add the Everyone
- Under the Basic permissions section, make sure you choose Full control before applying the changes you have made.
- Apply everything, right-click the key, and choose the Delete option from the context menu which will appear. Restart the computer and reinstall APO using the Configurator. Check to see if Equalizer APO now works properly!
Solution 6: Perform a Clean Install
Performing a clean install is a neat way of starting over with Equalizer APO and we highly recommend you try it out if everything above fails to provide results. Uninstalling it in Control Panel may not be enough and you will have search through the registry for remaining keys and values. Follow the steps below to perform a clean install of Equalizer APO!
- Click the Start menu and open Control Panel by searching for it simply by typing with the Start menu window open. Alternatively, you can click the cog icon in the lower-left part of the Start menu to open the Settings app if you are using Windows 10.

Opening Settings from the Start menu - In Control Panel, select the View as: Category option at the top right corner of the Control Panel window and click on Uninstall a Program under the Programs section.
- If you are using the Settings app, clicking on Apps should immediately open a list of all installed programs on your PC so wait for a while for it to load

Uninstall a program in Control Panel - Locate Equalizer APO in Control Panel or Settings and click on Uninstall/Repair. Follow any instructions which appear afterward to uninstall it completely.
- Since you are going to edit a registry key, we recommend you check out this article we have published for you to safely backup your registry to prevent other problems. Still, nothing wrong will occur if you follow the steps carefully and correctly.
- Open the Registry Editor window by typing “regedit” in the search bar, the Start menu, or the Run dialog box which can be accessed with the Windows Key + R key combination. Click the Edit button at the menu bar at the top of the window and click Find. You can also use the Ctrl + F key combination.

Finding all Equalizer APO related entries in the registry - In the Find window which will appear, make sure you type Equalizer APO in the Find what box and click the Find Next button afterward. A result value or key will appear. Make sure you right-click it and choose the Delete option from the context menu which will appear.
- Click Edit >> Find Next or use the F3 button to search for other entries and make sure you delete them all. Make sure you search for Equalizer as well! You can also use CCleaner to automate this process

Find Next in the registry - Download the latest version of Equalizer APO by visiting this link. Download its setup file, run it from the Downloads folder, follow the instructions on screen, and check to see if the problem persists after reinstalling it!