How to Create a Multiboot USB Flash using WinSetupFromUSB
A Multiboot disk or a USB is a media that can boot into multiple operating systems and install them. This is ideal for PC technicians who are doing a couple of installations every now and then.
WinSetupFromUSB is a Windows program, which prepares multiboot USB flash or fixed disk to install any Windows versions since 2000/XP, boot various Linux and *BSD flavors, as well as many Windows, Linux, DOS based and other utilities.
We will show you a complete guide to setting a USB up with different ISOs. WinSetupFromUSB can be downloaded via this link. The software is great and the ISOs you can add via it can be of any other operating system as well; like a Linux distribution for example.
One small step before you begin loading the ISOs on to the USB is ensuring that there is in fact enough space on the drive to hold all the ISOs that you want to install. Once you are sure that there is space, move over to the folder where you downloaded the WinSetupFromUSB tool. It’s a portable tool that doesn’t require any installation and you will soon find that it’s very easy to use. The installation folder will contain two executable files. If you are going to run the program on a 64-bit architecture then choose the file, the name of which ends in “x64”; if you have a 32-bit OS, choose the other one. With the tool launched, follow these steps:
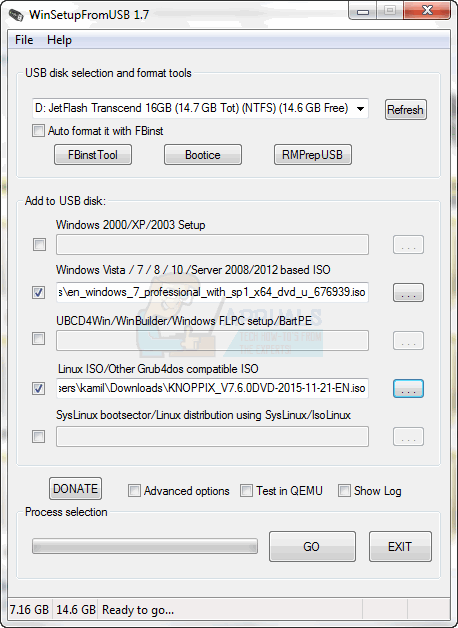
At the top of the tool, you will find a bar that’s supposed to hold the name and the description of the target USB drive. If the drive is already inserted, you should find it described in the space. If not, then insert it and click on “Refresh” and it should appear.
There is an “Advanced options” checkbox present in the window. Click on it.
This doesn’t really function as a checkbox so when the pop-up window appears, please don’t feel too fascinated. In the Advanced options window, select the “Custom menu names for Vista/7/8/10/Server Source” checkbox which can be found under the Vista/7/8/10/Server 2008/2012 Setup/PE section. Checking this box will allow you to enter the names of the folders in which you want the ISOs to be installed in. Close the window.
Now, please pay attention if you aren’t already. You will be adding ISOs from this step onward. When you add the first ISO, ensure that the “Auto format it with FBinst” checkbox is checked. This will allow the tool to format the target drive before throwing in the first ISO. This is necessary because it clears out any file system discrepancies that might exist on the drive.
If you know with certainty that you will be booting a computer within the UEFI mode then you can select “FAT32”, otherwise you can just select “NTFS”.
Now under the “Add to USB disk” section, you will select your first ISO. Check the box that is behind the text field in the “Vista/7/8/10/Server 2008/2012 Setup/PE” section.
Click on “Browse” button (the three dots) next to the field and make your way to where the ISO is located.
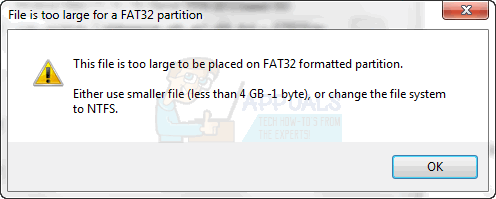
If you are using FAT32 and if the file is too large, you will be asked for permission to chop the file down into two parts or format the USB as NTFS. Click on “OK”.
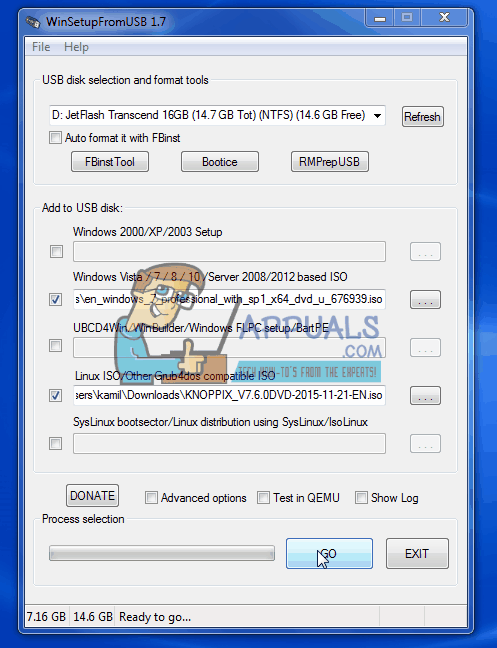
Before proceeding, take a few seconds to double check that the target drive is in fact the actual USB and that the ISO added is the one that you want to add. If you get warnings because of the size of your USB or because you have selected the auto-format checkbox, then don’t bother and just continue.
The formatting process will then begin and you will be asked to enter the name of the folder in which you want the ISO to be installed in. Don’t think too hard though because if you don’t enter anything within 30 seconds, the installer will choose the default name. The length of the name can be between 1 and 7 characters.
Another window, quite similar to the last one will now appear prompting you to enter the name that you want to see in the boot menu for the ISO. Within 30 seconds, you will be asked to add a name that contains between 5 and 35 characters.
Once that’s entered as well, the tool will start creating and adding folders to the USB drive. You can observe the status of the operation in the status bar of the open window.
When the ISO installation is complete, the tool will show a window that says “Job done”.
Now the tool should return to its initial state showing you the initial window again. You can close the program now or choose to add other ISOs. Before you proceed with the addition of multiple ISOs (using the same steps) here are a few things that you need to keep in mind:
The addition of more ISOs to a disk that already contains an ISO requires you to ensure that the “Auto format it with FBinst” checkbox is NOT selected. By default, the checkbox isn’t selected in the tool, but it’s always better to be safe than to be sorry. The formatting should only be carried out for the first ISO addition and if you proceed with the checkbox checked, you will still end up with one ISO at the end of the process: The one you just added.
Every time you add a new ISO, you have to go to “Advanced options” and make sure that you don’t proceed before enabling the “Custom menu names for Vista/7/8/10/Server source” checkbox. It’s of paramount importance that this step isn’t forgotten otherwise you won’t be prompted to choose names for your folders and the defaults will be selected.
Apart from these two mentionable things, you shouldn’t face any problems while adding as many ISOs as your USB can encompass using this excellent portable tool.