How to Configure Minecraft for HD Resources and Shaders
In this Appual’s guide “How to Install Minecraft Mods”, we went through the steps of installing Minecraft Forge, and how to install Minecraft resource packs.
However, many Minecraft users frequently run into problems when attempting to install Optifine HD alongside Forge, or after successfully installing Optifine HD, problems with Minecraft crashing when trying to run HD resource packs.
In this guide, we are going to go over the proper procedure for installing Optifine HD alongside Minecraft Forge, for the latest Minecraft version (1.12.2 as of writing), and also how to properly configure Minecraft to run HD resource packs.
- First of all, install Forge as a Mod on Minecraft
- Next, download the latest version of Optifine.
- Next, you should launch Minecraft, choose the Forge profile, and launch it. This will download some necessary files.
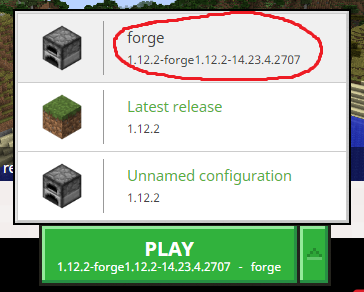
- After you click Play! and Minecraft successfully launches with Forge for the first time, go ahead and exit Minecraft.
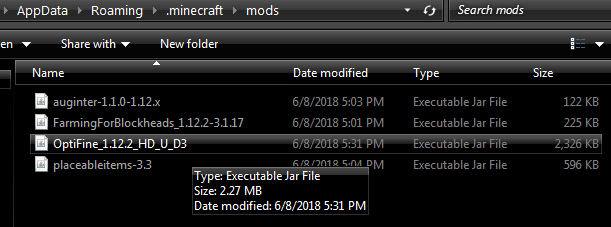
- Now open your C:\Users\[Your Username]\AppData\Roaming\.minecraft folder directly. You should see a folder named ‘mods’ – if not, create one.
- Now, the old method of installing Optifine was to actually install it was a Minecraft profile – but with the latest versions of Minecraft, Forge, and Optifine, you can install Optifine as a regular mod. So you simply need to drop Optifine’s executable .jar file into your mods folder, as seen below.
- Next, to beef up Minecraft’s graphics, you need to install GLSL Shaders, a Shader pack of your choice, and a resource pack of your choice. I’ll give you some recommendations later.
- To install GLSL Shaders, simply download the latest version here. Then drop the .jar file into your Minecraft mods folder, as you did with Optifine.
Why are Minecraft shaders so resource-intensive? I have 4GB VRAM!
Now, this is where we’re going to get into the nitty-gritty. A lot of users are confused as to why Minecraft shaders are so resource-intensive. For example, the absolute best quality shader for Minecraft is SEUS – but it can bring even the most powerful of computers to its knees. Averaging 30 FPS is very common even for computers with Intel I7s, 16GB of RAM, and GTX 1070 4GB VRAM video cards.
Why is this? It is simply because Minecraft shaders are applying their enhancements in real-time. This is different from how other computer games draw their graphics. When shaders are pre-defined and built into the game engine, its much less taxing on your VRAM / CPU. However, Minecraft shaders are being applied on top of the Minecraft engine, which means your CPU / GPU is constantly working to update/refresh/display the shaders. Does that make sense?
So if you’re wondering why Minecraft shaders turn your gameplay into a framed slideshow, there’s your answer. And if you’re wondering if your computer is powerful enough to run SEUS shader on maximum settings, it probably can’t.
Allocating More RAM to Minecraft (and other tweaks)
There are some important things we can do to prevent Minecraft crashing from GPU / RAM overload, and boost FPS a bit while using shaders.
The first thing we need to do is allocate more RAM to Minecraft. This will allow you to run high-resolution texture packs without crashing.
What you need to do is open the Minecraft Launcher, then go to Launcher Options and enable Advanced Settings.
After you enable advanced settings, click your Forge profile and then enable the tab for JVM arguments, as seen in the screenshot below.
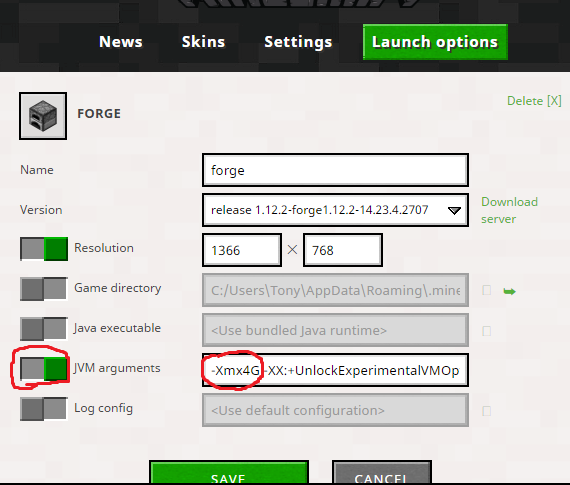
Next, you’re going to change the line that reads “-Xmx1G” to “-Xmx4G”. This will allow Minecraft to use up to 4GB of RAM, instead of the default 1GB. Setting it any higher than 4GB doesn’t really do anything unless you’re using literally a ton of mods.
Now, you can download the HD resource pack of your choice, and drop the .zip file to C:\Users\[Your username]\AppData\Roaming\.minecraft\resourcepacks
Now here’s a thing to know about resource packs. The default texture size for Minecraft is 16×16 – this means that each block is displaying 16 pixels wide and 16 pixels tall. HD resource packs come in other sizes though – typically, it goes 64×64, 128×128, 256×256, 512×512, and 1024×1024, and 2048×2048.
The higher the resolution of the texture pack, the more resources Minecraft will use – this includes VRAM, RAM, and CPU. You should start out by downloading a 128x resource pack, try it out for a bit, and if you get a steady, good FPS, try increasing to the 256x version, and so on until you find a comfortable balance of textures vs performance.
Now, as far as optimizing Minecraft Optifine for HD texture packs, most high-definition / photo-realistic texture packs recommend the following tweaks inside Optifine’s video settings:
- Disable “Fancy Grass”
- Set MipMap levels to 4
- Disable anisotropic filtering (AF is not compatible with shaders)
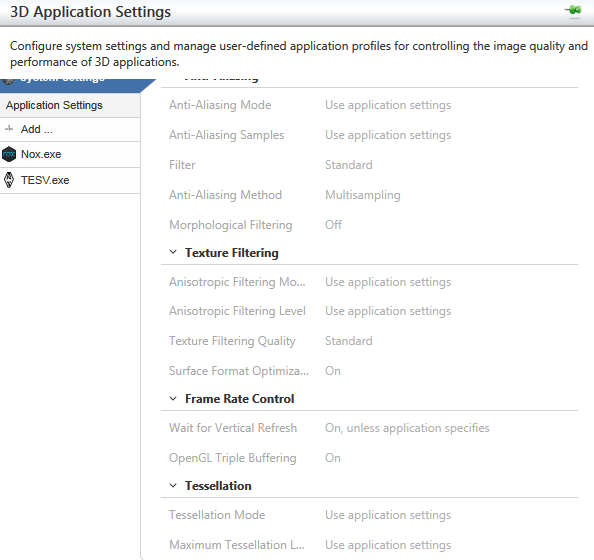
In your graphics card software (AMD Catalyst Control or Nvidia), set everything to “Application Controlled”. If you force AA, anisotropic filtering, etc. through your graphics card panel, you’ll get weird glitches in Minecraft, like white and blue lines between blocks!
Now after you’ve properly configured Optifine and you’re getting a good, steady FPS on Minecraft, its time to enable your shader. This is going to drop your performance a good bit (shaders will cut your FPS by more than half in many cases).
The best low-resource Minecraft shaders are:
- KUDA Shaders (on its Low / Medium settings – setting it to High or Cinematic will absolutely destroy your computer)
- Lagless Shaders
- Chocapic13 (comes in Lite / Low / Medium / High / Ultra / Extreme versions, so download each one to see what your PC can handle)
- Slidur’s (also comes in various versions, so test each one to find the best performance)
To get more FPS while using shaders, you’re going to want to go into the Shader options and adjust things. The things that have the most impact on performance are things like Volumetric Lighting, Distance Blur, Shadow Resolution, Bloom, etc.
While you’re inside a Minecraft game, you can press F3 on your keyboard to bring down the debug menu, which displays your current FPS. Then you can adjust the individual settings in your shader and watch the FPS meter, without going back and forth between the options and the game.
If you have any problems or questions about Minecraft performance while using HD resources and shaders, leave a comment below!


