How to Fix High CPU and RAM Usage by svchost.exe (netsvcs)
Many Windows users experience a bizarre and highly menacing problem where a specific process named svchost.exe (netsvcs) starts requisitioning and using more and more RAM after the affected computer boots and fails to let go of the RAM regardless of how much it accumulates.
What is svchost.exe?
Service Host or svchost.exe is an important Windows Host Process located in C:\Windows\System32 running as an executable file is a dependency of several Windows DLL files and related services without which windows will not work. Since this is a required system process, it can sometimes spike CPU Usage due to external processes that depend on it.
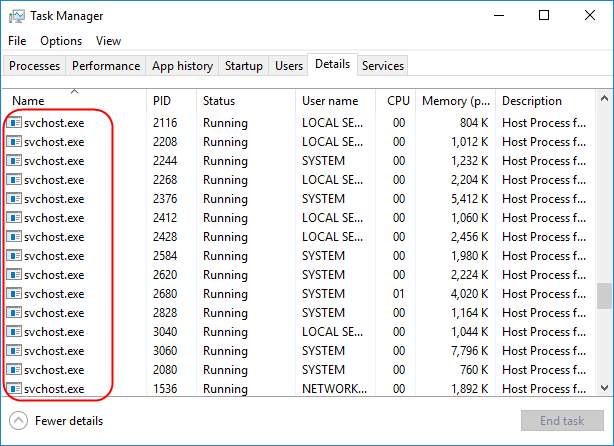
As shown in the picture below, you can see several svchost processes running with system / local and user accounts.
Why Does Svchost.exe (netsvcs) Spike RAM and CPU Usage?
This issue is so severe that the total amount of RAM used by the svchost.exe file (netsvcs) process goes even beyond 50% with the passage of a small amount of time and gets to the point where the affected computer becomes so sluggish that it just can’t be used and needs to be rebooted to become functional for a short time. The number of Windows users who have suffered from this issue in the past is, quite frankly, disappointingly large. While this problem is mostly seen in computers running on the Windows 7 Operating System Windows 8 and 10 aren’t at all immune to it.
The Major Culprit Behind: svchost.exe (netsvcs)
In most cases, the culprit behind this issue is either a virus or malware or a malicious program or service that starts automatically when affected computer boots up. Thankfully, there is quite a lot you can do to try and fix this issue and recover the excessive amount of RAM the svchost.exe (netsvcs) process typically takes over. But before moving on with the solutions, if you are facing the problem on Windows 7 PC, then visit the official Microsoft page to download the update to fix the issue.
The following are some of the most effective solutions for this issue:
Solution 1: Update the WindowsUpdate Client
Try updating the Windows Update Client from the link below depending on your system type. Once updated, test to see if this fixes the issue. (This is for Windows 7)
Download:
If this method fixes the issue, then there is no need to disable updates, however if it doesn’t then you can.
Solution 2: Clear Event Viewer Logs
- Hold the Windows Key and Press R. Type eventvwr.msc and Click OK.
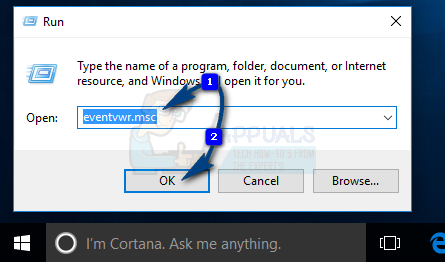
Open eventvwr.msc - From the left pane, expand Windows Logs. Right-click the sub-folders under it and choose Clear Log.
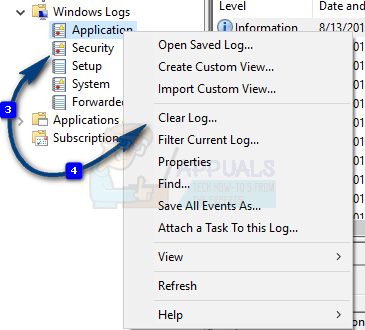
Clear Event Manager Logs - Do this for Application, Security, Setup, System and Forwarded Events
Solution 3: Install All Available Windows Updates
The svchost.exe (netsvcs) process using a boatload of RAM problem has been reported countless times to Microsoft, which is the reason why Windows has released a multitude of different patches for this problem bundled with quite a few of its Windows updates. Regardless of what version of Windows your computer is running on, there should be at least a few updates for your system, updates that include patches or fixes for this issue, and if that is the case, simply downloading and installing these updates should fix this issue for you.
- Open Windows Update. Click on Check for updates.
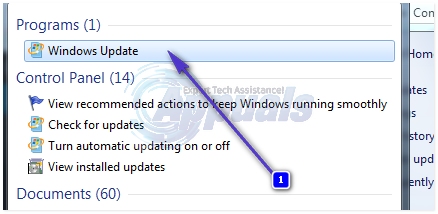
Open Windows Update - Allow your computer to check for and then list all available updates.
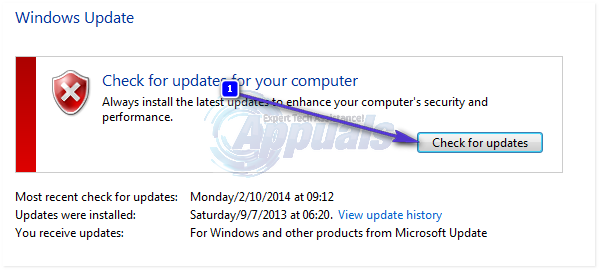
Download and install all available updates. There should be at least one update that contains a patch or fix for this problem among the many Windows updates that you download and install. You certainly can choose to not download some updates, but just be sure that you do not neglect any updates that might contain a patch or fix for this problem – updates such as Windows stability updates and cumulative Windows updates.
Solution 4: Scan Your Computer For Viruses and Malware
The svchost.exe process may be using tons of RAM because of a virus or malware infection. Specific viruses and malware may certain processes on your computer – such as svchost.exe – to start using excruciatingly large amounts of RAM without letting go of any of the RAM that they are no longer using. Since that is the case, another effective method that you can use to try and fix this issue is to download and install an antivirus or anti-malware program such as Malwarebytes and then use it to scan your computer for viruses, malware, and any other security threats.

Solution 5: Disable the BITS Service
The BITS (Background Intelligent Transfer Service) is a component of the Microsoft Windows Operating System that makes use of idle network bandwidth to download data crucial to the system (such as Windows updates) in the background. However, in some cases, the BITS service can malfunction, causing it to siphon off excessively large amounts of bandwidth from the user and also cause the svchost.exe process to start using up an unacceptably significant percentage of the affected computer’s Random Access Memory. If your computer is affected by the svchost.exe process taking up a lot of your RAM problem and BITS is also using a lot of bandwidth, it may be causing the issue in the first place, and if that is so, disabling the BITS service altogether should fix the problem.
- Hold the Windows Key and Press R. Type services.msc and Click OK.
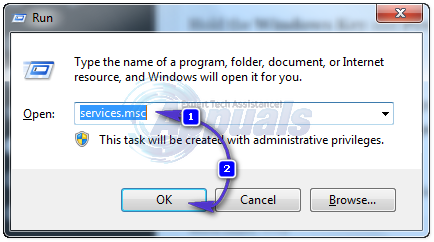
Open services.msc - Locate the service named Background Intelligent Transfer Service and double-click on it. Open the dropdown menu in front of the Startup type. Click on Disabled. Click on Apply. Click on OK. Doing so will disable the BITS service.
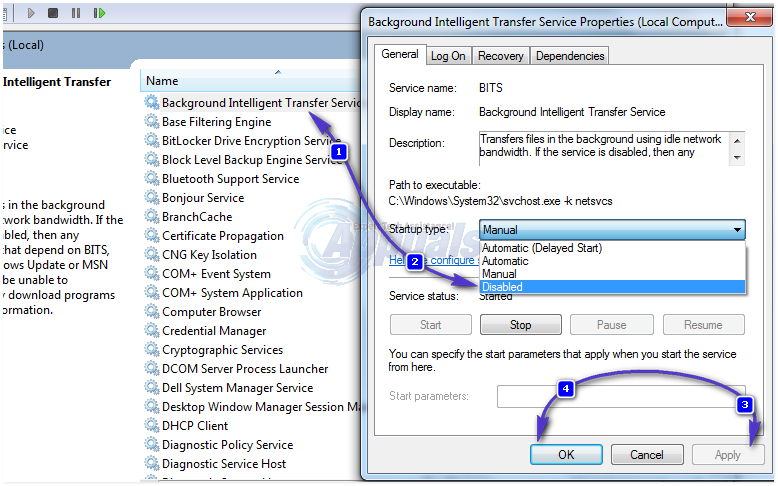
You should not be afraid to disable the BITS service as it will not, in any way, affect the way your computer runs on an everyday basis. If this solution does not get the job done for you, simply move onto the next one.
Solution 6: Disable the Wuauserv Service
The wuauserv service is the name of the Windows Update service. The Windows Update service is infamous for being responsible for the svchost.exe process taking up more than 50% of the total RAM a computer affected by this problem has. If the Windows Update service is causing this issue on your computer, disabling it will do the trick.
- Hold the Windows Key and Press R. Type services.msc and Click OK.

Run services.msc - Scroll down to the Windows Update. Double-click on the Windows Update Open the dropdown menu located in front of the Startup type. Click on Disabled. Click on Apply. Click on OK. This will successfully disable the wuauserv
While disabling the wuauserv service is one of the most effective solutions that you can use to try and get the svchost.exe process to not use a preposterously large amount of RAM, disabling this service will mean that Windows Update will no longer start and stop of its own accord. This means that available updates for your computer will not automatically be downloaded and installed. While this is not something that will hinder everyday operations, keeping your computer and all of its devices and drivers up to date is most certainly important.
Since that is the case, if you choose to disable the wuauserv service and if doing so fixes this issue in your case, be sure to, at least once a month, set the wuauserv service’s Startup type to Manual, right-click on the service and click on Start, open Windows Update, check for available updates and download and install all available updates. This will ensure that your computer and all of its devices and software stay up to date. Once you have downloaded and installed all available updates, you can turn the Windows Update service’s Startup type back to Disabled to make sure that you do not fall prey to the svchost.exe process using LOTS of RAM issue again.