Fix: Windows Update Standalone Installer 0x80096002 Error
Windows 10 can be installed or updated to in several different ways and Microsoft has made sure that you are provided with a variety of different options if you want to use their newest installment in their Windows OS series.
However, sometimes even this is not enough as there are always certain conflicts no matter which method you choose to install Windows with. There are a lot of different error codes whose meaning doesn’t really tell much about how to solve the problem or what to do in order to avoid it. Check out below to see some info about this particular error code.
Windows Update Standalone Installer 0x80096002 Error
This particular error message is related to the process where users try to install Windows 10 or some other update to your OS using the standalone installer which is used to perform the updating process manually.
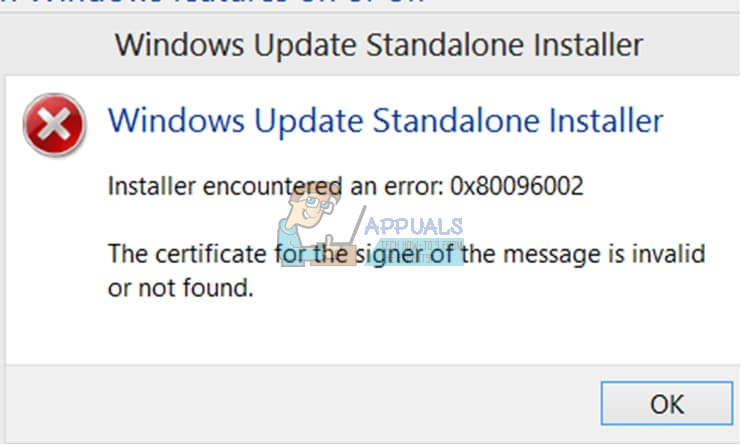
The error message is quite rare but a lot of people complained about not being able to conduct the updating process correctly when using the standalone installer. There are a couple of solutions for this problem so please check out below in order to see just how to deal with this issue effectively.
Solution 1: You Are Downloading a Program Not Designed For Your Operating System
If you are trying to download and install an update or a program which is not supported by your version of Windows, this issue is bound to appear. For example, several users who were running Windows 10 Home were trying to install BitLocker Drive Encryption, which is a tool designed for Windows 10 Pro and Enterprise versions.
If you are running Windows 10 Home, you need to update to Windows 10 Pro if you really want to use the program. Follow the instructions below:
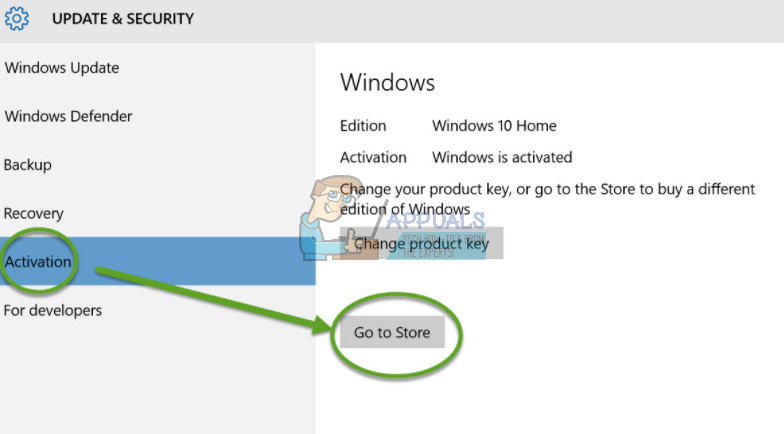
- If you are already running Windows 10 Home, you can purchase an upgrade to Windows 10 Pro through the Windows Store.
- Click Start >> Settings >> Update & Security >> Activation >> Go to Store, click $99.00 USD.
- Please note, Easy Upgrade will preserve your personal files, applications and settings, it simply unlocks the edition, the process is quite similar to the Windows Anytime Upgrade in Windows 7.
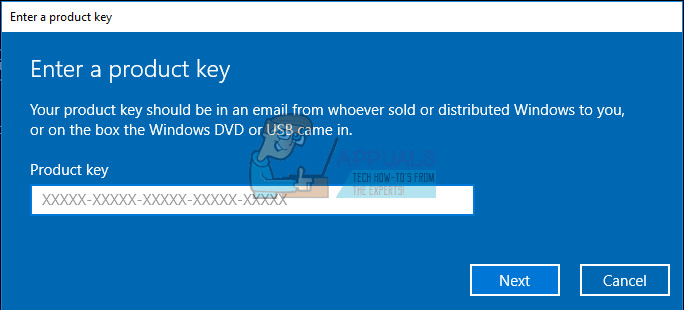
- You can also upgrade to Windows 10 Pro or Enterprise Using an Existing Product Key.
- Once you have your Windows 10 key ready select System.
- Select About and then click on Change product key or upgrade your edition of Windows.
- Click Yes if User Account Control comes up.
- Enter your product key for the edition you are upgrading to, whether it is Pro or Enterprise and wait while the product key verified.
- Make sure all open applications are closed and your work is saved then start the upgrade. Wait while the upgrade process kicks off; your computer will be restarted several times throughout this process.
- The amount of time the upgrade takes will vary between systems. But in my experience, it only took 5 to 10 minutes.
- That’s it! Close out of the upgrade complete verification screen and start using your new edition of Windows.
- Try downloading or installing the update again.
Solution 2: Install the Program You Wanted in Compatibility Mode for Your Operating System
If you are not willing to pay to upgrade your current version of Windows 10, you can also try to run the program in compatibility mode for your version of Windows in order to install it successfully. It’s a long shot but this particular solution is pretty easy to try and you should try it just in case.
Compatibility mode runs the program in the current version of Windows using the settings from previous version of Windows.
- Download the software setup file from the link.
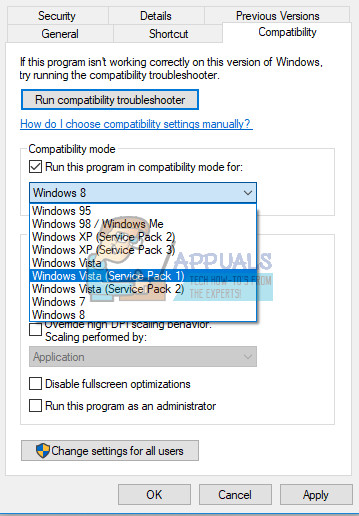
- Right-click on the setup file and click on properties.
- Click on the compatibility tab, check the box
- Run this program in compatibility mode for, select Windows 10 operating system from the drop down menu and proceed with the installation. Once this is done…
- Restart the computer and check if the changes are effective.
Solution 3: Troubleshoot Windows Update and Windows Installer Services
These two processes are crucial if you are trying to perform a Windows Standalone Update and you should definitely take a look at this solution if you are still trying to figure out the problem you are facing. The troubleshooter may also fix the problem for you without requiring you to do anyting at all.
Windows Update Troubleshooter:
- Click on Search bar which is next to Start Menu.
- Type “Troubleshooting” without the quotes and click on Troubleshooting.
- Then click on View All on the left panel of the screen.
- Click on both Windows Update.
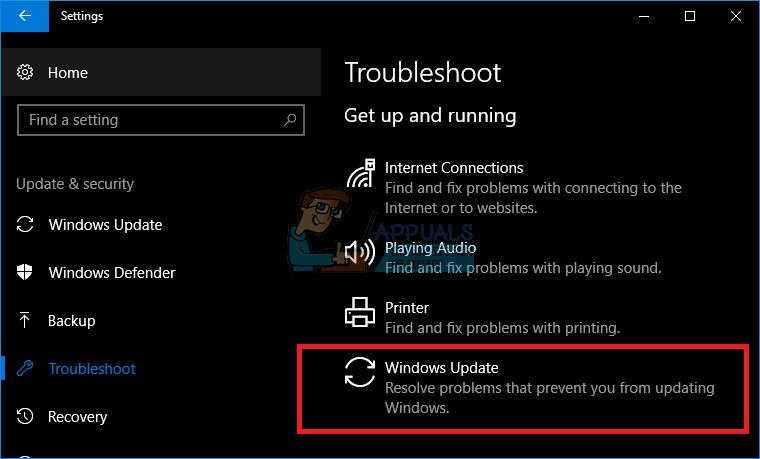
- Click on Next and follow the prompts to run the troubleshooter.
- If the issues still persist, refer to the method below.
Windows Installer Services:
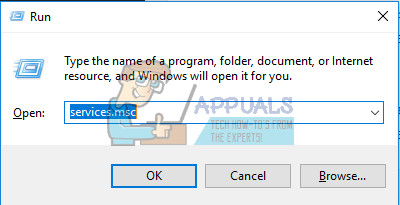
- If you are using a version of Windows older than Windows 10, the easiest way for you to access the services running on your PC is clicking on the Start button and navigating to the Run dialog box.
- Type “services.msc” in the dialog box and wait for the list of services to open.
- If you are using Windows 10, you can also access Services by using the Ctrl + Shift + Esc key combination in order to bring up Task Manager.
- Navigate to the Services tab in Task Manager and click on Open Services at the bottom of its windows, next to the gears icon.
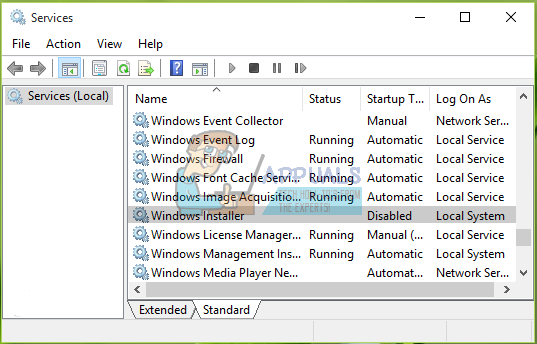
After you have successfully opened Services, follow the instructions below.
- Locate the Windows Installer service by clicking on the Name column in order to sort the services in an alphabetical order.
- Right-click on the the service and click on Properties.
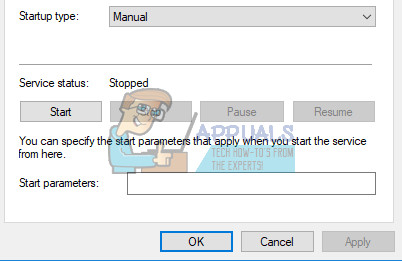
- Navigate to the Startup type and set it to Automatic (Delayed Start).
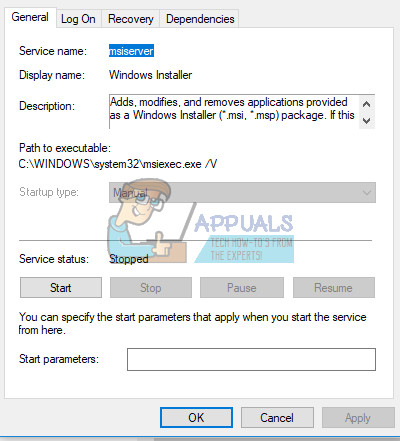
- If the service is not running, you will be able to click on Start just under the Service status.
The service should start now and you won’t have any problems dealing with it in the future. However, you may receive the following error message when you click on Start:
“Windows could not start the Windows Installer service on Local Computer. Error 1079: The account specified for this service differs from the account specified for other services running in the same process.”
If this occurs, follow the instructions below to fix it.
- Follow the steps 1-4 from the instructions below in order to open Windows Installer properties.
- Navigate to the Log On tab and click on the Browser… button.
- Under the “Enter the object name to select” box, type in your computer’s name and click on Check Names and wait for the name to become authenticated.
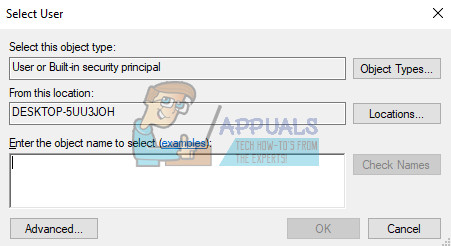
- Click OK when you are done and type in the administrator password in the Password box when you are prompted with it.
- Click OK and close this window.
- Navigate back to Windows Installer’s properties and click Start.
- Close everything and check to see if the service is still running.
Solution 4: Try a Different Method
If you tried to install a Windows Update manually by downloading it from Microsoft Update Catalog and you received the following error, you may want to try updating your computer differently. Windows 10 updates itself automatically each time a new update is released but you should check if your automatic updating system works.
You can check for updates manually by following the steps below:
- Use the Windows Key + I key combination in order to open Settings on your Windows PC. Alternatively, you can search for “Settings” by using the search bar located at the taskbar.
- Locate and open the “Update & security” section in the Settings app.

- Stay in the Windows Update tab and click on the Check for updates button under the Update status in order to check whether there is a new version of Windows available.
- If there is one, Windows should proceed with the download process automatically.

Alternatively, if your updating process is experiencing difficulties, you can try to reset your Windows 10 Update components in order to see just where the problem is. This particular fix is able to fix around 80% of all Windows Update related problems so you should definitely check this out if you are determined to update your Windows to the latest version.
- Open a Command Prompt. To do this, use one of the following methods, depending on your version of Windows:
Windows 10: Press and hold (or right-click) the Windows logo button on the taskbar and then select Command Prompt (Admin). Select Yes when the User Account Control box appears.
Windows 8.1 and Windows 8: From the Start screen, swipe in from the right side to display the charms, select Search, and then search for cmd. (Or, if you are using a keyboard and mouse, type cmd at the Start screen.) In the search results, press-and-hold or right-click Command Prompt, and then select Run as Administrator.
Windows 7 and earlier versions: Press the Windows logo key + R, type cmd in the Run box, and then press Enter. Right-click cmd, and then select Run as Administrator.

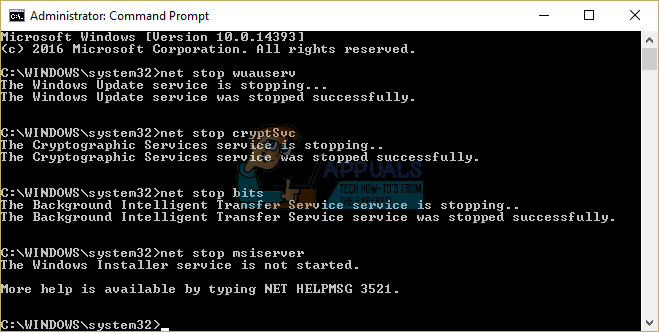
- Stop the BITS service, the Windows Update service, and the Cryptographic service. To do this, at a command prompt, type the following commands. Make sure that you press Enter after you type each command.
net stop bits
net stop wuauserv
net stop appidsvc
net stop cryptsvc
- Delete the qmgr*.dat files. To do this, at a command prompt, type the following command, and then press Enter:
Del “%ALLUSERSPROFILE%\Application Data\Microsoft\Network\Downloader\qmgr*.dat”
- Rename the softare distribution folders backup copies. To do this, at a command prompt, type the following commands. Make sure that you press Enter after you type each command.
Ren %systemroot%\SoftwareDistribution SoftwareDistribution.bak
Ren %systemroot%\system32\catroot2 catroot2.bak
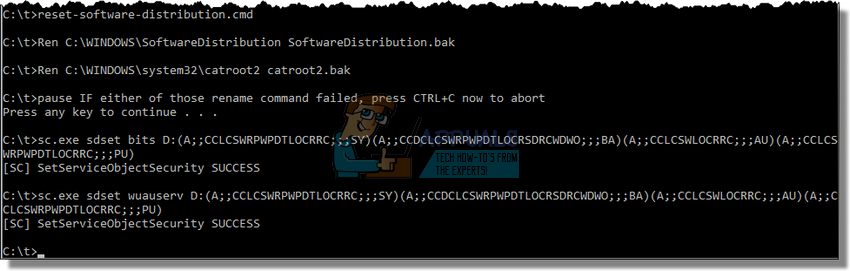
- Reset the BITS service and the Windows Update service to the default security descriptor. To do this, at a command prompt, type the following commands. Make sure that you press Enter after you type each command.
sc.exe sdset bits D:(A;;CCLCSWRPWPDTLOCRRC;;;SY)(A;;CCDCLCSWRPWPDTLOCRSDRCWDWO;;;BA)(A;;CCLCSWLOCRRC;;;AU)(A;;CCLCSWRPWPDTLOCRRC;;;PU)
sc.exe sdset wuauserv D:(A;;CCLCSWRPWPDTLOCRRC;;;SY)(A;;CCDCLCSWRPWPDTLOCRSDRCWDWO;;;BA)(A;;CCLCSWLOCRRC;;;AU)(A;;CCLCSWRPWPDTLOCRRC;;;PU)
- At a command prompt, type the following command, and then press Enter:
cd /d %windir%\system32
- Reregister the BITS files and the Windows Update files. To do this, at a command prompt, type the following commands. Make sure that you press Enter after you type each command.
regsvr32.exe atl.dll
regsvr32.exe urlmon.dll
regsvr32.exe mshtml.dll
regsvr32.exe shdocvw.dll
regsvr32.exe browseui.dll
regsvr32.exe jscript.dll
regsvr32.exe vbscript.dll
regsvr32.exe scrrun.dll
regsvr32.exe msxml.dll
regsvr32.exe msxml3.dll
regsvr32.exe msxml6.dll
regsvr32.exe actxprxy.dll
regsvr32.exe softpub.dll
regsvr32.exe wintrust.dll
regsvr32.exe dssenh.dll
regsvr32.exe rsaenh.dll
regsvr32.exe gpkcsp.dll
regsvr32.exe sccbase.dll
regsvr32.exe slbcsp.dll
regsvr32.exe cryptdlg.dll
regsvr32.exe oleaut32.dll
regsvr32.exe ole32.dll
regsvr32.exe shell32.dll
regsvr32.exe initpki.dll
regsvr32.exe wuapi.dll
regsvr32.exe wuaueng.dll
regsvr32.exe wuaueng1.dll
regsvr32.exe wucltui.dll
regsvr32.exe wups.dll
regsvr32.exe wups2.dll
regsvr32.exe wuweb.dll
regsvr32.exe qmgr.dll
regsvr32.exe qmgrprxy.dll
regsvr32.exe wucltux.dll
regsvr32.exe muweb.dll
regsvr32.exe wuwebv.dll
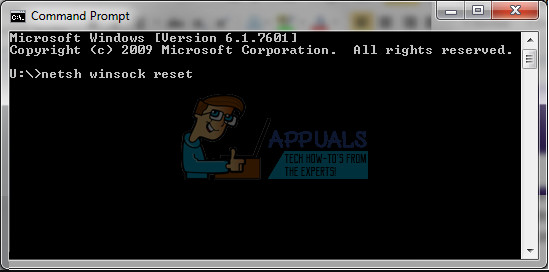
- Reset Winsock. To do this, at a command prompt, type the following command, and then press Enter:
netsh winsock reset
- If you are running Windows XP, you have to configure the proxy settings. To do this, at a command prompt, type the following command, and then press Enter:
proxycfg.exe -d
- If you are running other versions of Windows, at a command prompt, type the following command, and then press Enter:
netsh winhttp reset proxy
- Restart the BITS service, the Windows Update service, and the Cryptographic service. To do this, at a command prompt, type the following commands. Make sure that you press Enter after you type each command.
net start bits
net start wuauserv
net start appidsvc
net start cryptsvc
- Windows Vista only: Clear the BITS queue. To do this, at a command prompt, type the following command, and then press Enter:
bitsadmin.exe /reset /allusers
- Install the latest Windows Update Agent.
- Restart the computer.
- Try to update your version of Windows by checking for updates from the Update & security section in Settings and also try to perform the update via the Standalone Installer.