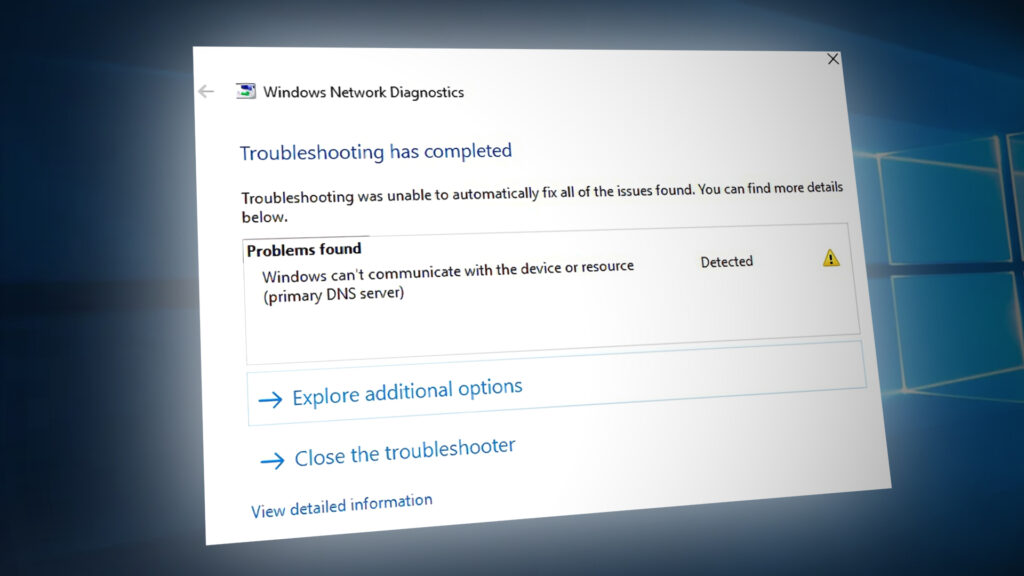
Error Solved: Windows can’t communicate with device or resource
The error “Windows Can’t Communicate with the Device or Resource (Primary DNS Server)” occurs when your computer is unable to connect to the primary DNS server set by your internet service provider. This error message pops up in the Network Diagnostics which is run when you are unable to connect to the internet.
This error message can be caused by a number of reasons such as your IPv4 or IPv6 settings not configured properly, you running a proxy server, a conflict with the network settings, or when the DNS server you are trying to access is temporarily unavailable. We will go through all the workarounds present by starting with the simplest one and working our way to more complex solutions.
Note: Try disabling proxy servers before you start with the solutions listed here. Also if you are using restricted internet in any institution (college, university etc.), it is best to follow the guidelines given by them as they have their own internet settings as compared to unrestricted internet we use in our homes.
Solution 1: Changing IPv4 and IPv6 Settings
The Internet Protocol version 4 (IPv4) is a protocol for use on packet-switched Link Layer networks (e.g. Ethernet). IPv4 provides an addressing capability of approximately 4.3 billion addresses. The Internet Protocol version 6 (IPv6) is more advanced and has better features compared to IPv4. It has the capability to provide an infinite number of addresses.
We will try changing both the settings on your computer and see if this solves the problem. This is the most common workaround for solving this problem and mostly solves the error message instantly.
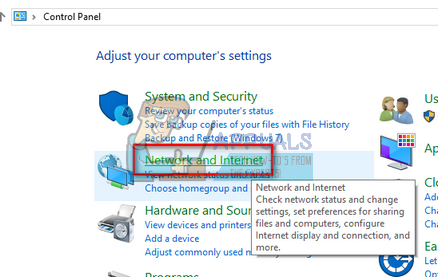
- Press Windows + R, type “control panel” in the dialogue box and press Enter.
- Once in the control panel, click on the sub-heading “Network and Internet”.
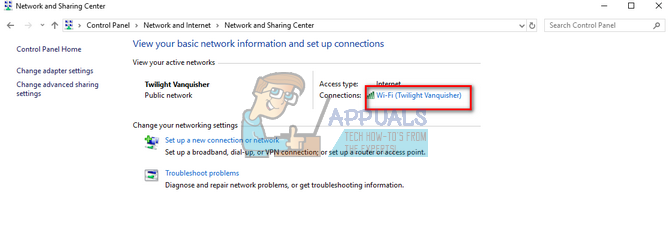
- Select “Network and Sharing Center” from the next window you are navigated to.

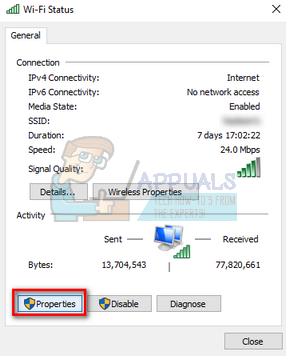
- Here you will find the network to which you are connected to. Click on the network present in front of “Connections” as shown in the screenshot below.
- Now click on “Properties” present at the near bottom of the small window which pops up.
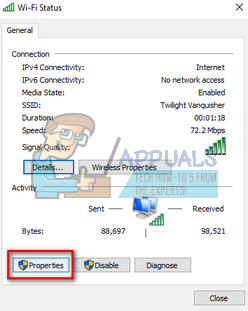
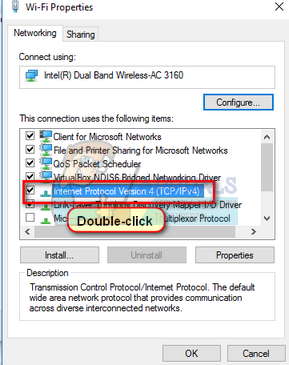
- Double-click on “Internet Protocol Version 4 (TCP/IPv4)”. Set both the options to “Obtain an IP address automatically” and “Obtain DNS server address automatically”.
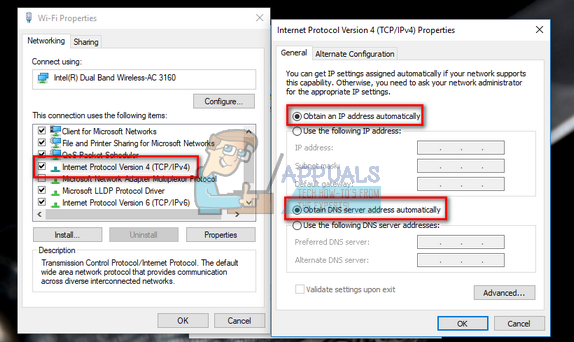
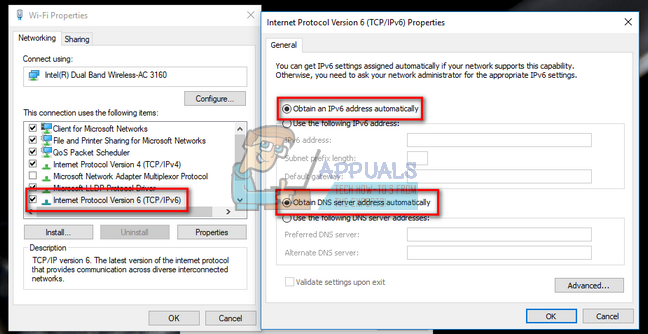
- Press OK to save changes. Now click on “Internet Protocol Version 6 (TCP/IPv6)” perform the same steps as mentioned in the earlier step.
- Press OK to save changes and exit. Now check if you can connect to the internet successfully.
Solution 2: Using Command Prompt to Reset Connection Settings
We can try another workaround which will force your computer to flush the IP and DNS configurations. It is possible that these settings are either corrupt or not configured as expected. We can try resetting them and see if this solved the problem. Do note that you administrator access to follow this solution.
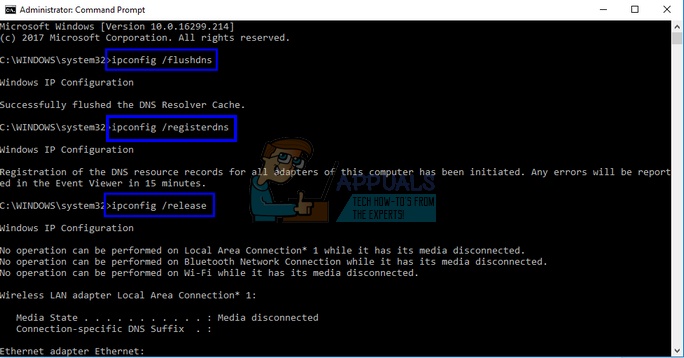
- Press Windows + R, type “command prompt” in the dialogue box, right-click on the application and click “Run as administrator”.
- Once in elevated command prompt, execute the following commands one by one.
ipconfig /flushdns
ipconfig /registerdns
ipconfig /release
ipconfig /renew
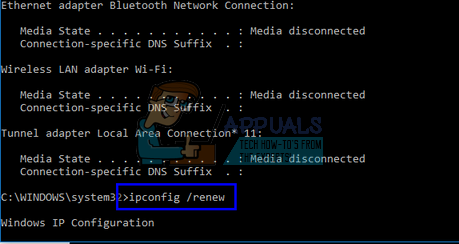
- Close the command prompt after executing the workarounds and restart your computer. Now check if the problem at hand got solved.
Solution 3: Resetting TCP/IP
If you are receiving this error message, your Internet Protocol or TCP/IP may have been corrupted. TCP/IP is one of the main components required by the Windows operating system to connect successfully to the internet. In this situation, even if you are physically connected to the internet or the link is up and running, you will not be able to send the packets. We will try resetting the TCP/IP of your computer and see if this does the trick.
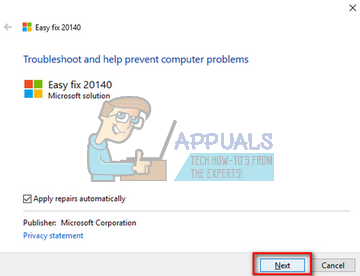
We can achieve our goal by downloading a tool from Microsoft and running it on the computer affected. Do note that you will require another device with an active internet connection.
- Head over to Microsoft’s official website and download the utility.
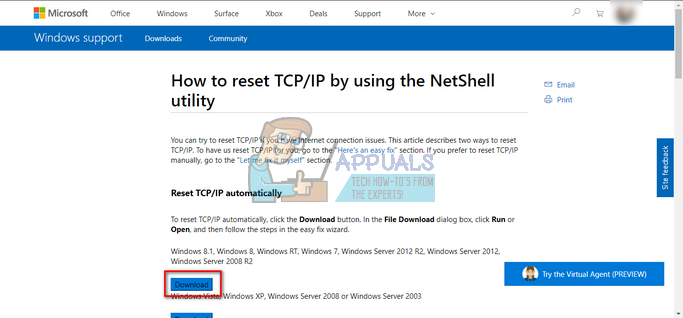
- Double-click the file downloaded, click on “Next” and follow the on-screen instructions.
Alternatively, you can perform the same function by opening an elevated command prompt, and executing the command “netsh int ip reset”. You can also define any specific path for the log file to be created by executing “netsh int ip reset c:\resetlog.txt”. Remember to restart your computer after performing this operation and check if the problem at hand got solved.
Solution 4: Resetting Drivers of your Network Device
The possibility that you have incorrect drivers installed are almost ignored when this error occurs. Windows automatically updates all the driver updates using Windows Update. It is possible that the current driver installed on your computer isn’t compatible or fit for your computer. It can also be the case that it is corrupted. We can try rolling back drivers and check if this solves the problem.
- Press Windows + R, type “devmgmt.msc” and press Enter.
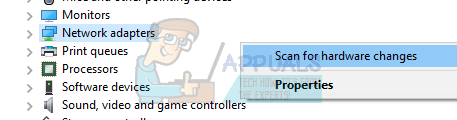
- Once in the device manager, expand network adapters and locate your hardware. Right-click on it and select “Uninstall”.
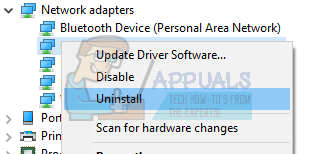
- Windows might pop up a UAC confirming your actions. Press Yes and proceed. After uninstalling the driver, right-click on any empty space and select “Scan for hardware changes”. Windows will now automatically detect your hardware and install the default drivers. Reboot your computer and check if the problem got solved.
If rolling back drivers doesn’t do the trick, we can try installing latest drivers. You should head over to your manufacturer’s website and download the latest drivers to an accessible location. Make sure you download the drivers according to your system specifications.
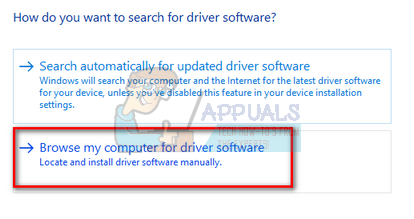
- Open device manager, right-click on your Ethernet hardware and select “Update driver software”.
- Select the second options “Browse my computer for driver software”. Browse to the driver you downloaded and install it accordingly. Reboot your computer and check if the adapters works as expected.
Solution 5: Restarting the Modem and Router
It can be possible that your internet router may be saved in the wrong configuration. Or any recent settings may have caused it not to work properly. Of course, you should try to restart the router first and check, but, if that doesn’t work, we can try resetting the router (hard-reset) manually and see if it improves our situation.
- Pick up your router and turn it back so all the ports are in front of you.
- Look for any button named “reset” on its back. Most routers don’t have these buttons so you don’t accidentally reset it to factory defaults, instead, you have to use something thin like a pin to press inwards towards the hole which says “reset”.
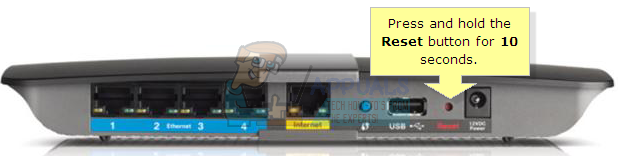
- Reset your router and connect your computer again to the Wi-Fi network. Launch Steam again and check if the problem gets fixed.
Note: It is worth noting that after you manually reset your router, your router won’t have any SSID (password) and the name of your Wi-Fi will be set to default (something like TPlink121). Furthermore, any internet settings that your internet provider have set on it will be removed. Do not perform this method unless you know those settings or your router works as a plug and play. It can be a real pain to call up the provider and ask them to guide how to make the internet working again so always keep this factor in mind. All the connected devices will be disconnected and you will have to re-connect all the devices one by one again.
Solution 6: Setting Google’s DNS
If all the above methods don’t work, we can try changing your DNS manually. We will use Google’s DNS and check if the connection problem goes away. If it doesn’t, feel free to revert the changes using the same method we implemented them.
- Navigate to the Properties of your internet hardware using the same guidelines given in solution 1.
- Double-click on “Internet Protocol Version 4 (TCP/IPv4)” so we can change the DNS server.
- Click on “Use the following DNS server addresses:” so the dialogue boxes below become editable. Now set the values as following:
Preferred DNS server: 8.8.8.8
Alternate DNS server: 8.8.4.4
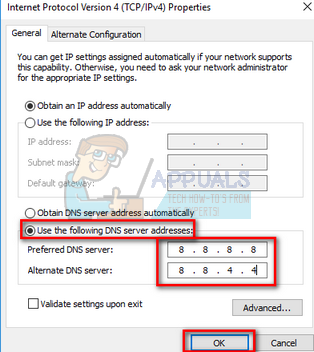
- Press OK to save changes and exit. Now restart your computer and see if this solved your problem.
Note: You can also use this method to set other DNS servers as provided by your Internet Service Provider (ISP). Ask them to give you a list of DNS servers which implemented on the network try inputting them accordingly. Furthermore, if none of the solutions work, it is possible that there is problem with the network you are using. Contact your Network Administrator or ISP. If you are facing this issue periodically, it’s highly possible that something is wrong with your router. You can try to replace it or let your ISP know about the whole situation.