Fix: Twitch Error 4000
Twitch is a live video streaming platform owned by twitch interactive. The platform was introduced in June of 2011. The platform consists mostly of Video game streams, E-Sport Competition streams, Music Broadcasts and has a recent trend of “Real In Life” streams.

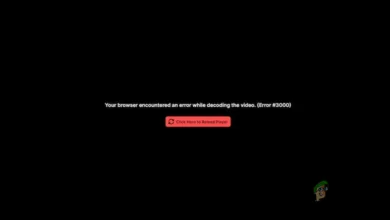
However, quite recently a lot of reports have been coming in of the users who are unable to watch the streams on the platform and an error message that reads “Media Resource not supported” pops up. In this article, we will inform you about some of the reasons due to which this error can be triggered and provide you with viable solutions in order to ensure complete eradication of the problem.
What Causes the Twitch Error 4000?
The cause of the error is not specific and it can be triggered due to a number of reasons, However, the most common ones are:
- Cache And Cookies: Cache is stored by a lot of applications in order to decrease the loading times. Similarly, cookies are stored by websites on the storage in order to decrease the loading times of the website and provide a smoother experience. However, overtime cache and cookies can become corrupted and therefore, cause problems with loading the website or even interfere with the functionality of the browser.
- Disconnection: In some cases, the computer might have been disconnected from the internet while you were trying to open the site and this might have interfered with the loading process of the stream or the website.
- Other Streams/Audio Playbacks: If there is any other application opened up on your computer that provides audio feedback, it can cause issues with the twitch stream as it can interfere with the playback service of the site or the browser.
- Autoplay Settings: If you are using the Chrome browser, the autoplay feature of the browser might be interfering with certain elements of the game and thus causing the error. The autoplay feature has a bug where it sometimes might trigger this error.
- Selecting Proper Output Device: Sometimes, the correct audio driver for the output device that you are using might not be selected. While the output device might function correctly in some applications it might not work for the others.
Now that you have a basic understanding of the nature of the problem we will be moving on towards the solutions.
Solution 1: Clearing Cache and Cookies
Cache and Cookies are stored by the browser in order to decrease the loading times. However, if they are corrupted they might cause problems with loading the site data or the streaming service of the site. Therefore, in this step, we are going to clear the cookies and the cache for the browser. For which:
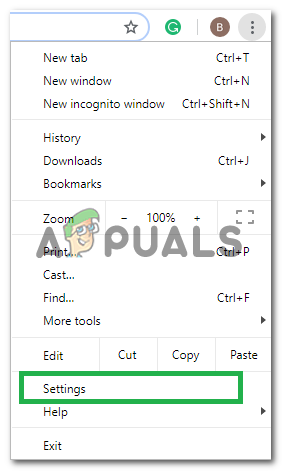
- Click on the “Menu” button on the top right side of the browser.

Clicking on the Menu Button. - Select “Settings” from the dropdown.
Clicking on “Settings” from the drop-down. - Scroll down and click on “Advanced“.
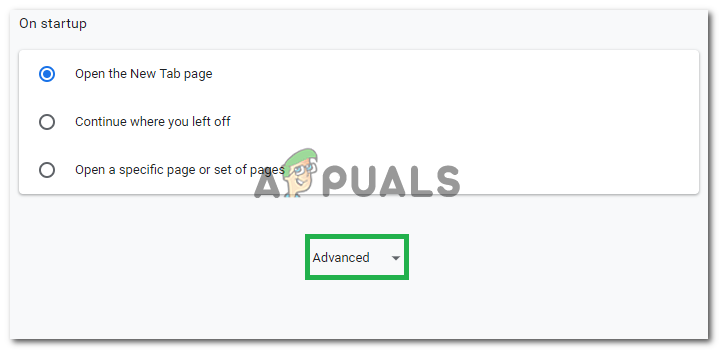
Clicking on “Advanced” - At the end of the “Privacy & Security” heading, click on the “Clear Browsing Data” option.
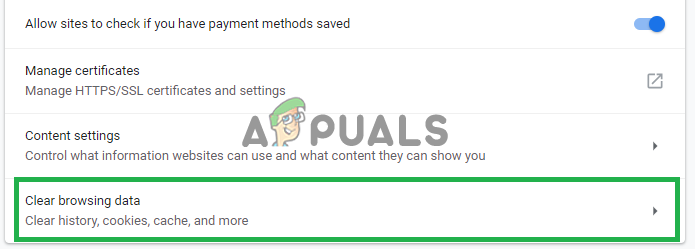
Clicking on “Clear Browsing Data”. - In the time range, select “All time“.
- Make sure that both the “Cookies and other site data” and “Caches image and files” options are checked.
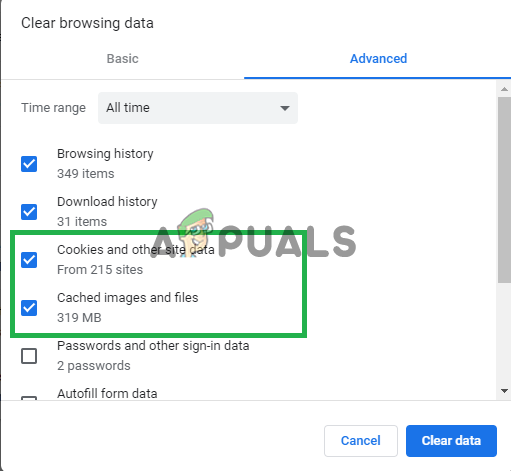
Checking both the options. - Now click on the “Clear data” option.

Selecting the “Clear Data” option. - This will now clear all the cookies and the cache, open the site and check to see if the problem persists.
Solution 2: Refreshing the Site
In some cases, the computer might have been disconnected from the internet while you were trying to open the site and this might have interfered with the loading process of the stream or the website. Therefore, in this step, we are going to be refreshing the page in order to make sure that the stream is loaded properly. For that:
- Open the tab in which you tried to load the site.
- Click on the “Refresh” button on the top left of the window by the address bar.

Refreshing the site. - Wait for the stream to load and check to see if the issue persists.
Solution 3: Closing Other Applications.
If there is any other application opened up on your computer that provides audio feedback, it can cause issues with the twitch stream as it can interfere with the playback service of the site or the browser. Therefore, it is recommended that you close all other applications, restart the browser and close any other tabs on the browser as well.
Solution 4: Selecting Default Audio Drivers.
It is possible that the correct audio drivers for the output device that you are using might not be selected. While the output device might work correctly in some applications it might not work for the others. Therefore, it is recommended that you chose the correct audio drivers from the Windows Settings. For that:
- Right–click on the sound icon in the bottom right corner.
- Select the “Sounds” option.

Selecting the “Sounds” option. - Click on the “Playback” heading.
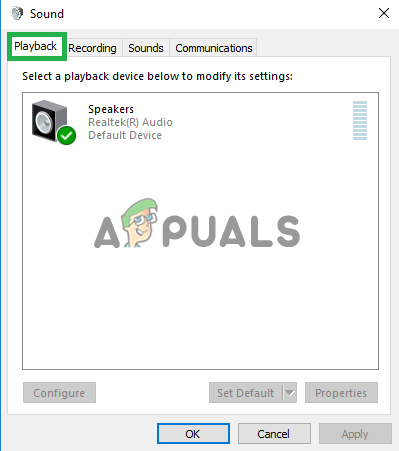
Selecting the “Playback” option. - Identify the correct audio drivers for your output device and “Right–Click” on them.
- Select the “Set–Default” option to select them as the Default Drivers.

Selecting the Default Device option.
Solution 5: Changing Autoplay Options.
If you are using the Chrome browser, the autoplay feature of the browser might be interfering with certain elements of the game and thus causing the error. The autoplay feature has a bug where it sometimes might trigger this error. Therefore, in this step, we are going to be disabling the autoplay feature. For that:
- Open the browser and load a new tab.
- Type in “chrome:flags” in the address bar and press “Enter”
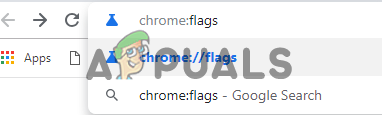
Typing in “Chrome:flags” in the address bar. - Find the “Autoplay Policy” heading, click on the dropdown and select “Document User Activation is Required“.
Note: There are a lot of options in those settings therefore, it is a bit difficult to find the Autoplay Policy one. However, you can press “Ctrl+F” and type in “Autoplay” and you will automatically be shown the option.
Selecting the option. - Once you select this setting none of the sites will play videos/audio automatically and you will have to manually press the play button in order to play videos or audio.
- Open the site and check to see if the issue persists.
Solution 6: Reinstall audio and graphics driver
Sometimes when you install device drivers on your computer, some of the installation files might get corrupted due to a poor internet connection or any other reason. If updating your audio driver didn’t resolve this error, then reinstall the audio driver on your computer. It is always recommended to reinstall the graphics driver too. Following the steps given below and check if the error is rectified:
- Press “Windows’ + “R” to open the Run prompt.
- Type in “Devmgmt.msc” and press “Enter”.

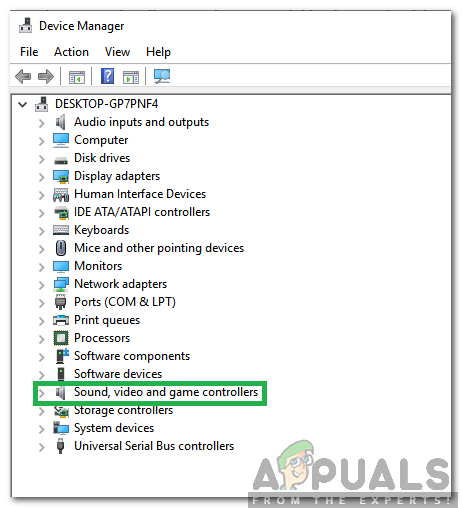
Run dialog: devmgmt.msc - In the device manager, expand the “Display Adapters” option and right-click on the “GPU Driver” that you are currently using.
- Select the “Uninstall Device” option and follow the on-screen prompts to uninstall this driver from your computer.

Clicking on the “Uninstall Device” option - Wait for the driver to be completely removed from your system by the setup.
- Windows should now be switch to a basic display adapter from Microsoft that should keep your display up and running.
- Navigate to the Nvidia or the AMD website depending upon which GPU you have on your computer and download the latest driver for your graphics card from their download directories.
- Run the downloaded executables to install these drivers on your computer.
- After successfully reinstalling the GPU drivers, we will now be reinstalling the audio drivers.
- Press “Windows” + “R” to open Run, type in “Devmgmt.msc” and press “Enter” to launch the device management panel.
- Inside this panel, double click on the “Sound, Video, and game Controllers” dropdown to expand it and right-click on the Sound Drivers that you are using.
Double clicking on the “Sound, Video and Game Controllers” option - Click on the “Uninstall Device” option to remove these drivers from your computer.
- Restart your computer after doing this and Windows should automatically reinstall a basic version of the driver. If it doesn’t, try to install a sound driver yourself that sits well with the motherboard installed on your computer.
- Check to see if doing so fixes this issue on your computer.
Solution 7: Unplug Audio Hardware and Plug It Back
It might be possible that the correct audio driver for the output device might not be selected or if you have additional audio hardware, that could prevent your PC from streaming with Twitch. Hardware such as headphones or external speakers could be interfering with the stream.
Therefore, it is recommended to unplug all audio hardware connected to the computer and try to launch the stream. If the stream is working correctly without the audio hardware plugged in, try reconnecting the hardware and check to see if the stream keeps working normally.
Solution 8: Diagnosing Background Applications
This error might occur on twitch if there is an unwanted application running in the background, that provides audio feedback. There is a chance that some active media player is interfering with the playback service of the site or the browser and causing this issue. Therefore, follow the steps indexed below to close the background apps and check whether the twitch error 4000 still persists:
- Press “Windows” + “R” to launch the Run window.
- Type in “taskmgr” and then press “Enter” to run the task manager.

Running the Task Manager - In the Task Manager, click on the “Processes” tab at the top and a list of applications should be shown that are currently running on your computer.
- Check if any application is using an abnormal amount of resources on your computer and click on it.
- Click on “End Task” to prevent it from running on your computer.

Selecting the “iTunes” process and clicking on “End Task” - Similarly, click on the “Memory” and the “Disk” options one by one and eliminate all high usage applications.
- Check to see if doing so fixes the issue with the twitch stream
- Performing the above steps should get rid of most of the third party applications that are running in the background. However, we also have to ensure that a system service or application isn’t interfering with the Twitch stream. Therefore, we will also be preventing that from running in the background.
- Press “Windows’ + “R” to launch the Run prompt.
- Type in “MSConfig” and press “Enter” to launch the Boot settings window.

Running MSCONFIG - In this window, click on the “Services” option and then uncheck the “Hide all Microsoft Services” option.
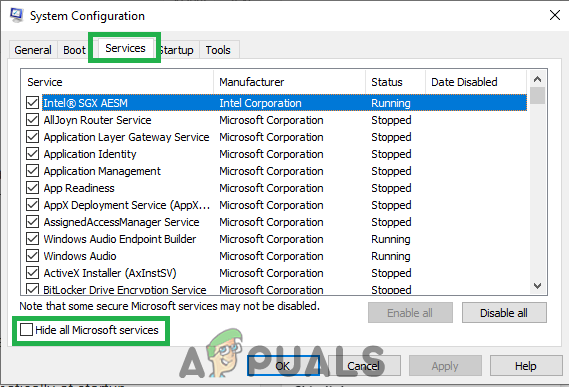
Clicking on the “Services” tab and Un-checking the “hide all Microsoft Services” option - Click on the “Disable all” button to prevent these services from launching at startup.
- Now, click on the “Startup” tab and select the “Open Task Manager” option.

Opening the Task Manager - In the task manager’s Startup tab, make sure to disable all applications from launching at startup.
- After that, save your changes and close out of both windows.
- Restart your computer and check to see if the stream works as it should.
- If it does, it means that a service or application was interfering with the proper functioning of the application. Therefore, you can start enabling these services and applications one by one and check which one makes the issue come back.
- After diagnosing the faulty service or application, you can either try to reinstall it or keep it disabled permanently.
Solution 9: Reinstall flash player
Flash Player is a software application that helps you to use content that is created using the Adobe Flash platform. You might encounter twitch error 4000 if your computer has an outdated version of a flash player or no Flashplayer installed at all. If this is the case, follow the steps illustrated below:
- Navigate to your favorite browser and download the Uninstaller for Flash player.
- Now close all the browsers and other programs that use Flash player.
- Double-click on the uninstaller to run it and follow the onscreen instructions.
- Now go to the following three locations and delete all the Flash Player files and folders:
C:\Windows\SysWOW64\Macromed\Flash
%appdata%\Adobe\Flash Player
%appdata%\Macromedia\Flash Player
- Now launch your favorite browser and download the latest version of Flash player.
- Double-click on the downloaded file and follow the onscreen instructions to install the Flash player.
Solution 10: Enable Hardware Acceleration
Hardware acceleration refers to the process by which an application will offload certain computing tasks onto specialized hardware components within the system, enabling greater efficiency than is possible in software running on a general-purpose CPU alone. Some media formats require hardware acceleration to play correctly. So, if it is disabled in your browser follow the steps below to re-enable it:
- Launch Chrome and open a new window.
- Click on the “Three Dots” at the top right and from the list of options, select the “Settings” button.
Clicking on the three dots in the top right corner - Scroll down and click on “the Advanced” arrow.
- Toggle on the “Use hardware acceleration when available” option and restart Chrome.
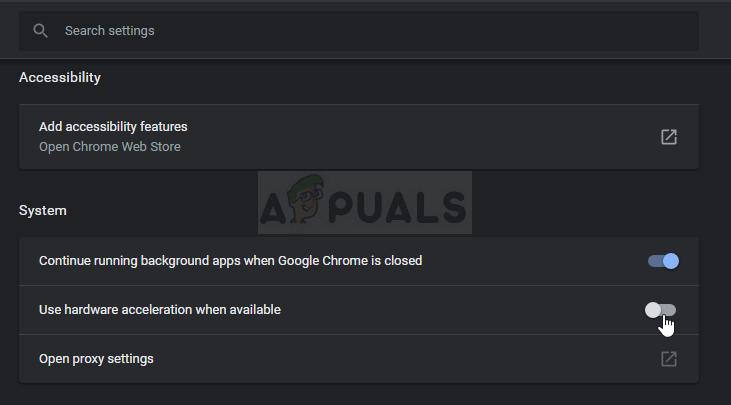
Enabling hardware acceleration - Check to see if doing this step, fixes this issue on your computer.
Solution 11: Disable unwanted extensions
A browser’s extension is a software module that is embedded in your web browser to customize and enhance your browsing experience. You might encounter twitch error 4000 if some of the enabled extensions on your browser are blocking some features of Twitch. Many users have reported that disabling “uBlock Origin” and “Ad-Block” has solved this problem. Therefore, follow the steps below to disable unwanted extensions:
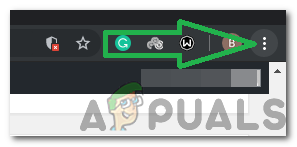
- Open Chrome and click on the three-dots icon on the top-right of the screen and select “More Tools”.
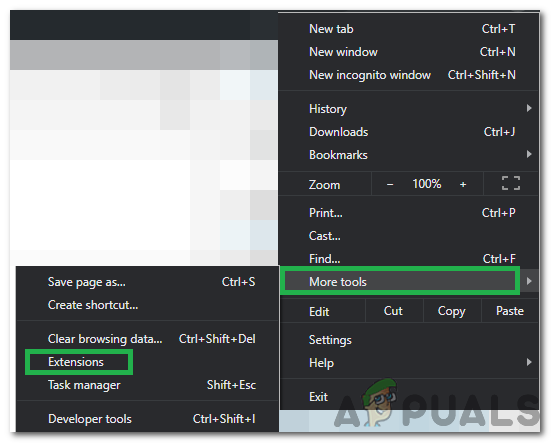
Clicking on More Tools and selecting “Extensions” - Now locate and navigate to the “Extensions” option.
- Locate the unwanted extensions and click the “Remove” button to disable them one by one and check if the issue is resolved or not.
Solution 12: Stream in incognito mode
Incognito mode is a crucial feature of a web browser that allows you to browse on the web privately by creating a temporary session that is isolated from the browser’s main session and user data. If you still can’t get rid of twitch error 4000, try to play your stream in incognito mode and check whether the error is rectified.
- Open the browser that you regularly use and click on the three-dots icon on the top-right of the screen and select “New Incognito Window”.

Opening a New Incognito window - Now proceed to the twitch website and log in to your account to see whether the issue is resolved.
Solution 13: Reset your stream key
Stream Key is an essential code that helps to identify the source of audio/video streaming in order to play the stream on a web or a desktop application. You might encounter error 4000 if your stream key got corrupted somehow. Hence, Reset your stream key by following the steps given below and check if the error is removed.
- Click on your profile icon at the top left of the Twitch home screen and select “Settings”.
- Locate and select the “Channel and videos” tab.
- Now click on the “Reset” button parallel to “Primary stream key”.

Clicking on the “Reset” button infront of the “Primary Reset Key” option - After resetting the Primary Stream Key, check to see if doing so fixes this issue.
Solution 14: Scan your PC for viruses
It is possible in some cases, that a malware or virus has infested itself on your computer and is actively interfering with your internet connection due to which you are getting the Twitch Error 4000 on your computer. Therefore, in this step, we will be performing a full scan on our computer which should get rid of any of these quite conveniently.
- Press the “Windows” + “I” keys simultaneously on your PC to open the Settings tab.
- Navigate to the Update & Security option and then click on the “Windows Security” button on the left tab.
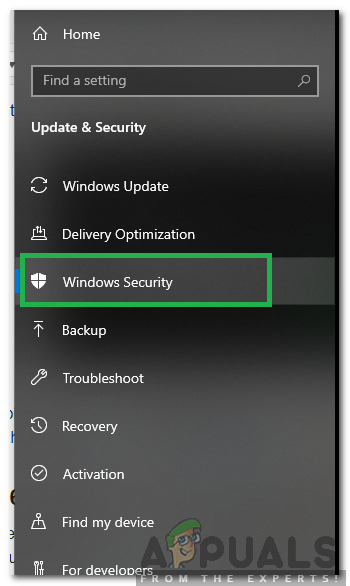
Selecting Windows Security from the left pane - After that, click on the “Open Windows Security” and select the “Virus and Threat Protection” option.
- After that, click on the “Scan Options” button below the “Quick Scan” window.

Open Scan Options of Windows Defender - Click on the “Full Scan” option and then hit the button of “Scan Now”.
- Wait for a few seconds while this process gets completed and then finally check if the error gets resolved now.
Microsoft Security Scanner is an additional tool that you can use to test the system for any further viruses and malware because sometimes the default tool isn’t able to perform the scan properly. Therefore, in this step, if the issue still hasn’t been resolved, we will be using the Microsoft Security Scanner to further make sure for any issues.
- Launch your browser and download the Microsoft Security Scanner from here.
- After downloading the executable, run it on your computer and let it install.
- Accept the License Agreement terms and click on “Next”.

Accepting the User Agreement - Select “Full Scan” and click on “Next”.

Initiating the Full Scan - After you opt for a full scan, the software will start scanning your entire computer to look for any malware or viruses that might’ve disguised themselves as normal executables or applications.
- After this scan has been finished, check to see if the Twitch error message still persists.
Solution 15: Use a VPN
Many Twitch problems occur due to ISPs throttling or in sporadic cases, just straight-up blocking Twitch. Also, some ISPs have really bad routing to Twitch’s servers. So, using a good VPN might be the key to eliminating the issue. The VPN should mask your internet traffic from your ISP and let Twitch load. But, if the issue only happens when you’re connected to a VPN or a proxy server, try disconnecting from it and then try opening Twitch again.
Solution 16: Update your web browser
Google keeps on launching the latest updates for its web browser in which bugs of the previous version are resolved and many features of the previous version are also improved. The twitch error 4000 might occur if you are trying to play your stream on an outdated version of google chrome. Hence, update your web browser by following the steps indexed below and check whether the issue is resolved.
- Click on the three-dot icon on the top-right of the screen and navigate to “Help” and select “About Google Chrome” and the update will start automatically.

Update Chrome - Wait for the browser to update and relaunch it to see if the error is rectified.
Solution 17: Flush The DNS
It is possible in some cases that the DNS cache of your system has been clogged due to which you are getting this error on your computer. Therefore, in this step, we will be completely flushing the DNS cache and then we will check to see if doing so gets rid of this issue on our computer. For that:
- Press the “Windows” + “R” key to launch the Run prompt.
- Type in “cmd” and press “Shift” + “Ctrl” + “Enter” to open with admin privileges.
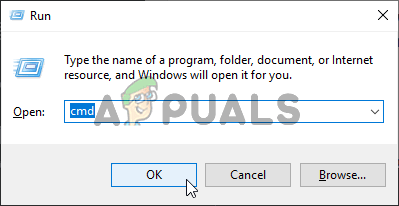
Running the Command Prompt - Type in the following command in the command prompt and press “Enter”.
ipconfig/ release - After this, type in the following command to trigger an IP renewal.
IP config /renew
- In the end, trigger the following command to flush the DNS cache completely.
ipconfig /flushdns

Flushing DNS - After initiating all of these commands, check to see if doing so has fixed the issue.
Solution 18: Use the twitch pop-out player
When twitch won’t load due to the error 4000, you can continue to enjoy streaming videos from the channel using the popout player. While this isn’t a permanent fix to the problem, it can come in handy when you need to stream immediately but your twitch player isn’t loading.
To open the popout player on twitch, click on the gear icon at the bottom right side of the player and select Popout Player.
Solution 19: Switch to Twitch desktop application
It is recommended for you to switch to Twitch’s desktop application. Download and install the desktop application by following the steps indexed below and check if the error persists:
- Open your favorite browser and download the desktop application for Twitch.
- Double-click the downloaded executable file and follow the onscreen instructions to install it.
- Log in to your account and see if the error is resolved.
Workaround: If you are still encountering this error even after switching to the desktop application, then the only solution you are left with is to contact Twitch customer support. Just explain your issue in the email and wait for them to provide you with a solution shortly.
Solution 20: Disabling Audio Enhancements
Your Audio Enhacmenets can be an issue as well, they can interfere with Twitch and it can cause decoding issues. Follow the methods to disable all the audio enhancements on your audio driver.
- Press and hold the Windows key then press R to open the run program.
- Once the run is opened, type the following command to open Sound Settings:-
mmsys.cpl

- Once the sound settings are opened check which speakers you have plugged in.
- Right-click on it and click “Properties”.

Changing the Sound Settings - Now head over to the “Enhancements” tab and check the option “Disable all enhancements”.

Disabling all Enhancements
If none of the methods/workarounds shown above helped you at all. It’s possible that there is something wrong with your ISP’s end. It’s highly recommended to call him and explain the situation to him so that he can check if there is anything wrong