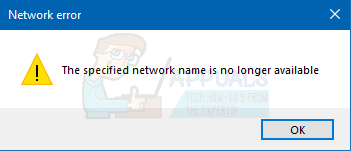
Fix: The specified network name is no longer available
If you are a user who uses network drives then you will most likely see this error. The error message will pop up when you try to access the NAS drive. For some users, they might be able to access the drive but they will see the same message when trying to sync the offline files from the NAS. If the problem is appearing when trying to sync then resyncing or trying to sync some time later might work but it will randomly show the error.
There are many reasons that can cause this error. The most common cause is using a device that supports SMB 1.0 on the latest version of Windows 10. The latest version of Windows 10 doesn’t support SMB version 1 and any device that supports this protocol will cause this issue. The issue can also be caused by an antivirus, especially Nod32, or a network scanning program.
Method 1: Enable SMB 1.0
If you have the latest Windows 10 Fall Creators Update and Windows Server, version 1709 (RS3) then the problem might be caused by the SMB 1.0. The SMB version 1 is not installed by default in the latest Windows 10 versions. So, any device that supports SMB version 1 will create this issue for you. Microsoft have specifically released a statement saying that connecting to a device that supports only SMB version 1 will cause error and the error you are seeing is one of those error messages. So, enabling the SMB 1.0 from the control panel will most likely resolve the issue for you.
Here are the steps for enabling SMB 1.0.
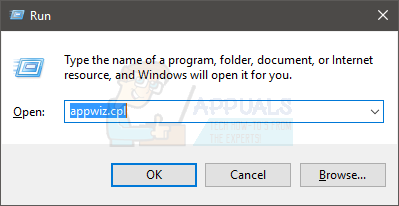
- Hold Windows key and press R
- Type appwiz.cpl and press Enter
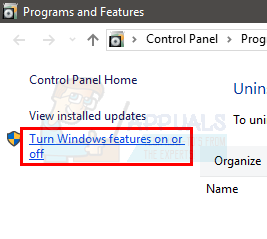
- Click Turn Windows Features on or off
- Scroll down and locate the option named SMB 1.0/CIFS File Sharing Support
- Click the plus + sign on the left side of SMB 1.0/CIFS File Sharing Support. If you don’t have a plus + sign then simply check the SMB 1.0/CIFS File Sharing Support
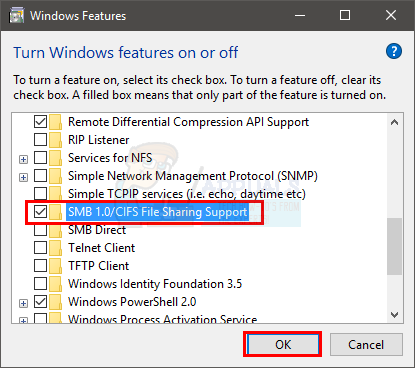
- Make sure every option under SMB 1.0/CIFS File Sharing Support is checked
Click Ok and you should be good to go.
Method 2: Disable AV and Network Scanning
The problem can be caused by your antivirus especially if you are using the Nod32. If your security application isn’t causing an issue then try to disable your real time network scanning. These 2 things have been known to cause this issue. So, try to disable both your antivirus as well as any network scanning and check if it resolves the issue.
Method 3: Map Network Drive Using IP Address
If the problem persists after following the methods given above then try to map the drive using the IP address instead of the computer’s name. Follow the steps given below to map a network drive with IP address.
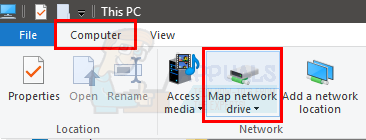
- Hold Windows key and press E
- Click Computer from the top
- Click Map a network drive. Make sure you click on the top part. If you click on the lower part of the button then you will see 2 new options. Select Map network drive from those options.
- Select the drive from the drop down menu in Drive section
- Enter the IP address instead of the Computer name in the Folder section. The end result will be something like \\IP Address\share folder
Once done, click Finish and you should be good to go.