FIX: PAGE_FAULT_IN_NONPAGED_AREA
PAGE_FAULT_IN_NONPAGED_AREA is an error displayed on a blue screen, also known as the Blue Screen of Death (BSOD). It occurs when Windows attempts to locate a critical chunk of data in the system’s memory but fails to find it; hence, it reboots your computer to protect it from further damage. The data it’s searching for resides on a page file that can be either in your system’s RAM or within the hard disk’s space that your system uses as RAM (known as the page file). In this guide, we will cover both possibilities.
Usually, this error is attributed to a fault either in your RAM’s connection to the motherboard or in the RAM itself. However, there are other methods that can be followed before we need to open up your system. Anti-virus programs are also known to cause this error, so be sure to try disabling these before proceeding with this guide. Additionally, you can follow our guide using this link: https://appuals.com/blue-screen-of-death-windows/. If all attempts are in vain, then we can start with Solution 1.
Solution 1: Recreate the page file
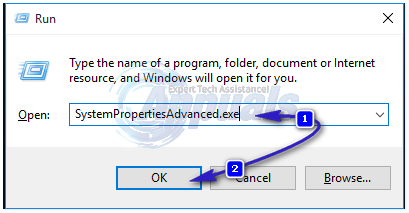
To speed up your system, Windows uses disk space on your hard disk. For this purpose, it creates a page file to which it refers for speedy access to your frequently used programs. Disabling the page file can help resolve the issue. To do this, hold the Windows key and press R. In the run dialog, paste ‘SystemPropertiesAdvanced.exe’ and press Enter to open it.
Sure, the corrected sentence is: “In the System Properties, click on the Advanced tab. Then, under Performance, click Settings. Next, choose Advanced from the new dialog that opens up. Lastly, clear the checkbox for ‘Automatically manage paging file size for all drives’.
Select No paging file. Click Set and confirm any warning message. Click OK > OK > OK to close all windows. Restart your system.
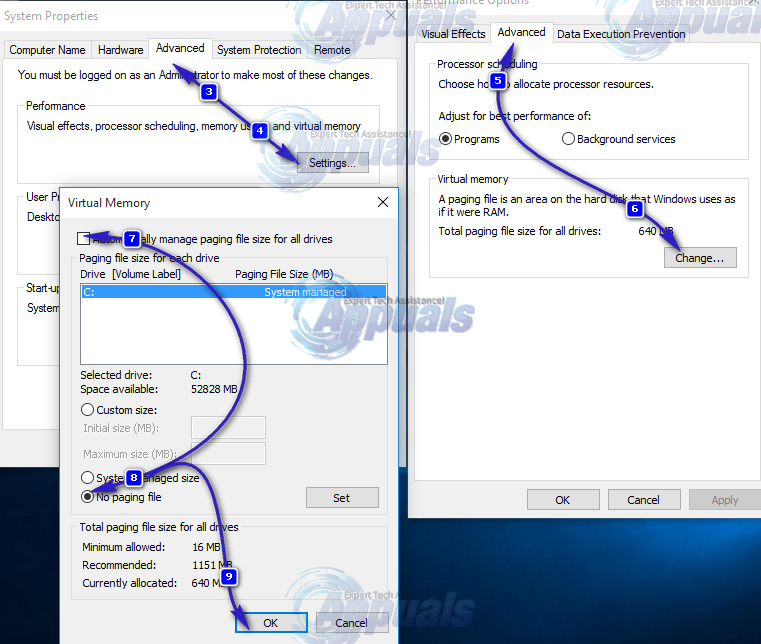
After restarting, revisit the previous steps to return to Virtual Memory. Then, select ‘System managed size’ and click ‘Set’. Check the box titled ‘Automatically manage paging file size for all drives’ found at the top. Then, click ‘OK’ three times to close all windows and restart your system. By now, any corrupt chunks in the page file should have been deleted. If you’re still experiencing the BSOD, proceed to the next solution.
Solution 2: Execute the ‘chkdsk’ command.
Chkdsk is a disk-checking utility in Windows that is used to search for and fix errors in the file system.
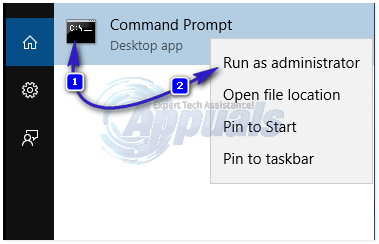
Click ‘Start’, type in ‘cmd’, then right-click on ‘cmd’ and choose ‘Run As Administrator’.
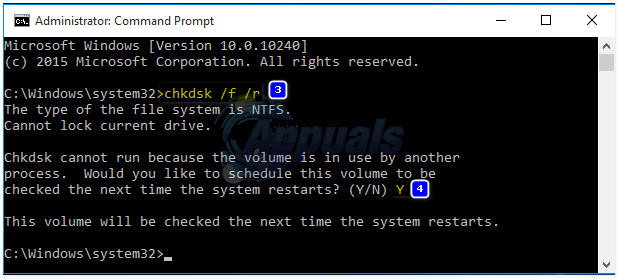
Type chkdsk /f /r and press Enter.
Let it run. If you receive a message stating, “The drive is locked. Would you like to schedule a chkdsk on the next restart? If so, type ‘Y’ for ‘Yes’,” then type ‘Y’ and press ‘Enter’.
Restart your computer and let the chkdsk run. It will automatically detect and fix errors it finds. If you face the issue again, move on to Solution 3.
Solution 3: Run System Restore
Hold down Windows key and press R.
Type ‘rstrui.exe’ into the run dialog box, then press Enter.
The default choice will be ‘Recommended Restore.’ However, what you need to examine is the date and time of the restore point when the system was functioning properly. This could be a month old or just a few days old. To view more restore points, select ‘Show More Restore Points.’ If there are no restore points available, skip this solution for now and create a restore point later when the issue is resolved. See here for more information.
Click ‘Next’ then ‘Finish.’ Afterwards, follow the on-screen instructions to complete your system restore.
Solution 4: Update Windows
Microsoft also keeps releasing updates to counter these errors. Make sure your computer is up to date.
For Windows 7 and 8, the procedures are the same.
Press the Windows key and type ‘check for updates.’ Click on ‘Check for updates’ in the search results. Allow the PC to check for updates and ensure all of them are installed, focusing most importantly on the critical and important updates.
For Windows 10:
Press Windows Key + R. Type ms-settings:windowsupdate and press Enter.
Now check for updates on your Windows and ensure they’re all installed.
Solution 5: Driver Interference
Follow Solution 2 in our guide here to make sure no driver is causing interference.
Solution 6: Run an SFC scan.
Follow our guide here to run a SFC scan. It is for Windows 10 but is applicable on Windows 7 and 8.
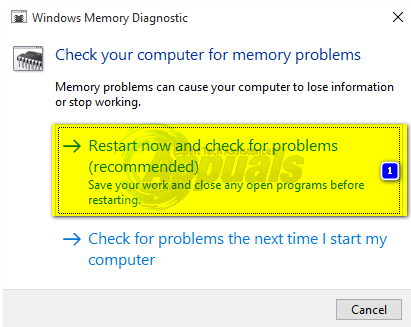
Solution 7: Use Windows Memory Diagnostics.
RAM is the main component that is used for paging. A Faulty RAM can also trigger such errors. Hold down Windows key and press R. In the run dialog type mdsched.exe and press Enter. A dialog box will appear asking if you want to reboot and check RAM now or later. Select the option which suits you better.
Upon rebooting, your RAM’s checkup will commence. If no errors are detected, your RAM is in good condition. If errors are found, employ common strategies to inspect your RAM. For laptop users, the RAM is located in a small compartment at the bottom of the laptop. Desktop users should open their CPU cautiously. The RAM sticks will be mounted on your motherboard, and there could be more than one. If there are multiple sticks, they are usually placed parallel to each other. Both sticks should be removed, and their golden contacts should be cleaned using a pencil eraser.
Clean the slots with a spare toothbrush.
To test each stick of RAM (assuming you have more than one, of course), insert one stick at a time and see if you encounter an error. Similarly, check if a slot itself is faulty by replacing the RAM in that slot with a known good one.
If you don’t perceive an error with one RAM unit, then the other RAM unit is assuredly faulty. If the results are consistent under all conditions, then the problem may lie within the motherboard itself. It would be best to send the laptop/desktop for hardware repair and diagnostics to either a service center or other repair shops.