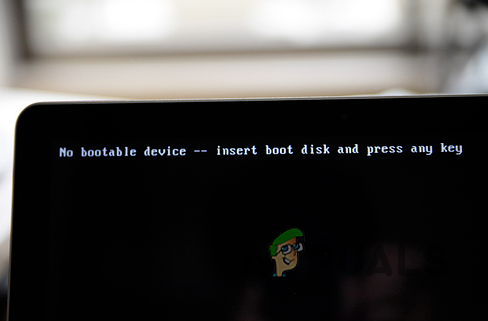
No Bootable Device – Insert Boot Disk and Press Any key? Here’s how to fix
Error message “No bootable device — insert boot disk and press any key” appears when users are trying to turn on their systems. As it turns out, the problem in question appears when your system cannot detect the hard drive or the location where you have installed an operating system. Since no operating system is detected, the error message is shown. This can sometimes be caused due to your BIOS settings in which case you can reset the CMOS.
In addition to that, the boot mode that you are using can also result in the issue which ultimately is related to your BIOS as well. In this article, we are going to show you how to resolve the error message in question so just follow through.
As it turns out, when you power up your device, the system looks for the location where an operating system is installed after it has been POSTed. Now, in the scenario where it does not find an operating system installed on your storage device or does not detect the storage device at all, the error message in question is shown. If you have a hard drive or SSD installed and the error message is still being caused, then it is very likely that the problem is due to the boot mode that is being used.
With that said, we are going to walk you through the whole process and show you how to change the boot mode along with many other things. Before we begin, make sure that you have a storage device installed and that all the cables are properly inserted, if there are any. Once you have done that, you can get started with the various methods down below right away.
Change Boot Mode
The first thing that you should do when you encounter the problem in question is to check the boot mode that is being used. As it turns out, in case you install Windows in, for example, Legacy Mode and then switch to UEFI, your system will fail to startup. As such, you will need to switch back to Legacy Mode to resolve the issue.
Changing the boot mode on your system will not have any effects on your system since you are already facing the problem in question. Therefore, you should try changing your boot mode to see if that resolves the issue. To do this, follow the instructions given down below:
- First of all, go ahead and restart your computer.
- As your PC is booting up, in the initial phase, you will have to press your BIOS key to get into the BIOS menu. The respective key is usually displayed as your PC starts booting up in one of the corners. You will have to be quick about this as it only lasts a moment. Usually, the keys are DEL, F8, F10, F9, F11, etc.

Opening up BIOS Menu - Now, we can’t provide an exact location for where you can find the boot mode that is being used. This is because the location can vary depending on your manufacturer and the firmware that you are using. However, to give you a general idea, you will be able to find the Bood Mode option under the Boot tab. If you see a Boot tab, navigate to it.
- From there, choose the Boot Mode option, sometimes referred to as UEFI/BIOS Boot Mode, and change it from whatever it was set to.
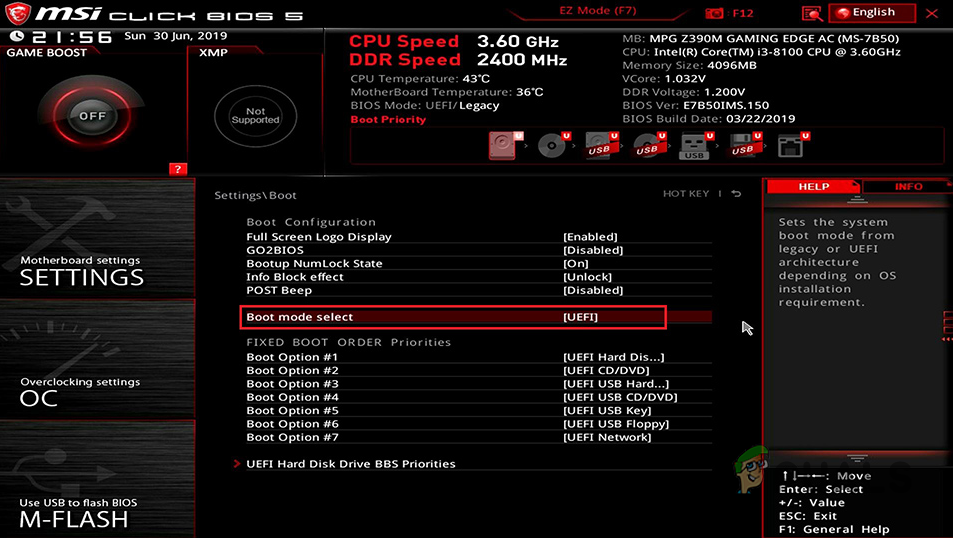
Changing Boot Mode - With that done, navigate to the Exit tab and exit out of the BIOS menu while saving the changes (there will be an option for saving and exiting out).
- See if the error message still occurs. In case it does, we would recommend changing your Boot Mode back to the original one.
Reset CMOS
If changing the boot mode does not fix the problem for you, then it may be that the error message in question is being caused by other BIOS settings. As such, to resolve the problem, you will have to reset these settings. CMOS is essentially a small chunk of memory where the BIOS configuration is stored. Therefore, when you reset the CMOS on your computer, the BIOS settings will be set to their default.
As it turns out, there are multiple ways of resetting your CMOS. Let us go through these various options one by one:
- First of all, go ahead and power off your computer.
- On some computers, you will have a respective button on your case for resetting the CMOS. If your does, hold down the button for a few minutes to reset the CMOS.

Resetting CMOS via Case Button - In addition to that, some PCs have a dedicated button for resetting the CMOS on the motherboard so you will have to access that. This will be labelled as RST or RESET CMOS. Hold down the provided button for a few minutes to reset the CMOS. In some cases, this might also be provided on the I/O shield on the back of your PC.

Resetting CMOS via Motherboard Button - Alternatively, you might have a CMOS battery which you will have to remove and then place back again. Removing the CMOS battery is quite easy and it requires gentle force. In some cases, there might be a metal clip holding the battery in place so you will have to slide it from under the clip. Once you have removed the battery, wait a couple of minutes and then put it back in.

Resetting CMOS via CMOS Battery - Finally, on some motherboards, you may have neither of these options but rather two pins that you will need to connect using a jumper (see the image down below for reference). This will be labelled as RESET CMOS or CLEAR CMOS on your motherboard. In the case of a jumper, you will have to remove it and then move it over the middle pin and the pin that was previously disconnected. Wait a few moments and then return the jumper to its original position.

Resetting CMOS via Jumper - As it turns out, in some scenarios, there may not be a plastic jumper provided. If this case is applicable, you will have two pins instead of three like in the case of a jumper. As such, you will have to connect the two pins together. You can do this by picking up a screwdriver and putting it in between the clips so that the metal end touches both pins. That way, the pins will be connected. Hold it for a few minutes to reset CMOS.
- Once you have reset the CMOS on your system, power on your computer to see if the problem still persists.
Perform a Clean Install
Finally, if the above methods have not fixed the problem for you, then it is very likely that the issue is due to the fact that you don’t have an operating system installed. If this case is applicable, you will need to perform a clean install of Windows so that you are able to boot into your system.
For this purpose, you are going to need a bootable USB of Windows so make sure that you have that. To perform a clean install, you can follow our thorough guide by clicking here that takes you through the whole process step-by-step. Once you install Windows, your computer should be able to boot up just fine.


