Fix: Destiny Error Code Cabbage
The error code Cabbage which was quite a regular occurrence among Destiny and Destiny 2 players caused so much outrage that there were even online petitions urging Bungie to fix this error as soon as possible.
The error code is often associated with faulty settings regarding your router or your router is blocking some of the ports needed by the game. Bungie is yet to post an article about this topic but there have been several confirmed solutions which should help you deal with this error code. Simply follow the instructions below and continue playing Destiny without problems.
Solution 1: Add Your Console to DMZ
DMZ stands for De-Militarized Zone and it’s a setting available on plenty of routers which will unblock all outgoing and incoming data from a single IP address. This is quite useful for console gamers as you will be able to simply let through any connections to your console, making it easier for you to connect and to get rid of certain error codes.
First of all, we will need to manually assign a static IP address to your console for the router you are currently using and the process is somewhat different of PS4 than it is on Xbox One.
PlayStation 4 Users:
- You can try to permanently assign your PS4 to the IP address that it is currently using. To find the IP address, power up your PS4 console.
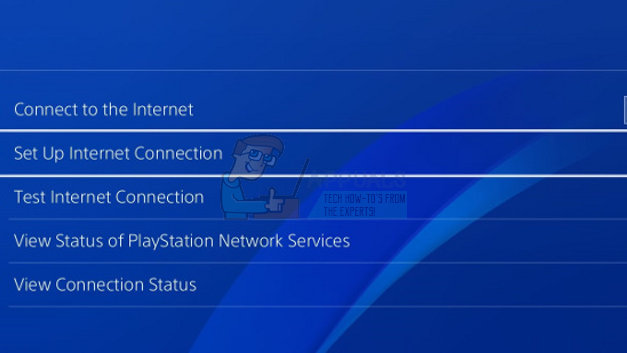
- In the PlayStation 4 main menu select Settings >> Network >> View Connection Status.
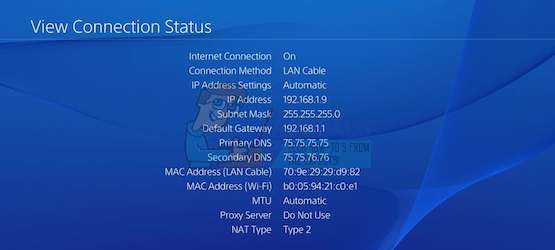
- Locate the IP address in the screen which opens up and make sure you write it down somewhere since you will need it to enable port forwarding. Make sure you also write down the MAC address of your PS4.
Xbox One Users:
You can try to permanently assign your Xbox One to the IP address that it is currently using. You can find the current IP address under advanced settings in the Xbox One Dashboard menu. To find the IP address, power up your Xbox One.
- Navigate to the home screen and push the menu button on the controller of your Xbox one.
- Navigate to Settings >> Network >> Advanced Settings.
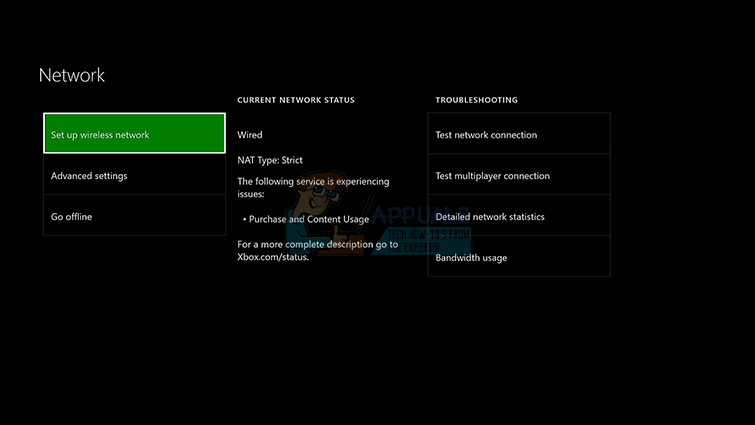
- In the IP settings section you should see the IP address listed. Write down this number because you will need to assign the IP address later.
- You should see Wired MAC address or Wireless MAC address listed under IP settings as well. Write down the 12-digit address for the connection that you are using.
That was the first step where we collected information about the respective consoles. Now we will need to assign static IP addresses to the consoles by following the steps below:
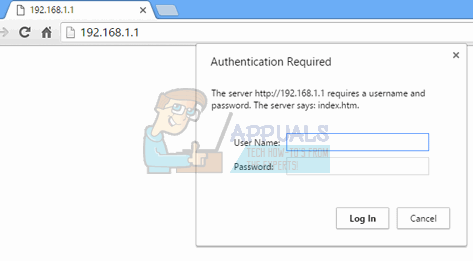
- Open a Web browser, type your Default Gateway number (IP address) into the address bar, and press Enter.
- Enter your username and password to access your router’s interface. The default username and password should be listed in your router’s documentation, on a sticker on the side of your router, or on the Port Forward website. If the username and password have been changed from the defaults and you don’t remember them, you’ll need to reset your router.
- The screen which enables you to add new IP addresses differs from router to router and there are no general rules to this.
- First of all, locate the Enable Manual Assignment option and click on the radio button next to Yes. The name of the option may be different or the option may not be present at all.
- Locate the window which allows you to type in the MAC address and the IP address of your choice so type in the addresses which you have gathered in the previous steps for your respective console.
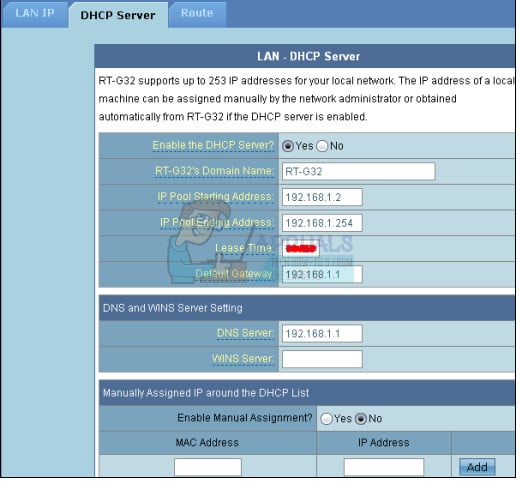
- After you have done that, click on the Add option and you have now added your console’s IP address to your router.
Now, we’ll need to add your console’s IP address to the DMZ which is a settings located in the menu after you login into your router using an Internet browser from a device connected to it.
- Open a Web browser, type your Default Gateway number (IP address) into the address bar, and press Enter.
- Enter your username and password to access your router’s interface. The default username and password should be listed in your router’s documentation, on a sticker on the side of your router, or on the Port Forward website. If the username and password have been changed from the defaults and you don’t remember them, you’ll need to reset your router.
- Locate the DMZ option in the Settings tab of your router. The option is always in a different location but it will most likely show up under the Security tab or something similar.
- Choose the DMZ option and enter the static IP address you assigned to your PS4. If everything goes right, your PS4 should now have access to the Internet. After you have confirmed these changes, make sure you turn off your router and your PS4 and wait for a couple of minutes.
- Turn them on, and navigate back to the Network Settings on your PS4. Choose the Internet Connection Test and everything should go smoothly. Now check to see if the error code still appears.
Solution 2: Use Your PC as a Hotspot
This is a temporary fix for the problem which you can use until Bungie sorts out their situation with the Cabbage error code. You can avoid this issue by generating a hotspot on your computer in order to connect to it and avoid the restrictions.
Microsoft Virtual Wi-Fi Mini Port Adapter is a feature added into Windows 7 and onwards. Using this feature, you can turn the physical network adapter that a computer has into two virtual network adapters. One will connect you to the internet, and the other will turn into a Wireless Access Point (Wi-Fi hotspot) for other Wi-Fi devices to connect with.
Read this guide Windows 10 Mobile HotSpot for detailed steps.
Solution 3: Activate UPnP and Disable FTP Server
This solution was posted as the best solution for Technicolor routers but most users claimed that this fix worked for them as well. These settings are not hard to change and this fix should not be skipped if you are trying to solve the Cabbage error code.
- Open a Web browser, type your Default Gateway number (IP address) into the address bar, and press Enter.
- Enter your username and password to access your router’s interface. The default username and password should be listed in your router’s documentation, on a sticker on the side of your router, or on the Port Forward website. If the username and password have been changed from the defaults and you don’t remember them, you’ll need to reset your router.
- Navigate to the Home >> Toolbox >> Game & Application Sharing settings on your router. Note that the name of these settings will differ from router to router which means you will need to search for them for a while.
- Enable the UPnP setting and check the Extended activation option next to it as well. Also, disable the FTP server option which should located there as well. If it’s not try to look for it under different setting tabs.
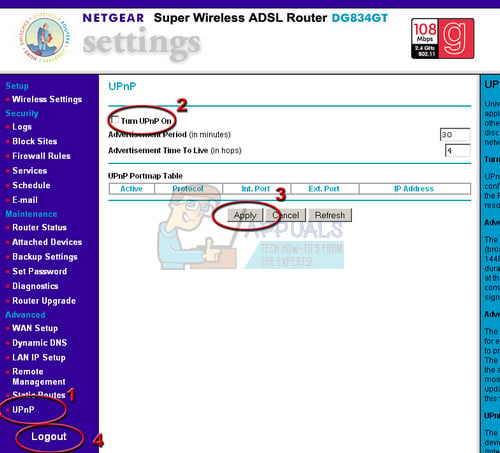
- Save the changes you made before exiting and turn off both your console and your router. Leave them turned off for a while before turning them back on.
- Check to see if the error code Cabbage still appears on your console while playing Destiny.
Solution 4: Unbind a Certain Port
Certain users who use certain router types have complained about the Cabbage error code on a regular basis (Thomson/Technicolor). It appears to be that the issue is actually caused by the ALG (Application Layer Gateway) which means that the CONE(UDP) connection helped is bound to the port 3074 which is needed by the Destiny to run properly.
You will need to unbind this port by following the instructions below. You will probably need to have full access to the router you are using and you will even need to call them if the information regarding the login credentials are not available online.
- Click on the Start menu and open Control Panel by searching for it.
- In Control Panel, select to View as: Category at the top right corner and click on Uninstall a Program under the Programs section.
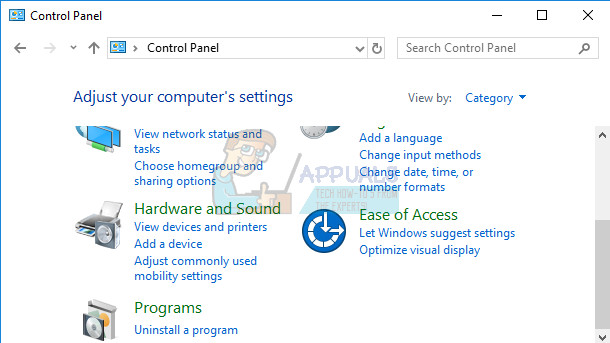
- You will be able to see the Turn Windows features on or off option at the top left part of the screen so click on it and locate the Telnet Client entry on the list. Enable it.
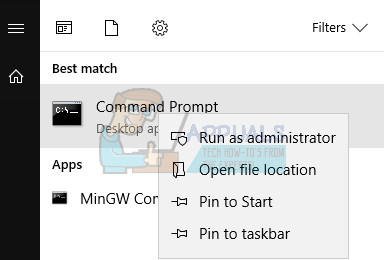
- Turn on your computer and log into Windows 10
- Press the Windows key in order to open the Start Menu, select the search button or start typing immediately, and type in “cmd”
- Select “Command Prompt” which should be the first result, right-click on it, and select the Run as administrator option.
- When Command Prompt launches, type in the following command:
telnet *your modem ip*
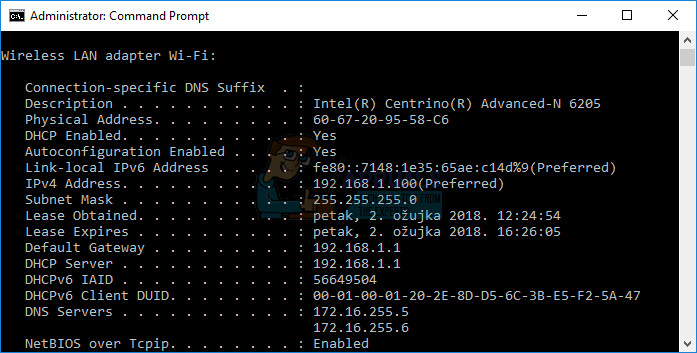
- If you don’t know your modem’s IP address, type “ipconfig /all” (there is a space after ipconfig) and press Enter to run this command.
- Take note of the IP Address (it will either be IP Address or IP Address v4) and type it in the Command Prompt window.
- Enter using the super user account of the broadband company whose Internet connection you are using. You will probably be able to find it online or you can just call them and ask them to give it to you.
- Type “connection bindlist” and tap the Enter key.
- If only the port 3074 is listed, you can use the following command to unbind this port:
connection unbind application=CONE(UDP) port=3074
- If a range of various ports is displayed, you will need to unbind the whole range. For example, if the range is from 3074 to 3658, you will need to use the following command.
connection unbind application=CONE(UDP) port=3074-3658
- Type the “connection bindlist” command again to see that there are no more ports displayed as bound. Exit saving changes and check to see if the error code Cabbage still appears while playing Destiny.
Solution 5: Set up Your Internet Connection Like This
Try tweaking your Internet connection settings like this in order to avoid the Cabbage error code. The magic of this solution is that you will change the DNS address to a free Google’s DNS and the error should sort itself out if that was the right cause for it. However, the process is somewhat different for PlayStation and Xbox users.
PlayStation 4 Users:
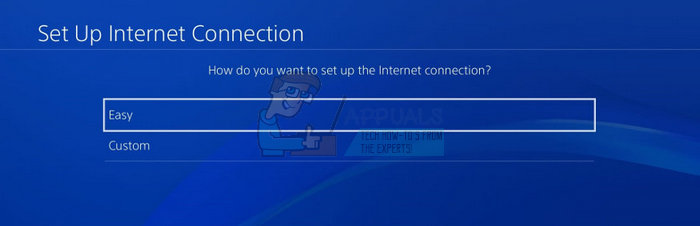
- Turn on your PS4 and navigate to Settings >> Network >> Set Up Internet Connection
- After that, Select the type of connection you are currently using to connect to the Internet (LAN Cable or Wi-Fi). If your PS3 is plugged in to the router, select LAN Cable and if you’re using a wireless connection, select Wi-Fi instead.
- The next screen should prompt you on “How do you want to set up the Internet connection”. Choose Custom.
- If you selected wireless, set up your connection as normal but you will also need to choose the wireless connection you are going to use in the future. If the network is password-protected, you will need to provide the key and it will display a padlock icon on the right side of the screen.
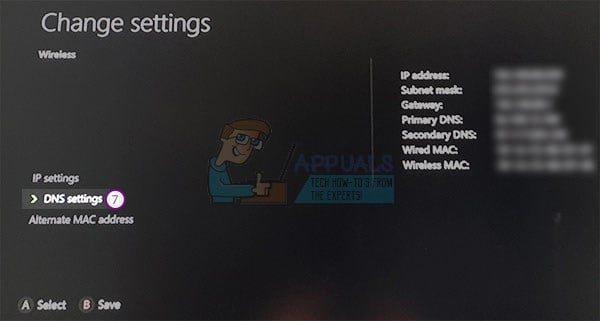
- Make sure you set your settings as following:
IP Address Setting: Automatic
DHCP Host name: Do Not Set
DNS Settings: Manual
Primary DNS: 8.8.8.8
Secondary DNS: 8.8.4.4
MTU Settings: Automatic
Proxy Server: Do Not Use
- Test your connection and check to see if the error code still appears.
Xbox One Users:
- Go to the Xbox One Dashboard and press the Options button on the controller you are using.
- Navigate to Network >> Advanced Settings >> DNS Settings >> Manual.
- Enter 8.8.8.8 for the Primary DNS and 8.8.4.4 for the Secondary DNS. Click Enter the both times to confirm and press the B button to save the changes
- Restart your Xbox One, restart Destiny, and check to see if the error code Cabbage still appears on your console.