Fix: Destiny Error Code Bee
The error code Bee is one of the most notorious Destiny error codes and it’s been bugging users for a long time. Bungie’s official statement is that the error code is caused by faulty communication between your modem and the Bungie’s servers but most people claim that their network settings are almost perfect.
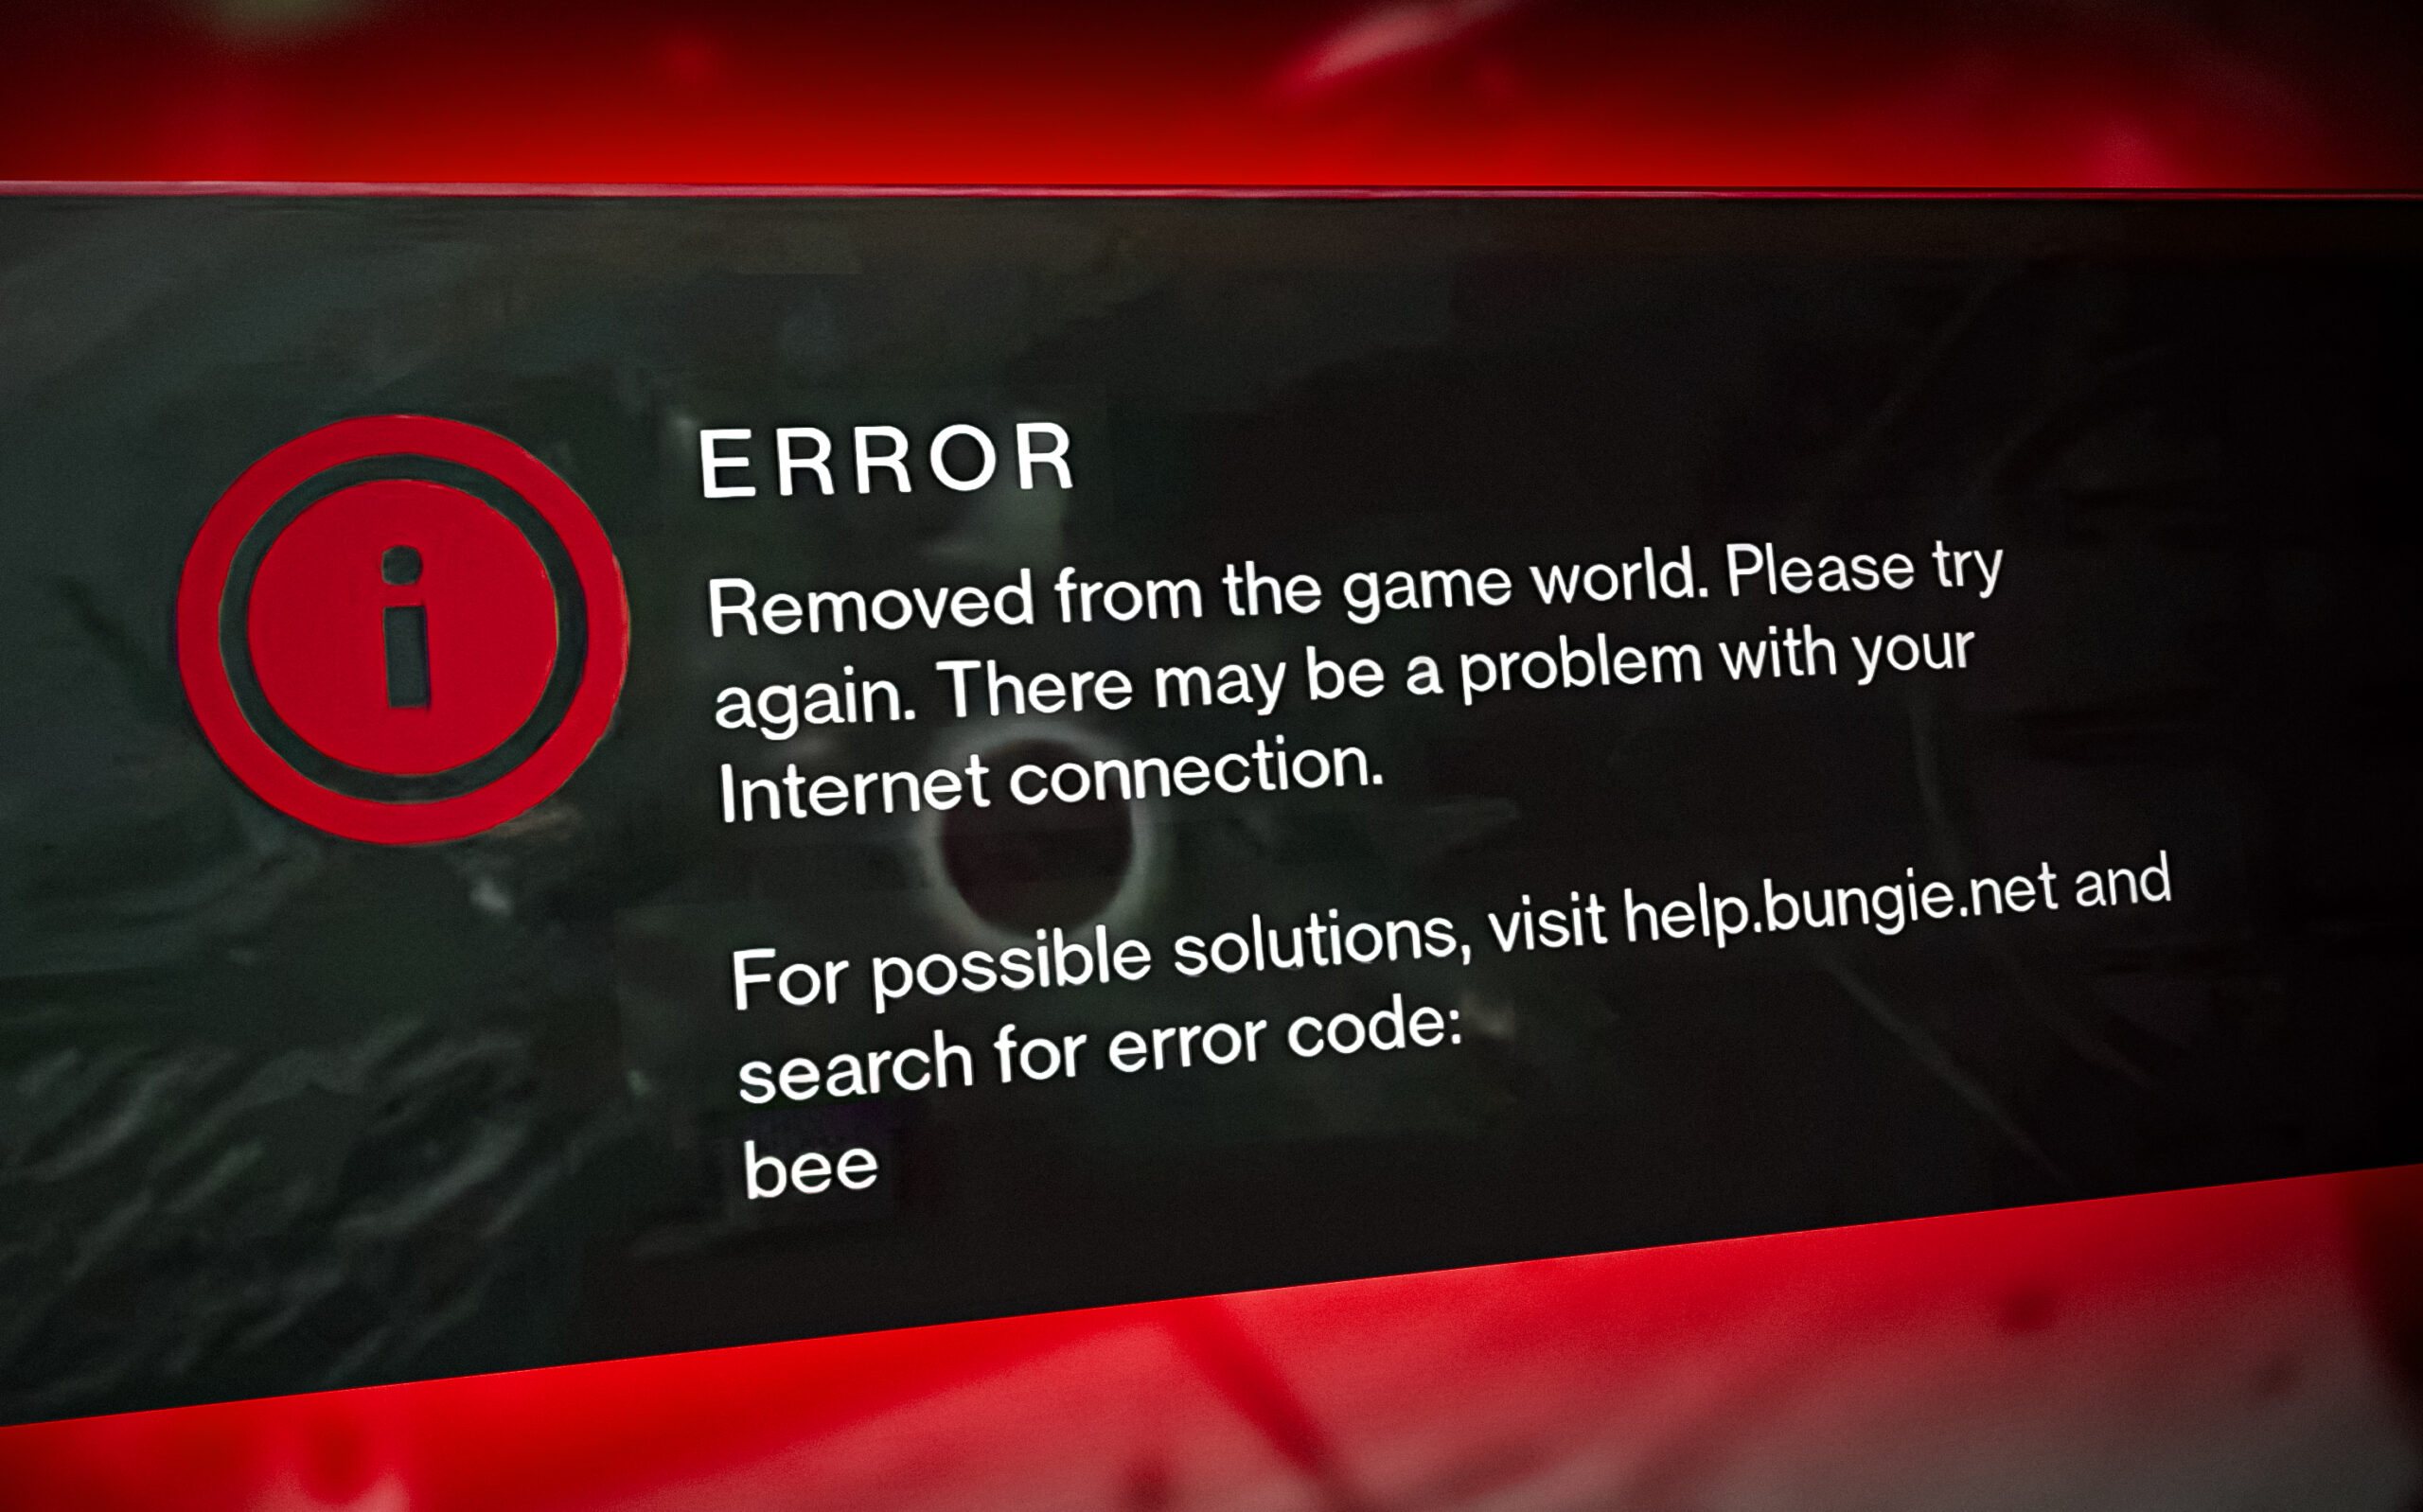
The error can be dealt with in a variety of different ways and you never know just what the real solution for your occasion is. That is why we recommend you follow all of the solutions above in order to see just what is the real solution for your Bee error code.
Solution 1: Change the Way Your Are Connecting to the Internet
Most users already know that playing using a wireless connection is unsafe and it can lead to high latency and frequent disconnects. However, some users have reported that sometimes it’s the other way around as they switched from connecting directly into the modem to using Wi-Fi.
This means that the error code can appear either due to a faulty connection with your modem or with your router. If you were using the Ethernet connection, try switching to Wi-Fi and running the game to check if the error code still appears; and vice-versa. Both of these options can help you get rid of the error code Bee for good.
Note: If you are in position, you can also try and replace your router if you have a spare one since some routers don’t allow Destiny to connect properly due to its high range of ports being used.
Solution 2: Restart and Unplug Your Console Completely
This solution has helped quite a few people deal with their Bee error code and this solution is quite a general method for fixing almost all Xbox-related issues. Naturally, this method can only be applied to users playing Destiny on Xbox.
However, make sure all of your games are synced online and backed up since this process may end up deleting them from your local Xbox One memory. There are two ways to delete the cache on Xbox One and reset your console completely:
- Press and hold the power button at the front of the Xbox console until it shuts down completely.
- Unplug the power brick from the back of the Xbox. Press and hold the power button on the Xbox several times to make sure there is no remaining power and this will actually clean the cache.
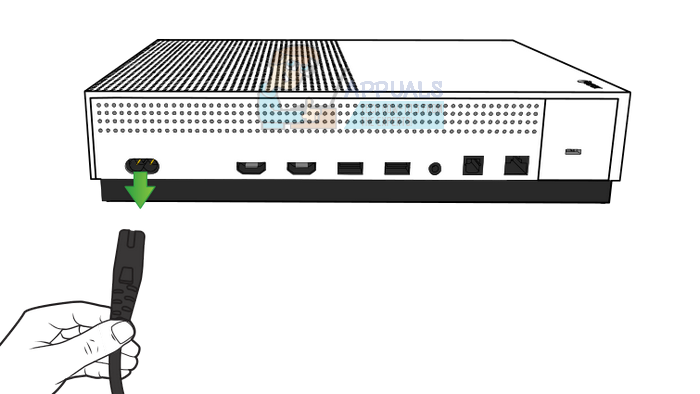
- Plugin the power brick and wait for the light located on the power brick to change its color from white to orange.
- Turn the Xbox back on as you would do normally and check to see if the Tapir error code still appears when you start Destiny or Destiny 2.
Alternative for Xbox One:
- Navigate to your Xbox One settings and click on Network >> Advanced Settings.
- Scroll down to Alternate Mac Address option and choose the Clear option which appears.
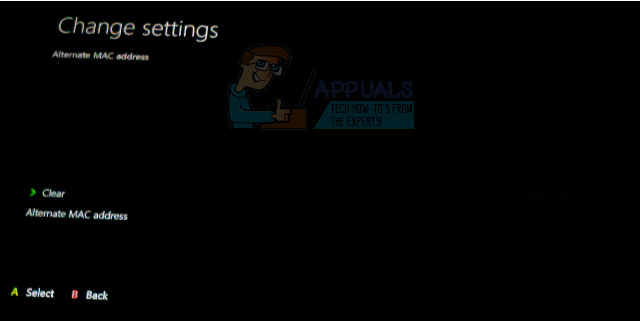
- You will be prompted with a choice to really do this as your console will be restarted. Respond affirmatively and your cache should now be cleared. Open Destiny or Destiny 2 after the console has restarted and check to see if the Tapir error code still appears.
If you are using a PlayStation 4 to play Destiny, make sure you follow the instructions below to hard reset your PlayStation 4 since PS4 does not possess an option to clear the cache:
- Completely turn off the PlayStation 4.
- Once the console is completely shut down, unplug the power cord from the back of the console.
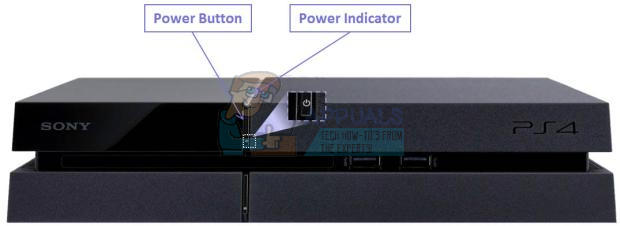
- Let the console stay unplugged for at least a couple of minutes.
- Plug the power cord back into the PS4 and turn it on the way you normally do.
Solution 3: Port Forwarding
Port forwarding is actually a great fix for these types of issues because of a simple fact that Destiny uses quite odd router ports which are quite high and some routers block these ports by default and some don’t. It’s important to perform these changes quite carefully as you will need to open these ports on your router, if you have the necessary permissions to do so. Follow the instructions below carefully and get rid of your Bee error code:
First of all, we will need to manually assign a static IP address to your console for the router you are currently using and the process is somewhat different from PS4 than it is on Xbox One.
PlayStation 4 Users:
- You can try to permanently assign your PS4 to the IP address that it is currently using. To find the IP address, power up your PS4 console.
- In the PlayStation 4 main menu select Settings > Network > View Connection Status.
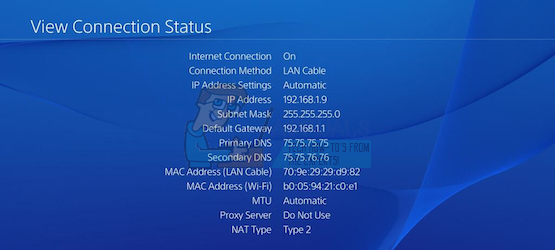
- Locate the IP address in the screen which opens up and make sure you write it down somewhere since you will need it to enable port forwarding. Make sure you also write down the MAC address of your PS4.
Xbox One Users:
You can try to permanently assign your Xbox One to the IP address that it is currently using. You can find the current IP address under advanced settings in the Xbox One Dashboard menu. To find the IP address, power up your Xbox One.
- Navigate to the home screen and push the menu button on the controller of your Xbox one.
- Navigate to Settings > Network > Advanced Settings.
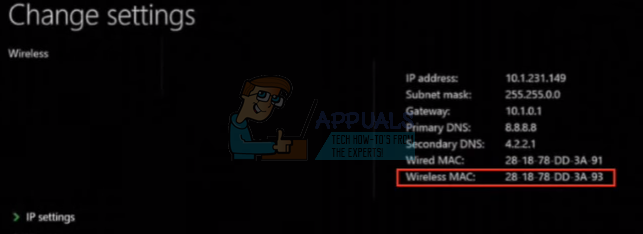
- In the IP settings section, you should see the IP address listed. Write down this number because you will need to assign the IP address later.
- You should see the Wired MAC address or Wireless MAC address listed under IP settings as well. Write down the 12-digit address for the connection that you are using.
That was the first step where we collected information about the respective consoles. Now we will need to assign static IP addresses to the consoles by following the steps below:
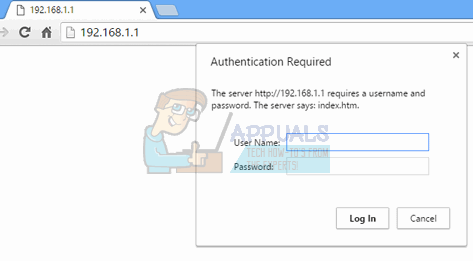
- Open a Web browser, type your Default Gateway number (IP address) into the address bar, and press Enter.
- Enter your username and password to access your router’s interface. The default username and password should be listed in your router’s documentation, on a sticker on the side of your router, or on the Port Forward website. If the username and password have been changed from the defaults and you don’t remember them, you’ll need to reset your router.
- The screen which enables you to add new IP addressed differs from router to router and there are no general rules to this.
- First of all, locate the Enable Manual Assignment option and click on the radio button next to Yes. The name of the option may be different or the option may not be present at all.
- Locate the window which allows you to type in the MAC address and the IP address of your choice so type in the addresses which you have gathered in the previous steps for your respective console.
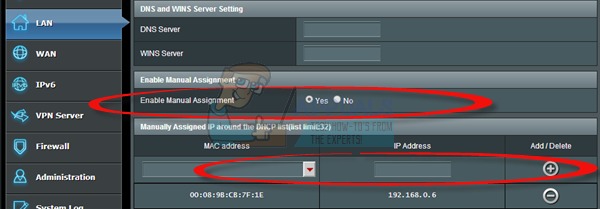
- After you have done that, click on the Add option and you have now added your console’s IP address to your router.
The last step consists of actually forwarding the ports used by Destiny through your router and via your console in order to get the game running properly again. Again, these settings may differ from router to router but the basis is the same. If you are having problems following these settings, make sure you search for the help page of your router’s manufacturer where these settings may be explained more clearly.
- Find the Port Forwarding section while still logged into your router. Each router will be slightly different. Common menu labels for the section of settings that contains Port Forwarding are “Port Forwarding”, “Applications”, “Gaming”, “Firewall”, and “Protected Setup”. If you don’t see one of these or something similar, try “Advanced Settings” and look for a Port Forwarding subsection.
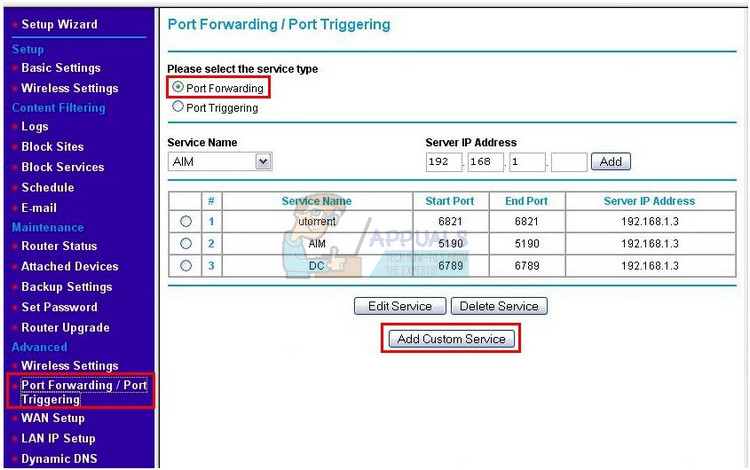
- No matter what the router or interface, you’ll need to enter the same basic information. Enter the port you want to open under Internal and External, or enter a range of ports to open under Start and End. Specially, for the Destiny and Destiny 2, there are several ranges you will need to open in your router and they are presented below:
7500-17899 (TCP)       Outbound

30000-40399 (TCP)     Outbound

35000-35099 (UDP)    Inbound and Outbound
- The TCP and UDP abbreviations are the options you should select under the Type of Service Type option. Since you can only select one of the options (or both), repeat these steps several times until you have covered all of the ranges presented above.
- Enter the static IP address you created for your console in the steps above and make sure you click on the Enable option if it is available.
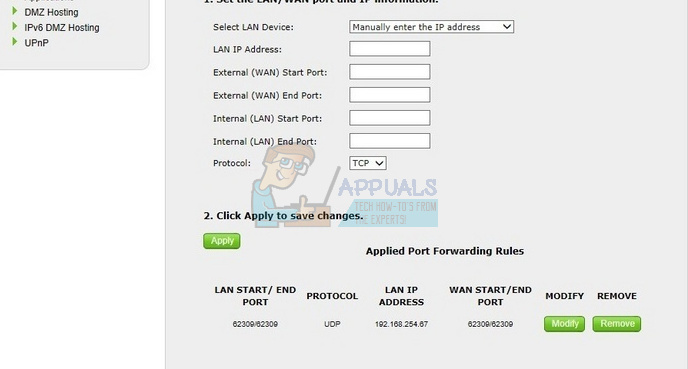
- Click on the Save or Apply button and make sure you restart both your router and your console in order to fully apply these changes.
Solution 4: Contact Your Internet Provider and Have Your Old Equipment Replaced
It turns out that the problem regarding this error code was caused by people having bad equipment which they used for their Internet connection and they haven’t replaced it in years. In most cases, those people used cable Internet to play the game and it turns out that simply replacing these was able to solve the issue.
If you are a cable Internet user and if you haven’t replaced any of your gear for more than a couple of years, perhaps you should contact a technician from the cable company or simply buy and replace the equipment yourself.
Nonetheless, if you are using any type of Internet connection and you start to notice a drop in performance, make sure you contact your Internet provider and make sure they do everything requested before you check whether the error code keeps appearing.