How to: Enable / Disable Data Execution Protection in Windows 10
Data Execution Protection (DEP) is a security feature available in all versions of Windows starting from Windows 7. It’s designed to guard against damages from viruses and other security threats. Despite its usefulness, some users may wish to disable it. Indeed, toggling DEP on and off is possible in any Windows version, including Windows 10. If you want to disable DEP in Windows 10, you need to:
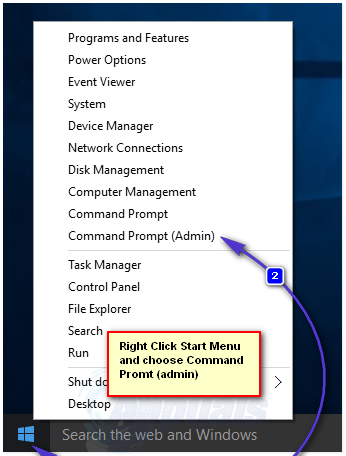
Right-click on the Start Menu button to open the WinX Menu. Click on Command Prompt (Admin) in the WinX Menu.
Type the following command into the elevated Command Prompt and then press Enter:
bcdedit.exe /set {current} nx AlwaysOff
Once the Command Prompt says that the operation was completed successfully, DEP will have been disabled on the computer.
On the other hand, if you want to enable Data Execution Protection on a computer running on Windows 10, you need to:
Right-click on the Start Menu button to open the WinX Menu.
Click on Command Prompt (Admin) in the WinX Menu.
Type the following command into the elevated Command Prompt and then press Enter.
bcdedit.exe /set {current} nx AlwaysOn
Once the Command Prompt says that the operation was completed successfully, DEP will have been enabled on the computer.
There is a chance that, if you are trying to turn DEP off on a UEFI-enabled computer (basically any computer that was sold with Windows 8 or 8.1 out of the box), you may receive an error message that says, “The boot configuration data store could not be opened. Access denied,” whenever you attempt to execute the commands used to enable and disable DEP in a Command Prompt. If that happens, ensure that the Command Prompt you use to execute the commands is an elevated one with administrative privileges – titled Command Prompt (Admin) in the WinX Menu.
If ensuring that you execute the commands in an elevated Command Prompt doesn’t work, you will need to reboot your computer. After this, open its BIOS settings, disable the Secure Boot feature, save the changes, and then reboot the computer in order for the commands to execute successfully. Once the commands have been successfully executed and Data Execution Protection has been enabled or disabled, simply return to the computer’s BIOS settings and re-enable the Secure Boot as it is essentially a useful feature.
sir when I am entering the command and hitting enter, the command prompt says” The boot configuration data store could not be opened. Access denied.” I have windows 10 installed in my laptop.