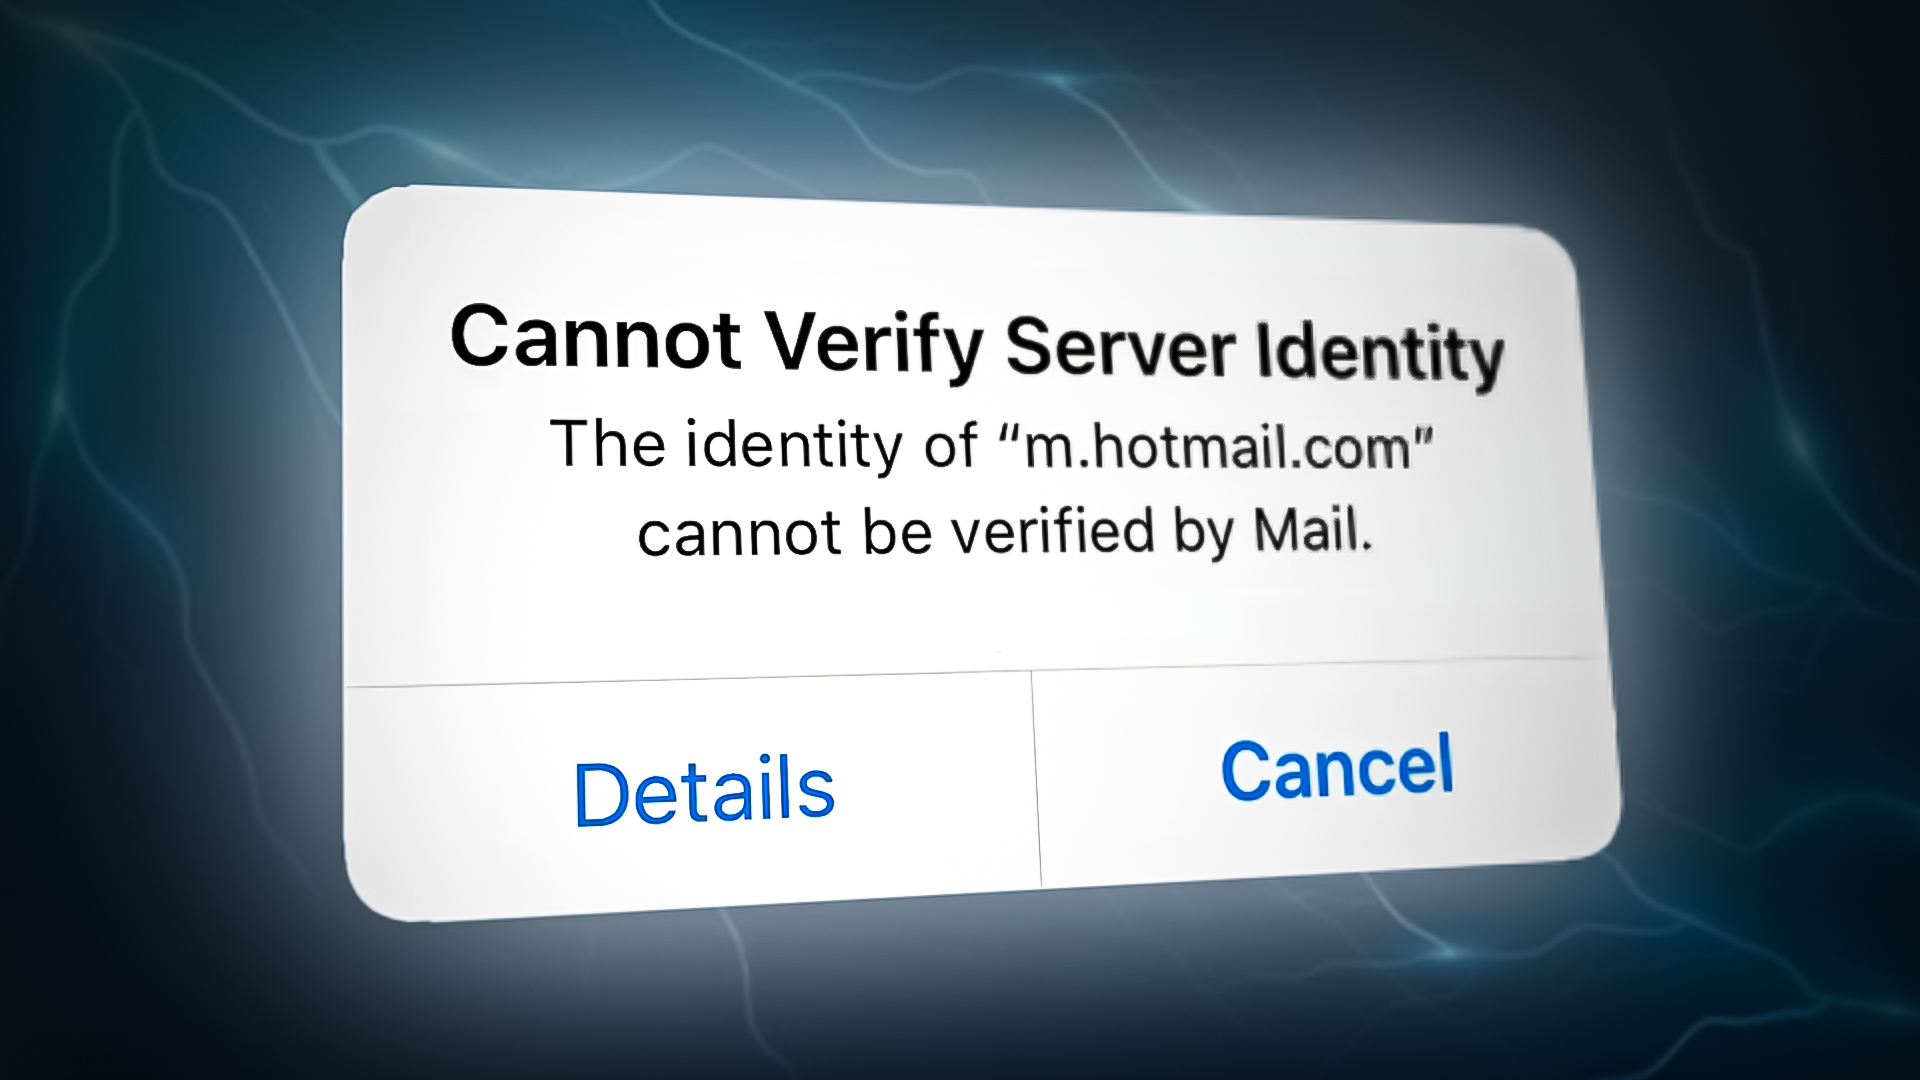
How to Fix “Cannot Verify Server Identity Error” on iPhone?
Cannot Verify Server Identity Error on iPhone occur mainly when your iPhone device detects the mail server’s certificate to be fake. The error primarily results from an expired or incorrectly signed certificate. When the server’s name does not match the domain name provided for the email address, it leads to this error on iPhone.
This is a common problem, but it won’t let the users send emails, nor can they receive any emails on their iPhones. Therefore, it needs instant resolution. Therefore, we have brought this article that has covered the error in detail, from its causes to their effective solutions that will help you to fix the problem in no time.
So, before proceeding with the solutions, let’s have a quick overview of the causes to know the root source of the error to fix the problem from the base.
- Incorrect date and time on iPhone- In case the date and time on your iPhone are not set correctly or is not matching to the current time zone, then you may find difficulty verifying server identity. So, when this is the cause found behind your error, then try fixing the problem by changing the date and time to the current GMT.
- Using an unsecured network connection- Sometimes, using an unsecured network connection may lead you to such an error. Therefore, it is suggested to use a private network instead of a public one to eliminate the problem.
- Mismatch in Domain and server name- When the name provided for the servers differs from the name given for Domain, the iPhone detects the certificate to be unreliable or fake, thereby giving you this error. Therefore, when such is the case found, fix it by changing the mail server name or setting up a free dedicated certificate.
- iPhone bugs or glitches- Another problem triggering cause is internal bugs or glitches in the iPhone. Therefore, it is recommended to restart your iPhone once when facing this error issue. Reboot will give your iPhone a fresh start, thereby fixing current internal problems on the device.
- Issues with the mail app- Similarly to iPhone bugs, if your mail app also contains any glitches, it may lead you to this error. So, in this situation, a simple reboot will help you to rescue the error problem. Restarting the mail app will resolve your internal issues, ultimately fixing the cannot verify server identity error.
- Wrongly configured network settings- Incorrect or wrongly configured network settings can trouble you with a can’t verify server identity error on your iPhone. Therefore, if you find this to be the reason behind the error, simply resetting the network settings will get you out of this error.
- Outdated iPhone software- In case you are using old or outdated iPhone software, it may become the reason triggering such a problem on the iPhone device. So, if you haven’t updated your iPhone software for a long time, updating it to the latest version is suggested to resolve the error.
- Outdated iOS carrier settings- Outdated or older iOS carrier settings may cause this error trouble. So, here updating the iOS carrier settings would resolve your error.
So, above are some reasons for this error on iPhone or iOS devices. Now, as you know the causes, you can quickly fix the problem by selecting the most effective solutions from the various mentioned.
1. Common Troubleshooting
It has already been mentioned above that mismatch in the Domain name, and server name can cause this error to arise on your iPhone. Mismatched names will let the iPhone detect the certificate as fake, thereby giving you this error. So, try troubleshooting below to eliminate the error when there is a difference in the server and domain name.
Changing the mail server name – If the hosting customer uses a VPS account, you can change the mail server name to match the certificate name.
Fixing the main configuration – Secondly, if the hosting customer is a Shared Hosting customer, then they can change the iPhone’s mail server settings to make use of mail.server-name.com instead of using mail.website-name.com.
Setting up a free certificate – The VPS user who does not use a liable certificate (such as self-signed certificates are not liable), then try setting up certificates from Let’s Encrypt, which is considered a trusted CA to provide free SSLs.
2. Use a Secure Network Connection
It has already been mentioned that sometimes using a public network may lead you to this error issue on iPhone. So, before going for any technical solution, it is advised to use a private network instead of a public to fix the problem. Using the private network has resolved this error for many users. You can use your mobile hotspot to connect or your home WIFI connection and check if the problem is fixed. Therefore, this solution is worth giving a try.
3. Set the Correct Date and Time On iPhone
Another reason causing this error on iPhone is the incorrect configured date and time. So, if the date and time is not correctly set on your iOS device or iPhone according to the current time zone or GMT, you will get this error. Therefore, in such a case, you need to correct the date and time on your iPhone or iOS device to eliminate the error.
For this, follow the below steps as guided:
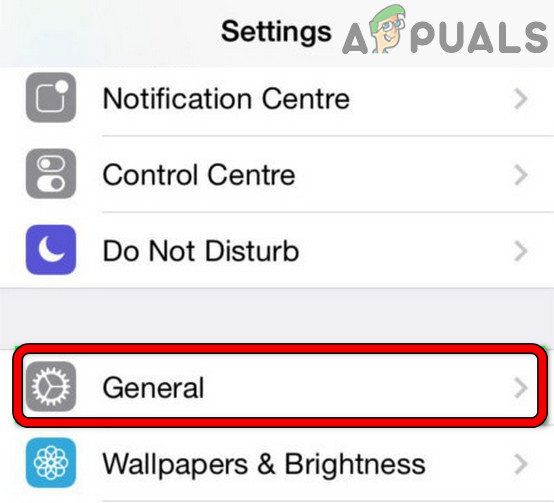
- On your iPhone, click on the Settings app and select the General option.

Open General Settings of iPhone
- Next, click on the Date and Time category.
- Here, on the Date & time screen, toggle on the button for Set Automatically.
- Once done, check if you can send or receive the emails or not.
4. Reboot Your iPhone
In most instances, iPhone internal bugs or glitches may cause this trouble on your device. So, if your iPhone has a bug or any other internal issues, you may face this error on an iOS device or iPhone. Therefore, here you just need to give your iDevice a simple restart. A restart will provide your device a fresh start, thereby fixing all the internal bugs or glitches currently prevailing on the device.
Follow the instructions below to restart your iPhone:
- Hold the side button of your iPhone until the power slider appears.
- Next, drag the slider to turn off your iPhone.
- Lastly, wait 1-2 minutes and then again press the side button for a second to restart the iPhone.
5. Re-add Your Email Account
Another potential solution you can use to fix the error is by re-adding your email account. You just need to delete your email account and re-add it to eliminate the error issue. You can do this by following the below-guided instructions as mentioned:
- Open the Settings app on the Home screen of your iPhone.
- Next, select the category Accounts & Passwords.
- Here, click on the Accounts section.
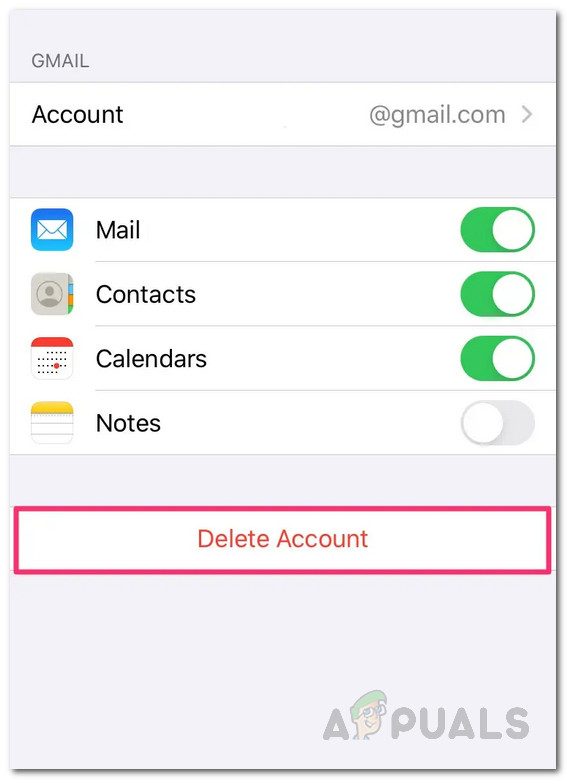
- Then, select the email account that you need to delete.
- Now, click the Delete Account button at the bottom of the screen.
Deleting Email Account - Next, click on Delete from My iPhone for final confirmation of email account deletion. Once confirmed, the selected email account will then be deleted.
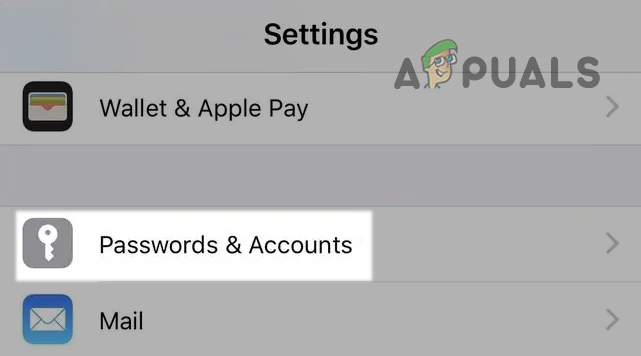
- After deletion, revisit the Settings app and click on the Passwords & Accounts category.
Open Passwords & Accounts in the iPhone Settings - Now, click Add Account and choose the provider for your email service.
- Then, provide all the required related information.
- Lastly, follow the on-screen guide to complete the email setup process.
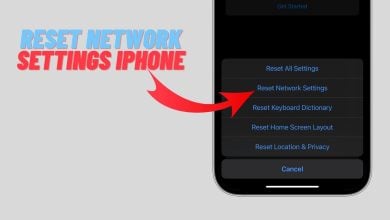
6. Reset Network Settings
If the above solutions are not working for you, then the problem might be related to the network settings. A wrongly configured network setting may cause connectivity problems between your iPhones and the server.
So, if you have modified the network and reset the network setting on your iPhone. As this solution helped many users to fix this error in their cases. So, the solution is worth giving a chance. Below are the steps to do so:
- Visit the Settings app on your iPhone home screen.
- Next, on the Settings panel, scroll down and choose General.
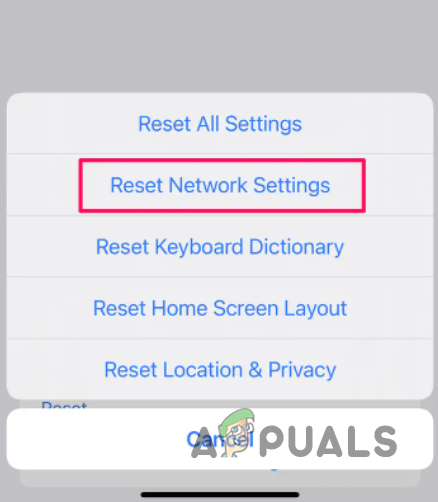
- Then, tap the Reset button.

Open Reset in General Settings of Your iPhone - Now, select the option for Reset Network settings. Once fixed, all your previously configured network settings and latest customizations will get erased or deleted.
Resetting Network Settings iPhone - If asked, enter your passcode to proceed.
- Finally, confirm resetting all settings on the iPhone.
Now check if you cannot verify the server identity error on iPhone is resolved, or else head to the next fix.
7. Disable SSL Encryption
This is another proven solution mentioned by many other users who cannot verify server identity errors on their iPhones simply by disabling the SSL Encryption. Therefore, we advised her to go for this solution once. Below are the steps to disable SSL encryption on iPhone:
- Open the Settings app on your iOS or iPhone device.
- Next, scroll down to navigate the Mail app. Once found, click on it.
- On the next appearing mail app screen, select the option Accounts and click on the problematic email account in case having multiple accounts.

Select the option Accounts - Click on your email ID at the top.
- Lastly, choose Advanced and toggle off the button for Use SSL.
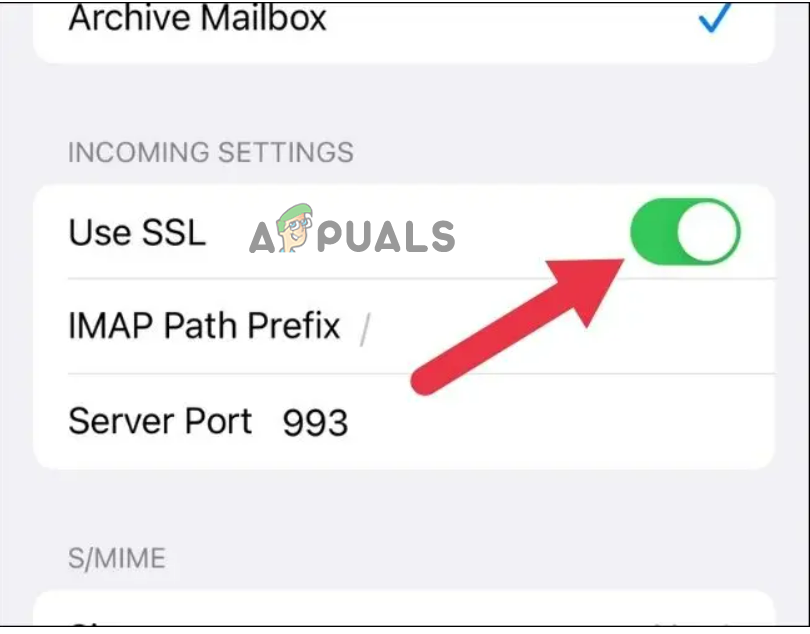 Disable SSL option
8. Update iOS carrier Settings
Sometimes outdated or older carrier settings on iOS can cause this error. Using the older version may cause connectivity problems, thereby showing the error. Therefore, updating your older iOS carrier settings is recommended once to eliminate the error.
Here’s how you can update the iOS carrier settings:
- Visit the Settings app on the Home screen of your iOS device.
- Next, on the Settings panel, look for the General category and click on it.
Open General Settings of iPhone - Now, click on the option About.
- Lastly, follow the on-screen guide to install the latest carrier update.
- Once installed, check if the issue got resolved or not.
9. Download the Latest Software on iPhone
In most cases, outdated or old software versions on your iOS device or iPhone may cause this error. An outdated or older version with time creates several problems, and cannot verify server identity error is one of them. So, when older software is found to be the culprit behind the error, try dealing with the situation by updating the OS to the latest available version on your iPhone to get rid of this error.
Also, updating the iPhone software to the latest version fixes various iPhone problems and contains various features that make your iDevice more stable and secure.
Follow the guidelines mentioned below to update the software:
- Open the Settings app on your iPhone.
- Next, go for the General category and click on the Software Update option.
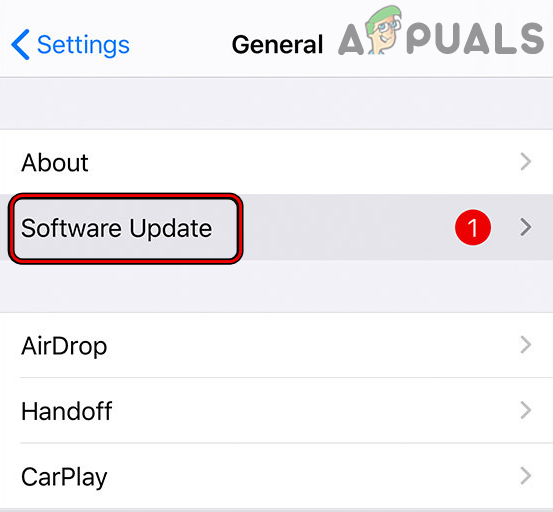
Update Software of iPhone - On the next screen, check for the available software update. If any are found, click the Download and Install option and wait until the device installs the latest updated software on your iPhone.
- Once done with the installation, restart your iPhone and let the changes take effect, and then check for the error.
10. Factory Reset
Lastly, if none of the above fixes works for you, go for a Factory reset. But before performing a factory reset, make sure to have a backup of your entire iPhone data, as a factory reset will delete entire data that leaves the iPhone like a new one. Follow the below guidelines to perform a reset on your iPhone.
- Launch the Settings on your iPhone.
- Next, scroll down and choose the option, General.
- After that, select the option Transfer or Reset iPhone.
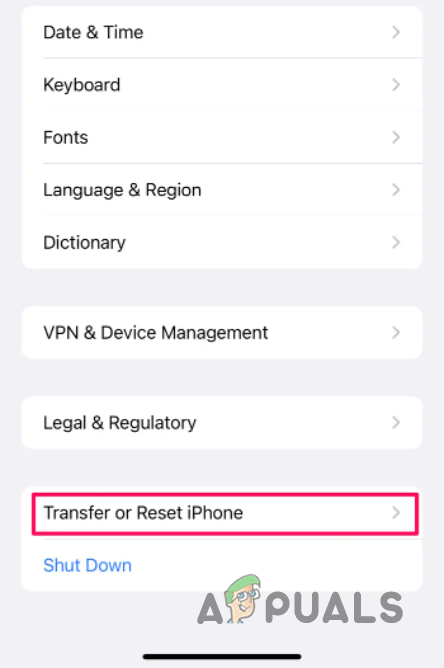
Navigating to Reset Options - Next, click on Reset All Settings.
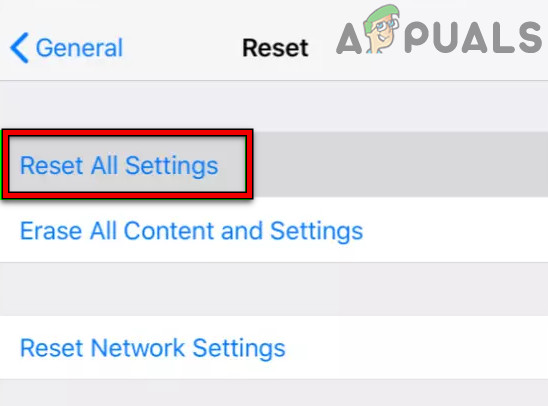
Reset All Settings on Your iPhone - If asked, provide the passcode or Restriction password to proceed.
- Now, give the final confirmation to reset all settings on your iPhone and click on the option.
- Wait for the iPhone to complete the factory reset process.
- Once done, your iPhone will automatically reboot.
- Lastly, launch the Mail app and check if the error still persists or not.