Fix: Windows 10 Mail Error 0x85050041
Error 0x805050041 indicates that the built-in mail application on Windows 10 is not syncing or connecting with the mail servers. There are various reasons for this issue to occur, all pointing to connectivity issues between the server and your system. If the issue lies with your mail provider, then you’ll have to wait until they rectify it. However, if the problem is on your end, you can perform the few steps listed here to fix it. These steps include disabling the antivirus, re-adding the email account, rebooting your router, and conducting a system file checker scan.
Personally, I am not a fan of the built-in application due to its limited ability to provide details on errors, as compared to Outlook, Thunderbird, and Windows Live Mail.
To troubleshoot the issue, proceed with the steps below.
Troubleshooting Error Code 0x85050041 in the Windows 10 Mail App.
First, run the system file checker scan. It can fix most of the issues. (see instructions here)
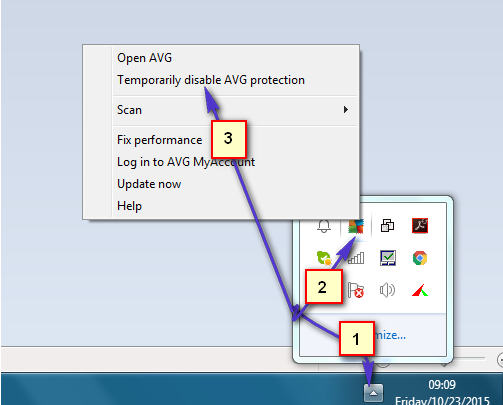
Close the Mail app and temporarily disable your anti-virus and firewall. Most anti-virus applications can be disabled by pulling down their contextual menu from the system tray. All you need to do is right click on it and choose the appropriate option.

After it has been disabled, try re-syncing your mail. Click the sync icon on your mail app next to the magnifying glass to push sync. If this fixes the issue, then uninstall and reinstall your antivirus or firewall. The issue is most likely caused by your firewall application blocking the connection from the mail app or to the email server. Reinstalling usually resets it. Some people who have encountered this issue also needed to switch to different antivirus software – for example, from Kaspersky to AVG. If you determine that the issue is not caused by the antivirus, try re-adding your account.

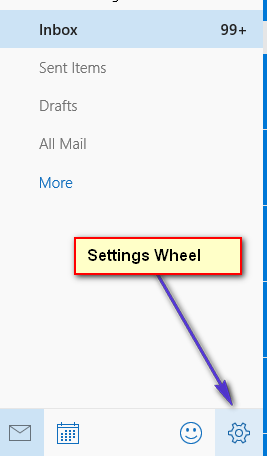
Wait and see if that fixes the issue. If not, then delete and re-add your account. To do that, click the settings wheel, then choose ‘Accounts.’ Next, click your account from the list and choose ‘Delete Account.’

After the account has been deleted, click the Settings wheel again, choose Accounts, and then choose Add Account. Then, re-add the account and test.
If, unfortunately, you find that neither removing nor re-adding your email account to the Mail app fixes this issue, or if the Mail app is stuck while you attempt to remove the account, there is only one path left to take – to uninstall and then reinstall the Mail app entirely. Please note that the Mail app is packaged with the Calendar app. So when you uninstall the Mail app, you will also be uninstalling the Calendar app. However, when you reinstall the Mail app, the Calendar app will also be reinstalled. There are two different methods for uninstalling the Mail app, but only one method for reinstalling it.
I am uninstalling the Mail app.
Option 1: Use the built-in PowerShell utility,
Open the Start Menu.
Search for “Powershell”. Right-click on the search result titled ‘Windows PowerShell,’ then click on ‘Run as Administrator’ in the context menu. Alternatively, hold the Windows Key and press X, then choose ‘Command Prompt (Admin).’ Type ‘powershell’ in the black command prompt followed by the Enter key to change the prompt to PowerShell Prompt.
Type the following into PowerShell and press Enter:
Get-AppxPackage –AllUsers
You are going to see a list of all the apps installed on your computer. Scroll down this list, looking for an app named ‘WindowsCommunicationApps’. Once the app has been found, copy whatever is in its ‘PackageFullName’ field.
Type the following into PowerShell, replacing X with whatever you copied from the PackageFullName field of the windowscommunicationapps app, and then press Enter:
Remove-AppxPackage X
The command will be executed successfully in a matter of seconds. Once the Mail app has been deleted, you can close PowerShell.
Restart your computer.
Option 2: Use a third-party utility by the name of Windows 10 App Remover
There exists a third-party utility – Windows 10 App Remover – that can be used to quite easily uninstall basically every built-in Windows 10 application there is. While this option does require the use and installation of a third-party program, this method is much simpler as it requires nothing more than a click on a button inside the app and confirmation of the action.
Download the latest version of the Windows 10 App Remover from here.
Launch the Windows 10 App Remover.
In the Windows 10 App Remover, click on Calendar & Mail.
In the resulting popup, click on Yes.
Wait for the Mail app to be uninstalled (which should only take a few seconds), at which point you are free to close or even uninstall the Windows 10 App Remover.
Restart your computer.
Reinstalling the Mail app
In order to reinstall the Mail app (and the Calendar app), you are going to have to manually navigate to the Windows Store, search for the Mail app and then install it from there. In order to do so, you need to:
Open the Start Menu.
Search for “store”.
Click on the search result titled Store.
Once the Store opens up, type “mail” into the search box, and when the search suggestions load up, click on Mail and Calendar.
On the app page for Mail and Calendar, click on Install.
Wait for the app to be reinstalled. You should know that, once the app has been reinstalled, you are going to have to set it up from scratch all over again.
Once the app has been reinstalled, restart your computer and check to see whether or not the problem has been fixed once it boots up.