The error DNS_PROBE_FINISHED_NXDOMAIN often occurs when the DNS fails to reach the web IP address. DNS or Domain Name System translates the Domain names like appuals.com into the IP (Internet Protocol) for the browsers to load the content.
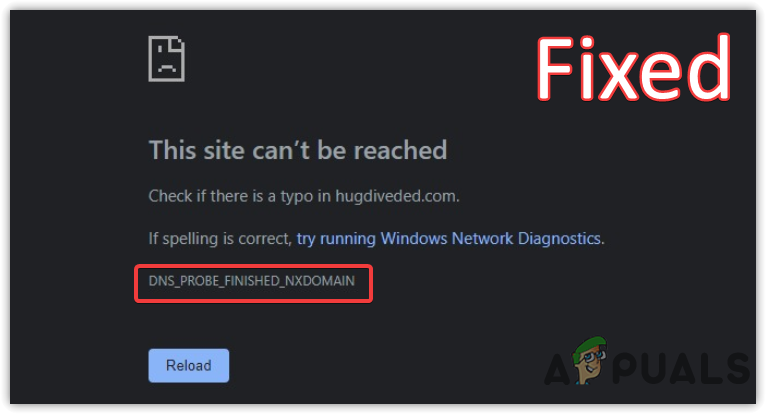
This error can be caused by many factors, such as DNS Server or cache issues, invalid domain names, interference from the adblocker, misconfigured host file, and problems with the router’s firmware.
Common Fixes
Before diving into the solutions, we recommend performing common troubleshooting as mentioned below.
First, check the domain name or website URL properly, as it can be incorrect. Try to access the website on your other devices. Try accessing the website from another device; if you can access the website from another device, it means that there is a misconfiguration in your main device. In that case, you can start applying the solutions provided below.
If the website isn’t opening on another device, there are two possible causes; either the website has blocked your ISP/Country from accessing the website. If you can access other websites, it is possible that the website you are trying to access is down, or the issue could be from the website’s webmaster. In both cases, you can only wait till the issue resolves.
If you are a webmaster, you can check the website’s DNS settings to ensure that the DNS settings are set correctly. If the problem is not from the DNS settings, check your hosting to resolve this issue.
1. PowerCycle Your Router
This error can be triggered due to the firmware issue or overheating the WIFI device. In my case, When I tried to access my router admin panel, I received this error message because my WIFI device was being used for a long time, and I did not restart my router for a long time. Hence, my device was heating up, and for that reason, the DNS was not able to reach the router’s admin IP address. So when I restarted, the error was immediately resolved. Follow these steps:-
- Unplug the adapter from the Modem/Router and the electric outlet
- Wait for 2 to 3 minutes, and then plug the power cables back
- Wait for the lights to turn on
- Once done, check if the error is fixed.
2. Switch to a Public DNS
Humans cannot remember IP addresses, so the DNS was introduced to translate the human-friendly name to IP addresses so the browser can understand which website you want to visit with the help of DNS.
Using an Automatic DNS server takes the DNS server provided by your ISP, which is unreliable, and sometimes stops working properly. Therefore, we will apply the Public DNS provided by Google, which is stable.
If the error is resolved after changing DNS, that means your DNS server was experiencing issues.
To change the DNS settings, follow the instruction below.
- Click Start Menu and type Control Panel
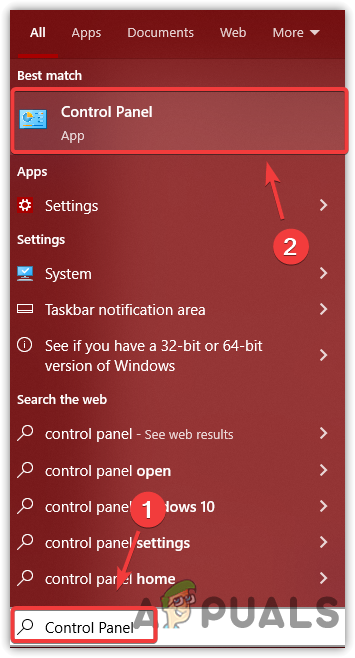
Opening Control Panel On Windows - Open the control panel and head to the following path
Control Panel\Network and Internet\Network and Sharing Center
- Click Change Adapter Settings from the left pane
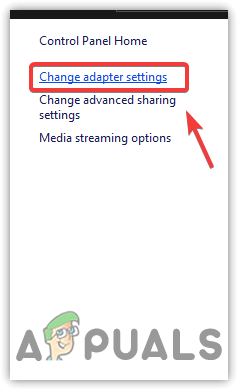
Clicking Change Adapter Settings To View Network Adapters - Right-click on your Ethernet or WIFI connection
- Click Properties
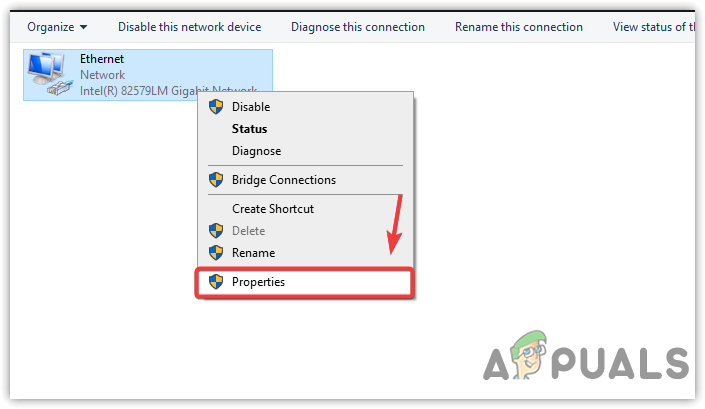
Opening Network Adapter Properties - Find and select Internet Protocol Version 4 (TCP/IPv4)
- Then, click Properties from the right side
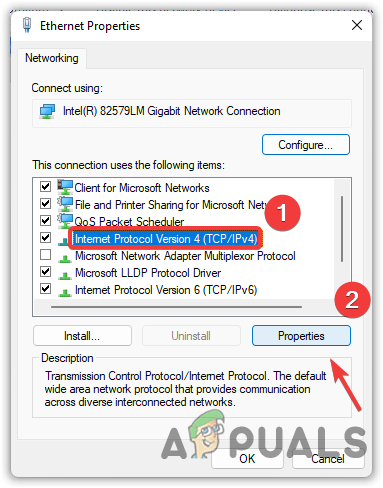
Selecting Internet Protocol Version 4 (TCP IPv4) To Open Properties - Choose Use The Following DNS Server Addresses
- Now, if you want to use a manual DNS server, you can use Google DNS, as it is secure and faster than other DNS services. For that, type the following numbers in the boxes mentioned below
Preferred DNS Server
8.8.8.8
Alternate DNS Server
8.8.4.4
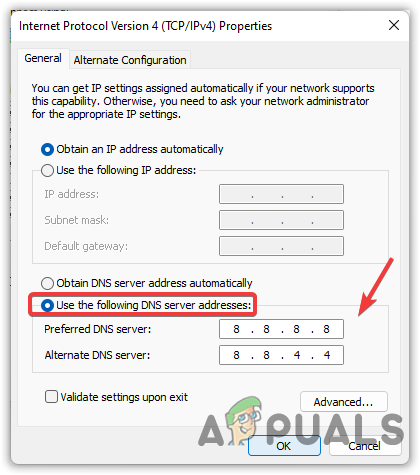
Changing DNS To Google DNS - Once done, click OK
- To switch from the manual DNS to automatic DNS, choose Obtain DNS Server Address Automatically and click OK to save the changes.
- Once done, type the command prompt in the search box
- Right-click the Command Prompt and click Run As Administrator
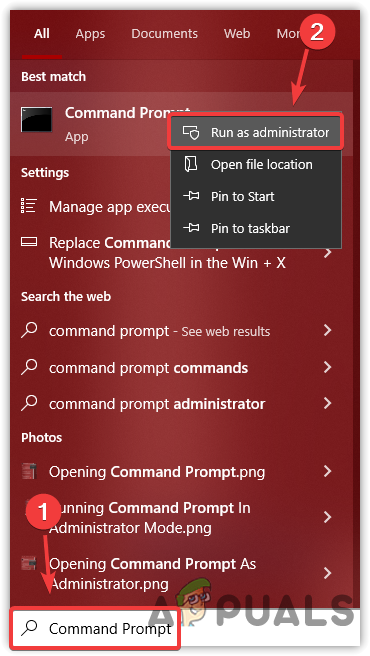
Opening Command Prompt As Administrator On Windows - Paste the following commands in the terminal and press Enter to flush your DNS
ipconfig /flushdns
ipconfig /registerdns
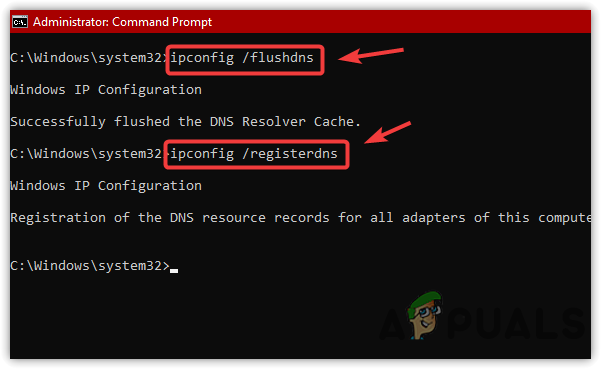
Flushing DNS - Once all is done, check if the error is fixed.
3. Automatically Configure Your DNS Settings
You can also configure your DNS settings properly using the free DNS Geek tool, which can resolve all your DNS issues. The script we will provide is not certified, so you might be prompted with an unverified publisher message. Follow the steps to run the script:
- Go to the link to download DNS Geek Tool
- Once the downloading is finished, click Start Menu and type Windows PowerShell
- Right-click the Windows Powershell and choose Run As Administrator
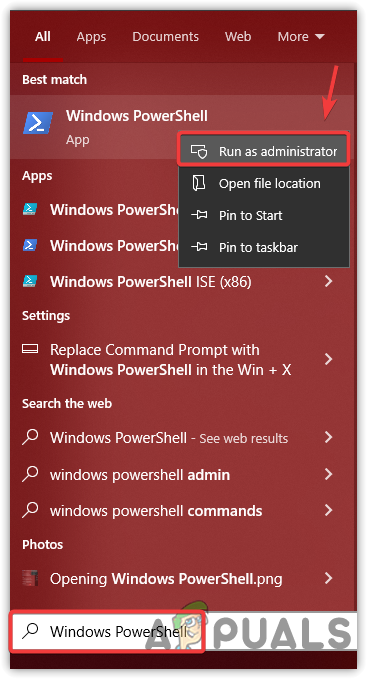
Running Windows PowerShell With Administrators Privileges - Once the terminal is opened, type the following commands to avoid the Execute Policy Restrictions
Set-ExecutionPolicy Unrestricted -Scope Process
Set-ExecutionPolicy Restricted

Changing Execution Policy - Once done, now go to the folder where the DNS Geek Tool is installed
- Right-click on the script and choose Run With Powershell
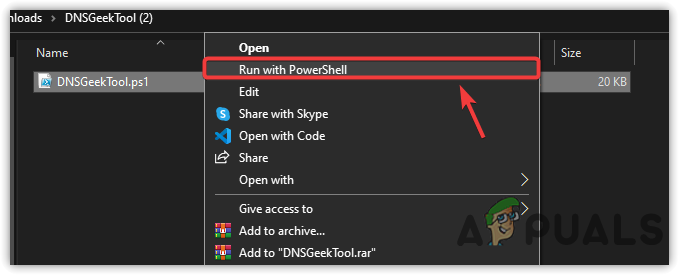
Running PowerShell Script - Once done, check if the issue persists.
4. Assign Automatic IP Address
If you are using a dedicated IP address, it can cause issues because sometimes, when your DHCP server is bloated, and many devices are connected to your router, it can’t be able to assign you the IP address your computer is requesting, which can cause an IP address conflict causing nxdomain error.
So if there is a problem with your DNS server or IP address, this will fix it. Below are the steps:
- Click Start Menu and type Settings to open it
- Navigate to Network & Internet
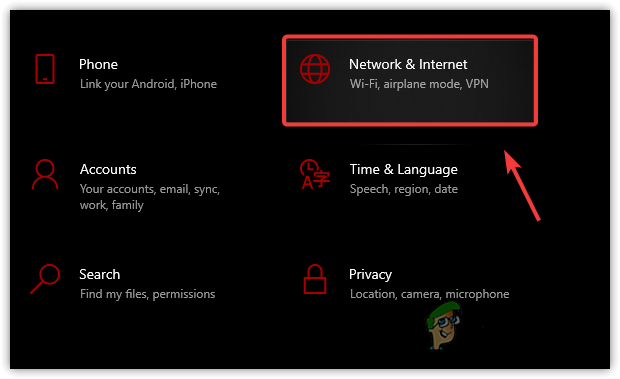
Navigate to Network And Internet From Settings - Click Ethernet or WIFI from the left pane
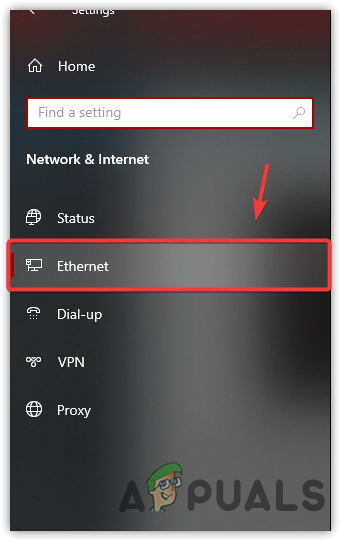
Navigating Network Connection Settings - Click the Connected Network connection to view the network connection settings
- Scroll down to the bottom and click on the Edit button under IP Settings
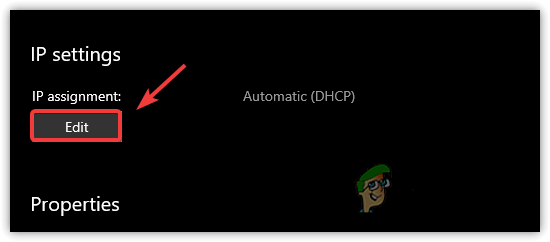
Clicking Edit to Change The Network Settings - Select Automatic (DHCP) and then click Save
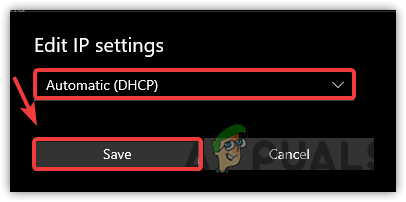
Changing IP Settings From Manual To Automatic - Once done, check if the error persists.
5. Disable Adblocker
Your adblocker might be interfering and preventing you from accessing the website. Try disabling the ad blocker or resetting your browser to fix this issue. Follow these steps to disable your AdBlocker extension:-
- Open your Chrome browser, and head over to this link: chrome://extensions/

Chrome Extension Page - Once on the Extensions page, find the ad blocker you are using. In my case, it’s ‘Ublock Origin.’
- Simply toggle off the switch in front of Adblocker to disable it.
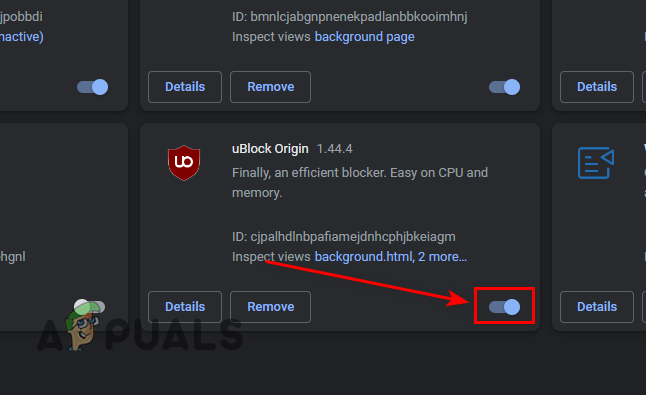
Disabling uBlock Origin - After disabling it, check if you can access the website.
- If you can access the website, you can whitelist the server’s address from your AdBlocker.
Note: Each adblocker has a different way of whitelisting the website. Check your adblocker’s official website for steps.
6. Remove Website From Hosts File (if applicable)
The Hosts file is an operating system file that maps hostnames to IP addresses. It is a text file you can use to assign a local domain name, redirect websites, block websites, and others.
So if you have edited the hosts file recently, it is possible that the domain name you are trying to access is blocked from the hosts file. Below are the instructions to remove the entry from the hosts file.
- Click Start Menu and type Notepad
- Right-click on the notepad and click Run As Administrator
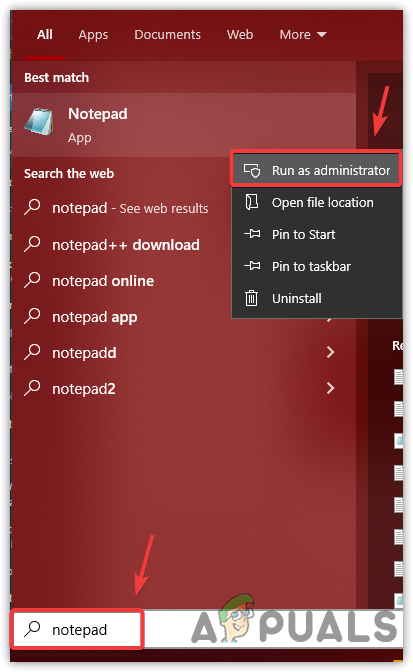
Opening Notepad With Administrator Privileges - Once the Notepad is opened, click on File and then click Open
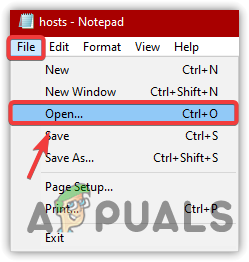
Opening File in Notepad - Paste the below path in the address bar in the file explorer to navigate
C:\Windows\System32\drivers\etc
- Select All Files from the bottom right
- Then, double-click on the Hosts file to open it in notepad
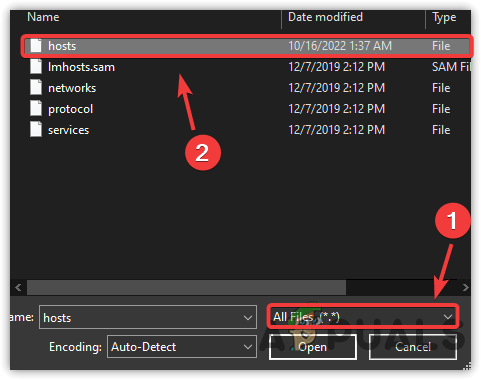
Opening Operating System Hosts File in Notepad - Now check if there is an entry with a domain name that you are trying to access
- If there is, remove it and save the file by pressing Ctrl + S on the keyboard.
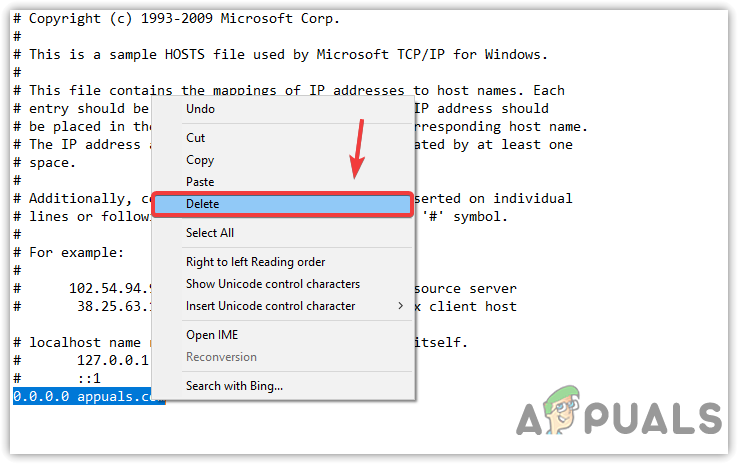
Removing Entry From Hosts File
7. Disable Third-Party Antivirus
Another factor that can cause this error is a third-party antivirus firewall. It is possible that your third-party antivirus is interfering and causing this issue. To fix this, you can try disabling or uninstalling the third-party antivirus. The following steps might help with different third-party antivirus:
- Right-click on your Antivirus from the system tray
- Hover your mouse on Avast Shields Control
- Then click Disable For 10 Minutes
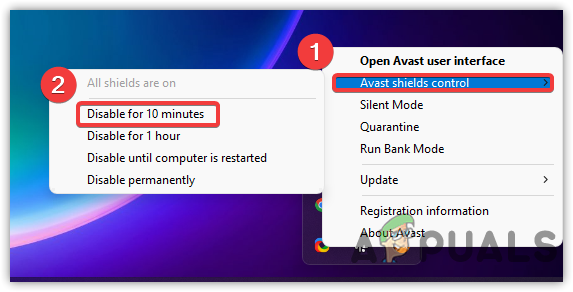
Disabling Third-Party Antivirus Temporarily - Once done, check if the issue persists.
8. Use VPN
You can access the website through a VPN. There are many VPNs available on the internet, and you can choose the best one by visiting the guide on The Best VPN For Streaming and Gaming in 2022.
If none of the methods shown above worked for you, the DNS issue is occurring from your ISP’s side. Contact your ISP and let them know that you are facing this DNS issue.