Fix: DNS_PROBE_FINISHED_NO_INTERNET
DNS_PROBE_FINISHED_NO_INTERNET tells us that there is no Internet Connection Available. So I assume, that you’re on this page from another device that has internet. The error is too general, it doesn’t tell us why, where, and how has it not got the internet, instead, it just says “no internet”. So to fix this issue, we will have to troubleshoot it as there is no straightforward fix but by the end of this guide, you should be able to fix it.

Method 1: Check Connectivity
Make sure that your router or whatever device is responsible for the internet, is receiving internet from your ISP. If it is a wi-fi device, then connect your phone or another wifi-enabled device to this router/modem and see if gets the internet. If it does, then the router is fine if it doesn’t then speak to your ISP because you’re not getting the internet.
If you are already connected to the internet from another device, check if google chrome is working fine on that device. If it’s working fine, then you don’t have connectivity issues, however, if it’s not working fine we suggest you restart your router. Once you verify that there are no connection issues from your router. You can check if everything else is working fine on your Computer. You can follow these steps below:
- Hold the Windows Key and Press X. Choose Command Prompt (Admin) or PowerShell (Admin).
- Once Command Prompt or PowerShell is opened, type the following command:-
ping -t 8.8.8.8
- Press enter, and if your network is working fine reply should be like this:-
Reply from 8.8.8.8: bytes=32 time=42ms TTL=53
Reply from 8.8.8.8: bytes=32 time=42ms TTL=53
Reply from 8.8.8.8: bytes=32 time=42ms TTL=53
However, if the reply is any sort of error then your computer’s network configuration may have a problem. You can carry along with the methods below.
Method 2: Power Cycling your router
Just to double-check and make sure that your router isn’t the problem in this case. We can actually try to power-cycle our router and that should potentially fix this issue for you. Follow these steps below:
- Power off your modem and your router completely by switching them off.
- Wait 10 minutes and power them back on.
- Wait 1-2 minutes after powering it up now check to see if the issue persists.
If this doesn’t work for you, we can try to reset your Network Configurations.
Method 3: Resetting your Network Configurations
If the methods above didn’t work out for you, there is a chance that your Network configurations aren’t correct which is causing your Computer to not connect to the router successfully. We can reset your Network configurations by using CMD with commands. To reset your Network Settings properly, Follow these steps below:
- Hold the Windows Key and Press X. Choose Command Prompt (Admin) or PowerShell (Admin).
- Type the following commands one by one to reset your Network Settings.
netsh winsock reset
netsh int ip reset
ipconfig release
ipconfig /renew
ipconfig /flushdns
Restart your computer and check to see if the issue persists.
Method 4: Clearing Chrome’s Host Cache
Clearing the DNS Host cache of your Google Chrome client can help you with this issue as well. Your Google Chrome client holds a record of DNS entries to save looking them up every time which reduces the loading time of the website but sometimes bad cache can give you errors such as ERR_NAME_NOT_RESOLVED and ERR_CONNECTION_RESET. You can easily clear your Google Chrome’s cache, follow the steps below:
- Open your Google Chrome.
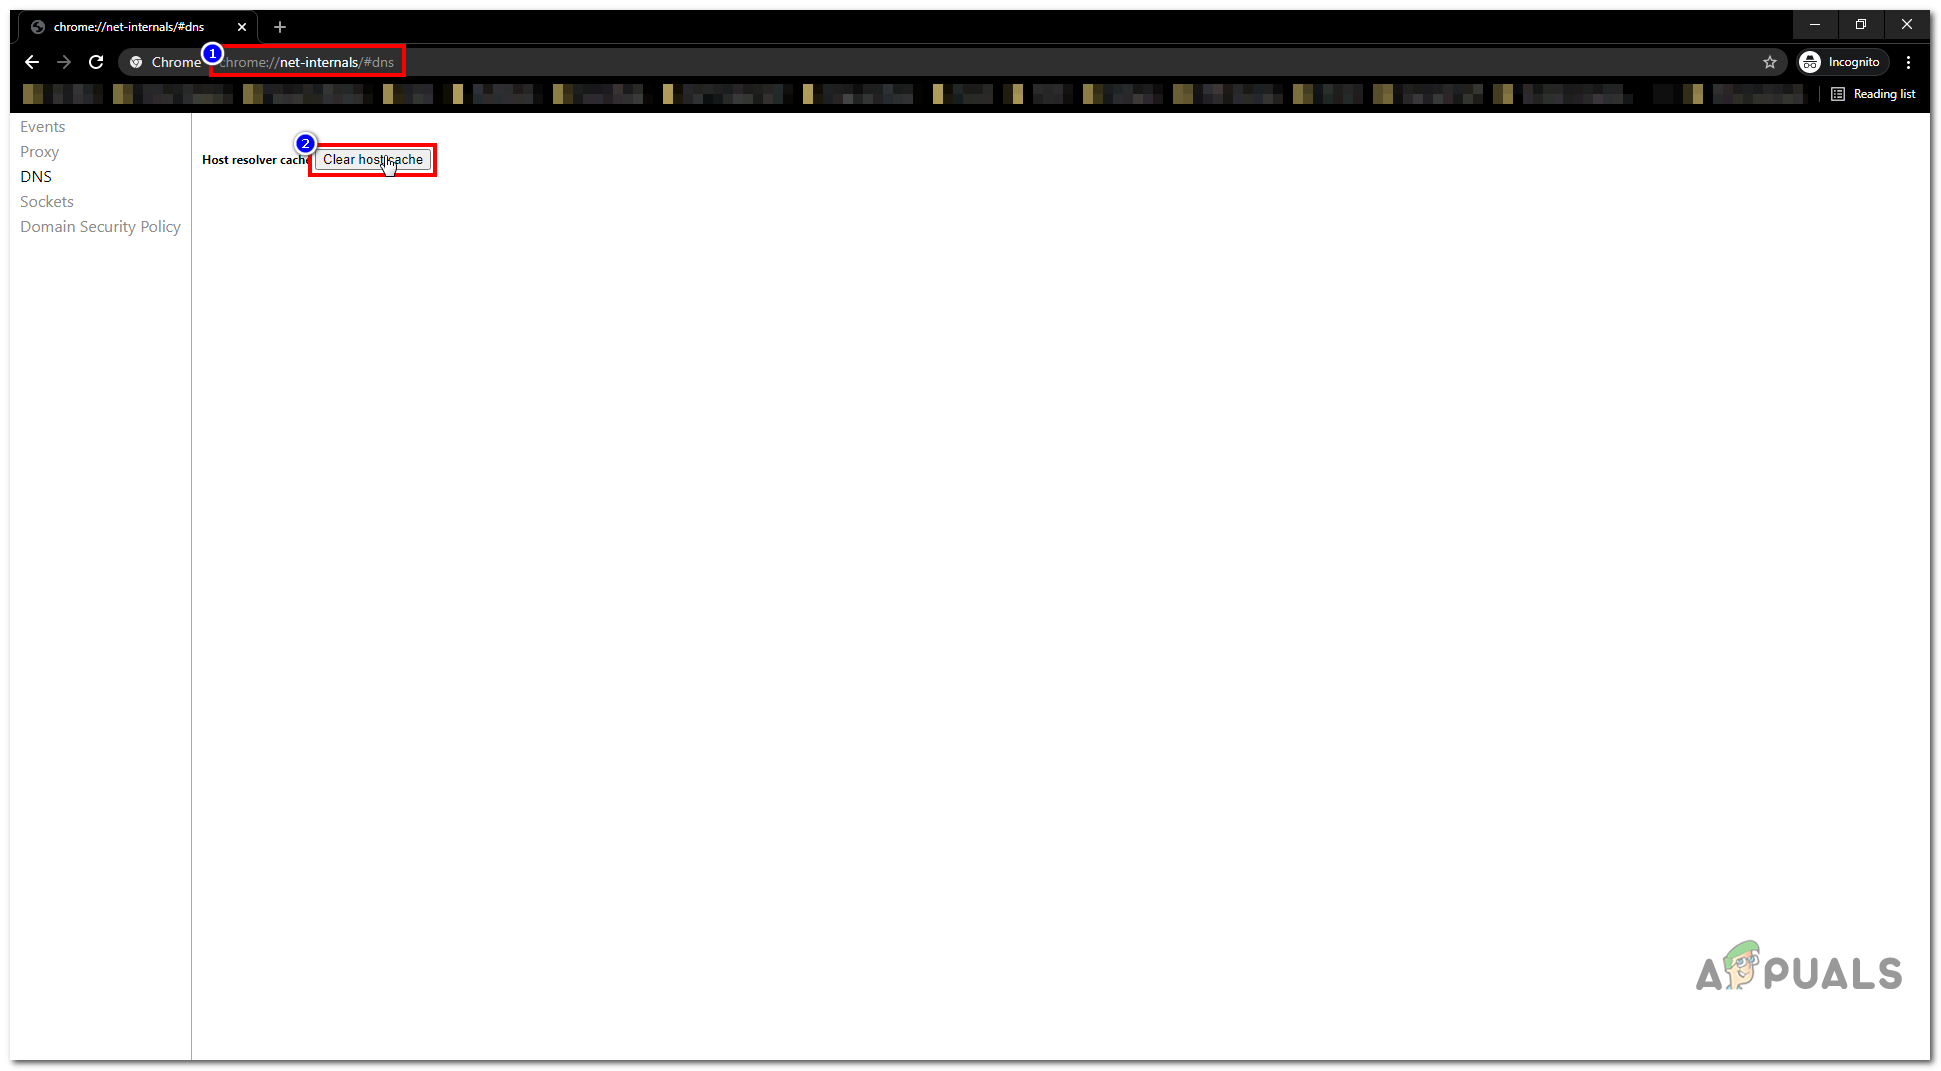
- In the URL Section put this URL and press Enter.
chrome://net-internals/#dns
- This should open Google Chrome‘s Host resolver cache page. Now Simply click “Clear Host Cache”

Clearing Host cache - Restart your Google Chrome and check to see if you can access the website again.
Method 5: Reset Google Chrome
This step is not technically related to what we did in previous steps, but I would still recommend performing these instructions below.
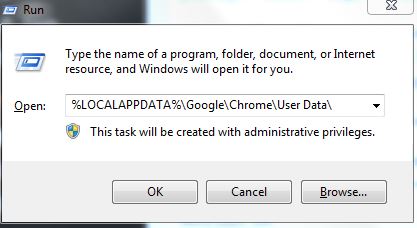
- Press and hold the Windows key and press R
- In the run dialog that opens up, type
If you are running Windows XP
%USERPROFILE%\Local Settings\Application Data\Google\Chrome\User Data\
If you are running Windows 7/Vista/8/8.1/10
%LOCALAPPDATA%\Google\Chrome\User Data\

Click OK. This will open Windows Explorer with a bunch of folders, right-click the default folder, and select rename, rename this folder to default.old. If it tells you that Chrome is already in use, then save these steps, reboot your computer, and without opening Chrome perform these steps. After the default folder has been successfully renamed to default.old see if the issue is fixed by re-opening Chrome.
Conclusions
If you are still getting this issue and the website you are trying to load says Allow Chrome to Access the Network in Your Firewall or Antivirus Settings. It’s possible that your Firewall is blocking Google Chrome to access the internet. We have covered this issue in our extensive guide that you can follow over (here). That should definitely fix this issue for you.