How to Fix All Local User Accounts Missing from the Login Screen
All the local user accounts may be missing from your login screen as a result of the wrong configuration of group policy or system registry. Moreover, users not part of a user group (as a result of a software glitch) may also result in the error at hand.
The issue arises usually, after a Windows update when the user tries to log in to his system but the user is not shown with any of the local user accounts.
Before proceeding, keep in mind that you may use solution 1 or 2 to log in to the system (or use a domain/Microsoft account, if present) & then try other solutions to permanently resolve the issue. Once logged in, check if performing a cold start (after the user properly signed out of the account & then shutting down the PC) of your PC clears the glitch.
If you are a part of a domain network, then check if the security policy of your organization is not causing the issue. Also, make sure no security product that is used to control the system’s login (like Duo 2FA) is causing the issue. Last but not least, check if all the user accounts are password protected (even the guest accounts) & are shown in the “\users” path (you may execute it in the Run box).
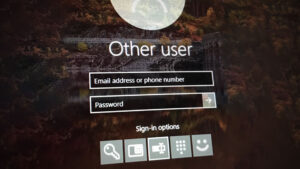
Solution 1: Login Through the Other User Option
You may use the Other User option by entering the user name after the backslash to log into the system (if the option is shown). Once you have successfully logged in to the system, then you may try the other solutions to permanently solve the problem.
- Click on the Other User option & press the backslash (i.e., \) key.
- Now enter your user name (i.e., \[User name]) & enter your password/PIN, e.g., your user name is XYZ, then enter \XYZ in the username field.
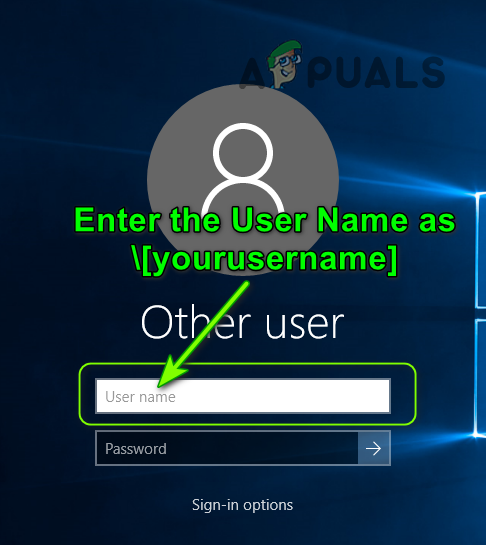
Enter the Username after the Backslash - Then hit the Enter key & check if you have successfully logged in to the system.
- If not, you may have to enter the PC Name before the backslash & then the user name (i.e., [localmachinename]\[localaccountname]) e.g., if your PC name is ABC & your user name is XYZ, then enter ABC\XYZ.
- If you have successfully logged in to the user, then log in to all the other local users one by one (some Windows updates are required to apply on each logged on user profile), & after that check if the local accounts are shown on the login screen.
If you are encountering the issue on the domain/Azure AD, you may try the domain/Azure AD name & then enter the backslash followed by the user name (i.e., AzureAD\Name).
Solution 2: Use the Advanced Recovery Options
If the Other User option did not work, then you may try the advanced recovery options e.g., the startup repair or use the safe mode.
Startup Repair
- Force shut down your PC thrice & for the third time, you will be shown with the Troubleshoot screen.
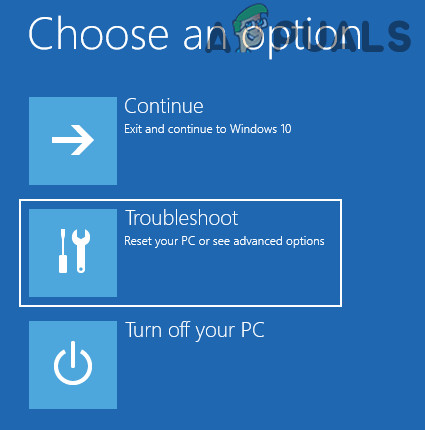
Open Troubleshoot in Advanced Startup Menu - Now open Advanced Options & select Startup Repair.
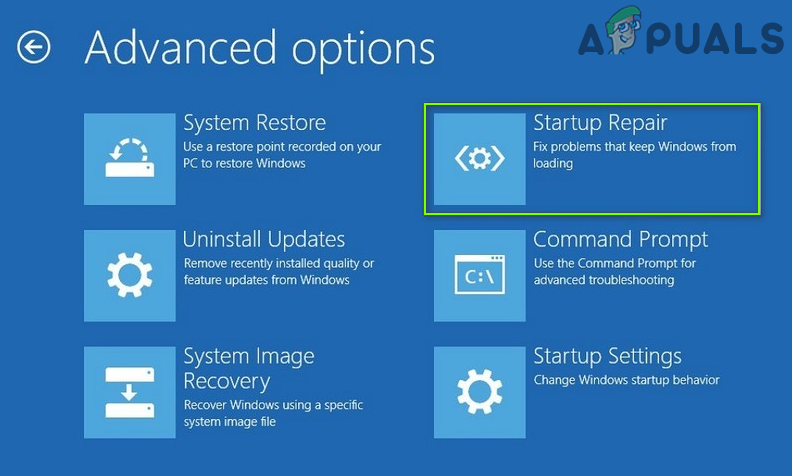
Open the Startup Repair - Then follow the prompts on your screen & check if that resolves the log-in issue.
Safe Mode
- Boot your system into the safe mode (Troubleshoot > Advanced Options > Startup Setting).
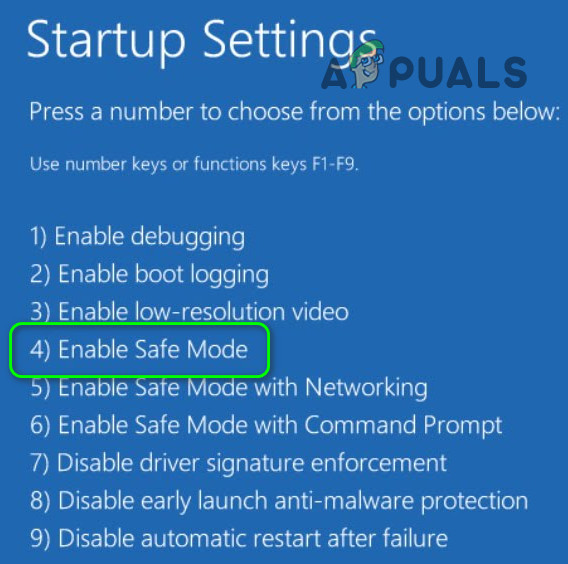
Boot Your System into Safe Mode - Once your system booted into the safe mode, then you may try the other solutions discussed in this article.
Use the Command Prompt to Enable the Built-in Administrator Account
- If the safe mode did not work, boot the system into the recovery mode (as discussed above) & open Command Prompt (Troubleshoot > Advanced Options).

Open Command Prompt in the Advanced Options - Now, execute the following:
net user administrator /active:yes
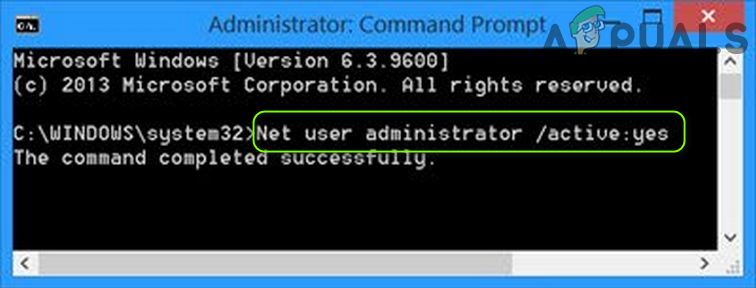
Activate the Built-in Administrator Account Through the Command Prompt - Then reboot your PC & check if you can log in to the local administrator account. If so, then use it to try the other solutions discussed in this article.
Solution 3: Disable the Fast Startup of Your PC
The accounts issue may arise if the Fast Startup option for your system is enabled as it can make the system overlook an essential system resource. In this context, disabling the Fast Startup may solve the problem.
- Hit the Windows key & in the Windows Search, type Power Options. Now select Power & Sleep Settings.
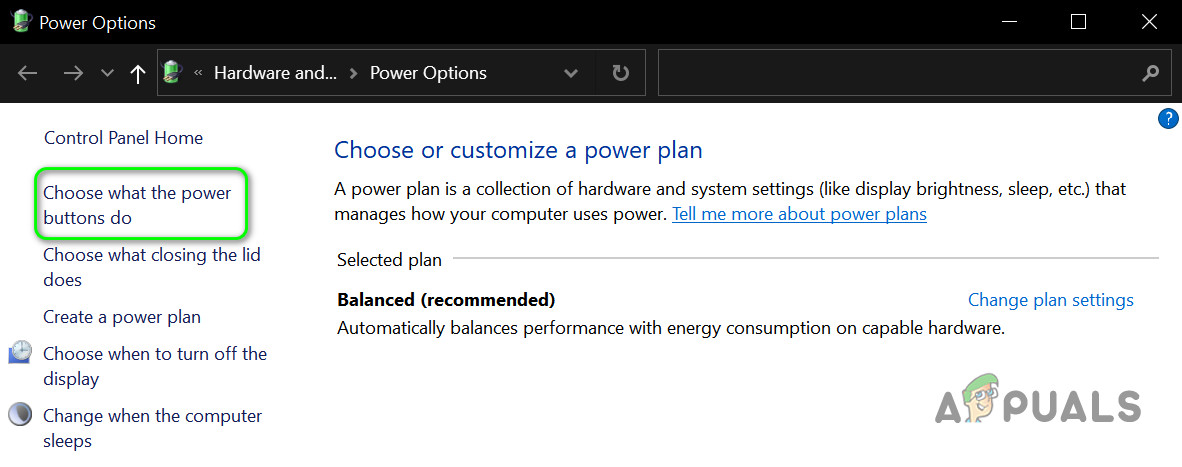
Open Power & Sleep Settings - Now, in the right pane, click on Additional Power Settings & click on Choose What the Power Buttons do.
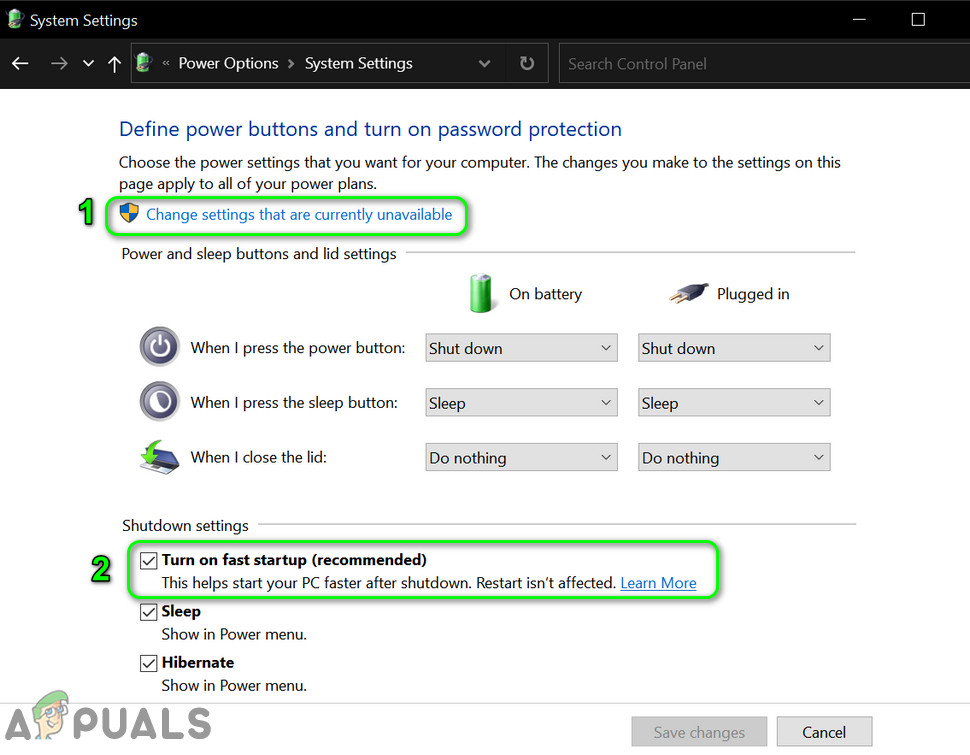
Open Choose What the Power Buttons Do - Then click on Change Settings That Are Currently Unavailable & disable the option of Turn on Fast Startup.
Disable Fast Startup - Now save your changes & reboot your PC to check if the login problem is solved.
If the issue persists, then check if switching the graphics card (from switchable to integrated & vice versa) in the system’s BIOS sorts out the problem.
Solution 4: Assign the User to the Administrator Group of the PC
You may not see local user accounts on the login screen if the user accounts are not part of the user groups (due to a software glitch). In this case, adding the users to a group may solve the problem. But before proceeding, make sure no user is added under Settings > Accounts > Access Work or School (you may add it in the Other Users).
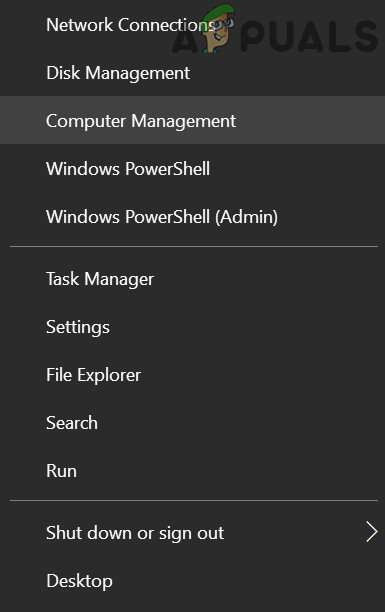
- Right-click on the Windows button & in the Power User menu shown, select Computer Management.
Open Computer Management - Now, in the left pane, expand Local Users and Groups & select Users.
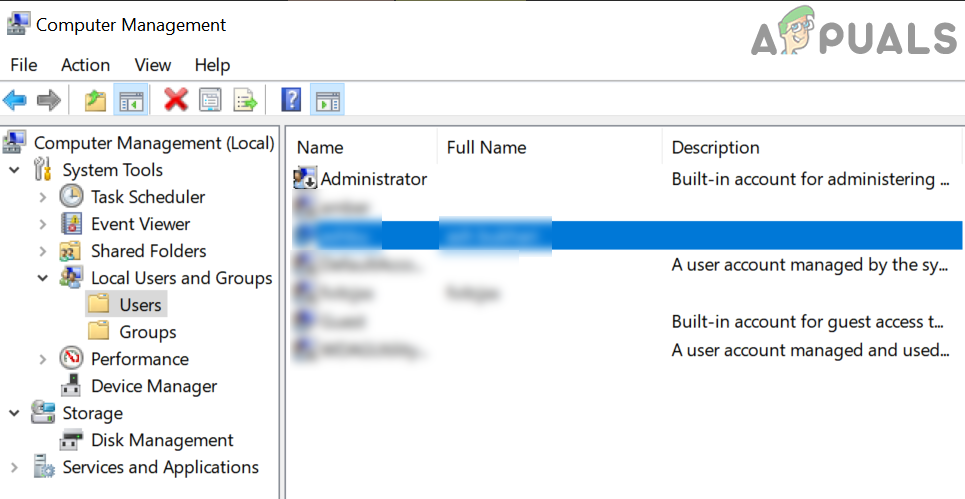
Double-click on Your User Account in Local User and Groups - Then, double-click on one of the problematic accounts.
- Now, in the General tab, make sure the account is not disabled & head to the ‘Member of’ tab.
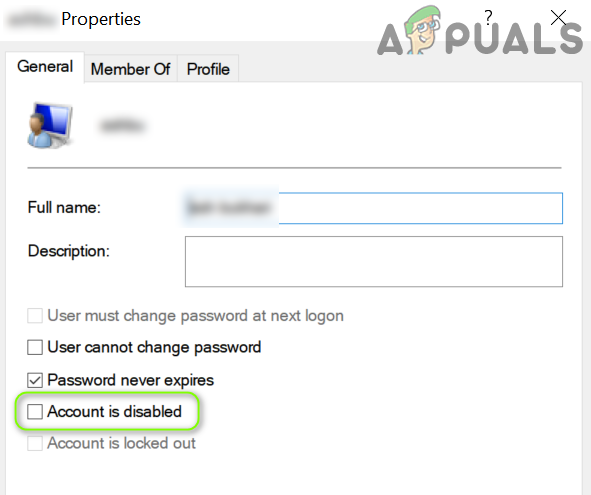
Uncheck Account is Disabled - Then check if the account is a member of a group. If so, check if the added group is an administrator.
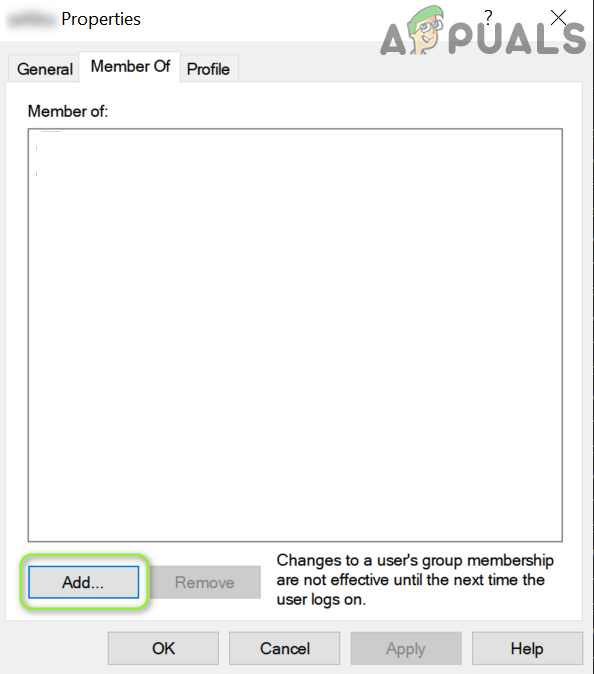
- If the account is not a member of an administrator group, then click on Add & click on the Advanced button.
Click on Add in the Account’s Property Window - Now click Find Now & then double-click on Administrators.
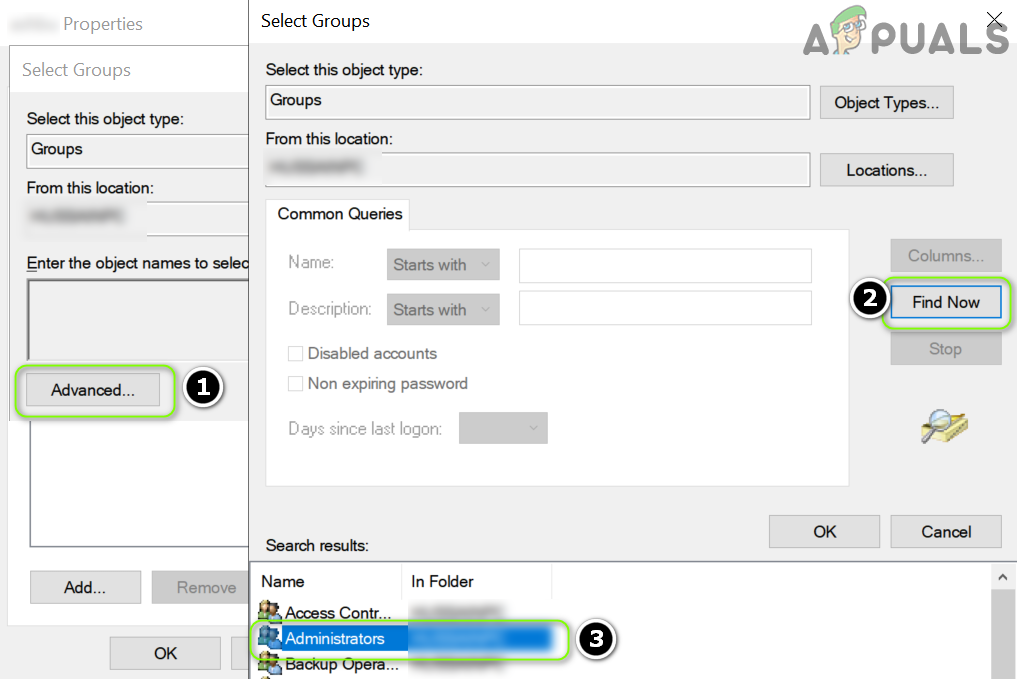
Add the User to the Administrator Group - Then click on Apply/OK & repeat the same to other problematic accounts.
- Now reboot your PC & check if the accounts’ issue is resolved. If so, then do not forget to assign the users to their proper groups.
You can achieve the same by executing the following in an elevated command prompt:
net localgroup "Administrators" [Computer Name]\[Missing User] /add
If the issue persists, then you may create a new user account & transfer the data to it.
Solution 5: Use the Group Policy Editor
You may encounter the issue at hand if the group policy of your PC does not allow you to do so. In this context, editing the relevant group policy settings may solve the problem. Windows 10 Home Version users may have to install the Group Policy Editor.
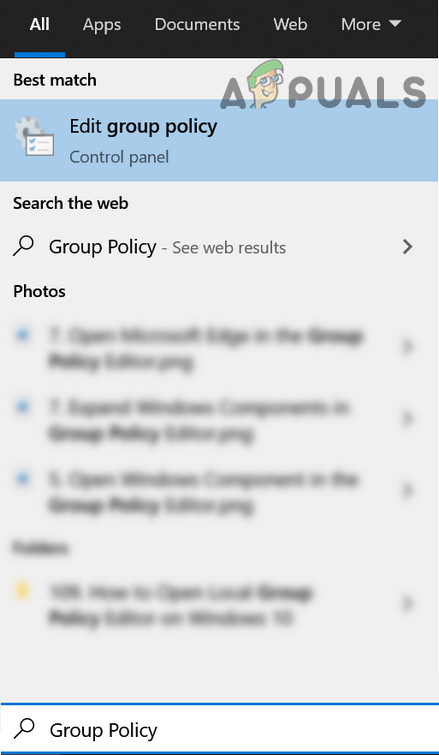
Press the Windows key & in the search box, type Group Policy. Then select Edit Group Policy.
Now try the following configurations:
Enable ‘Enumerate Local Users on Domain-Joined Computers’
- Navigate to the following:
Computer Configuration>>Administrative Templates>>System>>Logon
- Then, double-click on Enumerate Local Users on Domain-Joined Computers & set its radio button to Enabled. Now Apply your changes.

Double-Click on Enumerate Local Users on Domain-Joined Computers - Then make sure Hide Entry Points for Fast User Switching is disabled (or Not Configured).

Set Entry Points for Fast User Switching to Not Configured - Now close the Group Policy editor & log out of the account.
- Then reboot the PC & check if the accounts issue is resolved.
Edit the Security Options
- Steer to the following:
Computer Configuration>>Windows Settings>>Security Settings>>Local Policies>>Security Options
- Now, double-click on Interactive Logon: Don’t Display Last Signed-in & set its radio button to Enabled.
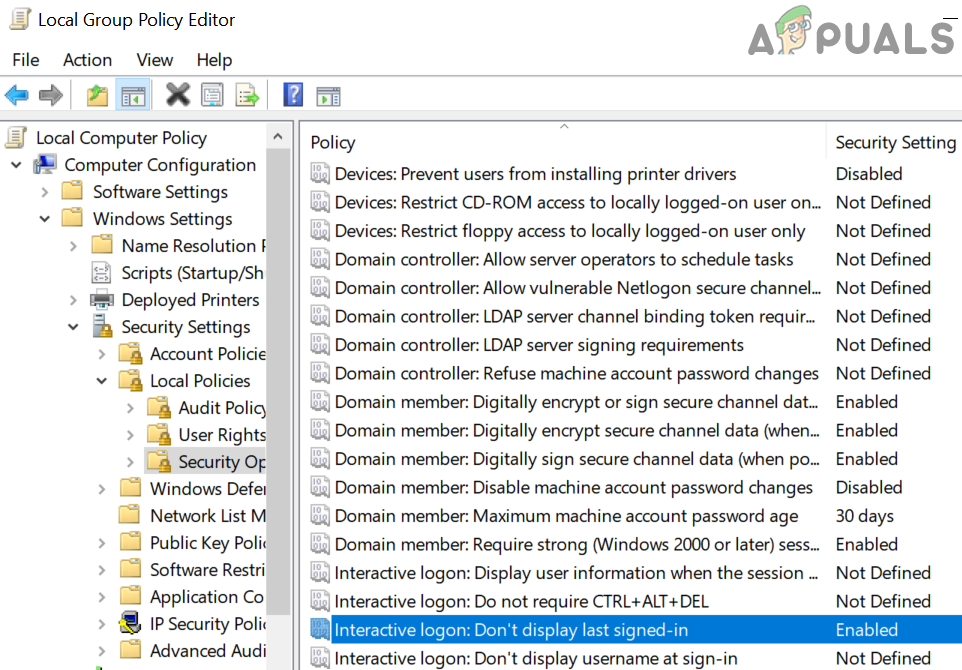
Enable Interactive Logon: Don’t Display Last Signed-in - Then click on Apply/OK & reboot the PC to check if the accounts issue is resolved.
- If not, open Security Options in the Group Policy Editor (repeat step 1), & double-click on Interactive logon: Display User Information When the Session is Locked.
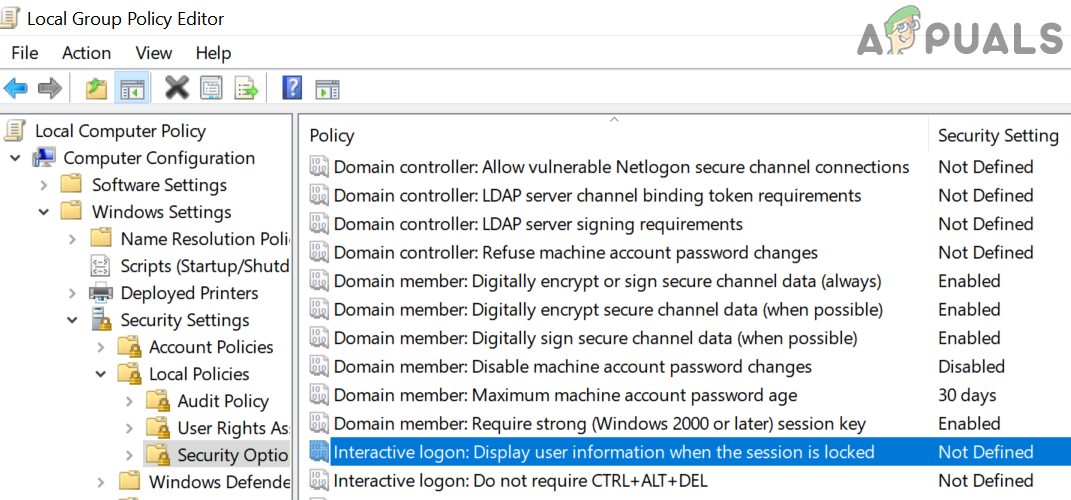
Open Interactive logon: Display User Information When the Session is Locked - Now, in the dropdown, select Do not Display User Information & click on Apply/OK.

Select Do Not Display User Information - Then enable the Interactive Logon: Do not Display Last User Name (if applicable to you) & close the Group Policy Editor.
- Now reboot your PC & check if the accounts issue is resolved.
Edit Windows Logon Options
- Navigate to the following:
Computer Configuration>Administrative Templates>>Windows Components>>Windows Logon Options
- Now double-click on Sign-in and Lock Last Interactive User Automatically After a Restart & set its radio option to Enabled (if it is already enabled, then disable it).

Enable Sign-in and Lock Last Interactive User Automatically After a Restart - Then click on Apply/OK & reboot your PC.
- Upon reboot, check if the system is clear of the login issue.
You can achieve the same by disabling the following settings:
Settings>>Accounts>>Sign-in Options>>Privacy>>Use My Sign-in Info to Automatically Finish Setting up My Device After A
Solution 6: Edit the System’s Registry
The accounts issue arises if the system’s registry is not properly configured. In this scenario, you may have to edit the relevant registry items to overcome the log-in issue.
Warning: Advance at your own risk as editing the registry of your system is a proficient task & if done wrong, you may cause undying damage to your system/data.
Launch the Registry Editor with the administrator privileges & try the undermentioned solutions (some of these keys may not be available to all users) one by one to check if the issue is resolved, but before that, make sure to create the backup of your system’s registry.
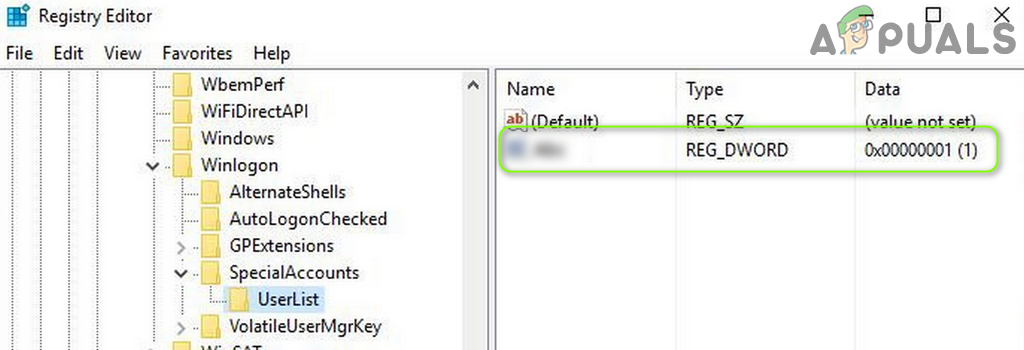
Delete Accounts in SpecialAccounts Key
- Navigate to the following (you may copy-paste it in the editor’s address bar):
HKEY_LOCAL_MACHINE\Software\Microsoft\WindowsNT\CurrentVersion\Winlogon\SpecialAccounts
- Now, select UserList, and in the right pane, check if any of your user accounts show there.
- If so, then delete the accounts entries & reboot your PC to check if the accounts issue is resolved.
Delete the Account in SpecialAccounts
Disable HideFastUserSwitching
- Navigate to the following:
Computer\HKEY_LOCAL_MACHINE\SOFTWARE\Microsoft\Windows\CurrentVersion\Policies\System
- Then, double-click on HideFastUserSwitching & set its value to 0.
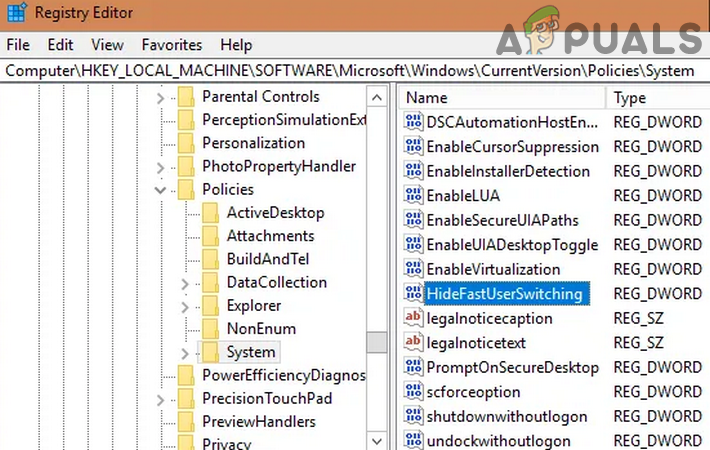
Disable HideFastUserSwitching - Now reboot your PC & check if the accounts issue is resolved.
Disable DontDisplayLastUserName
- Navigate to the following:
Computer\HKEY_LOCAL_MACHINE\SOFTWARE\Microsoft\Windows\CurrentVersion\Policies\System
- Now, double-click on the dontdisplaylastusername & change its value to 0.
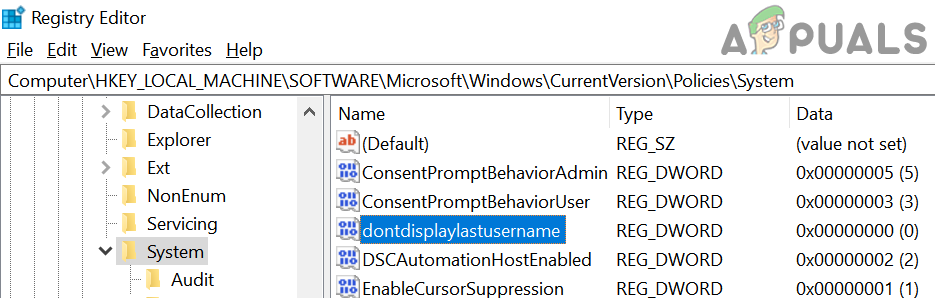
Disable dontdisplaylastusername - Then close the editor & reboot the PC to check if the accounts are shown on the login screen.
Delete the Corrupt Profile in ProfileList
- Navigate to the following:
Computer\HKEY_LOCAL_MACHINE\SOFTWARE\Microsoft\Windows NT\CurrentVersion\ProfileList
- Now, in the left pane, click the first entry under ProfileList (usually, S-1-5-8), & in the left pane, check if the ProfileImagePath entry exists there. If the entry exists, then, in the left pane, click on the second entry under the ProfileList & check for the ProfileImagePath entry. Keep on checking for all the entries under ProfileList until all the entries that do not have ProfileImagePath are found.
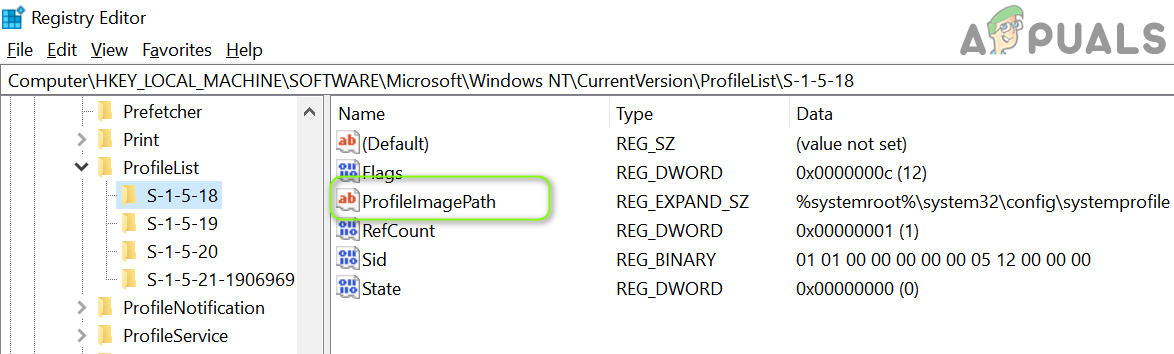
Check for Profile Image Path - Once you have found the keys that do not have ProfileImagePath entry (in the right pane), then, in the left pane, delete the key (e.g., if S-1-5-19) that does not have ProfileImagePath entry in the right pane, then confirm to delete the registry key.
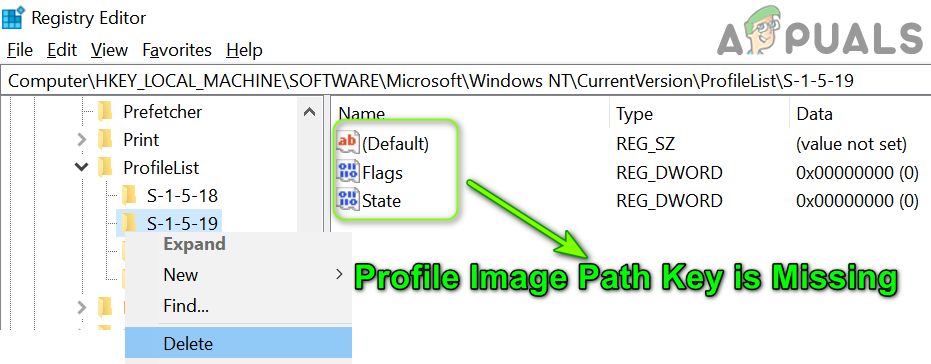
Delete the Key if Profile Image Path is Missing - Now repeat the same for all the sub-keys in ProfileList that do not have the ProfileImagePath entry.
- Then reboot your PC & check if the User Accounts issue is resolved.
Delete All Group Policy Registry keys
- Navigate to the following path:
HKEY_LOCAL_MACHINE\Software\Policies\Microsoft
- Now, right-click on Microsoft & select Delete.
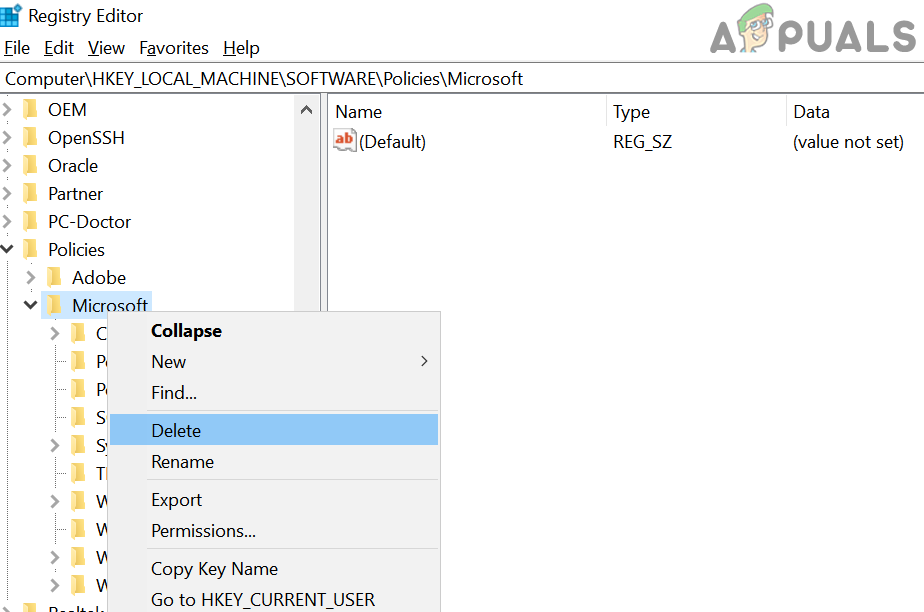
Delete the Microsoft Key - Then confirm to delete the key.
- Now, delete the Microsoft key at the following path:
HKEY_CURRENT_USER\Software\Policies\Microsoft
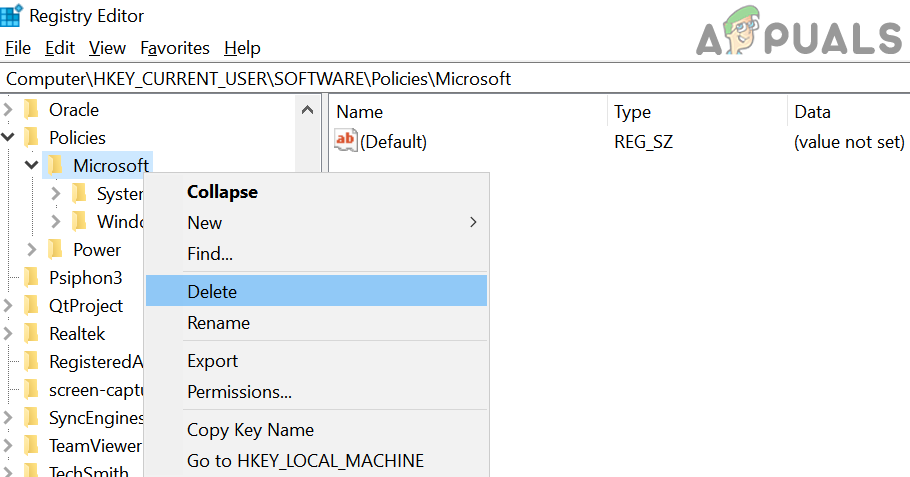
Delete the Microsoft Key in HKCU - Now, delete the Group Policy Objects key at the following path:
HKEY_CURRENT_USER\Software\Microsoft\Windows\CurrentVersion\Group Policy Objects
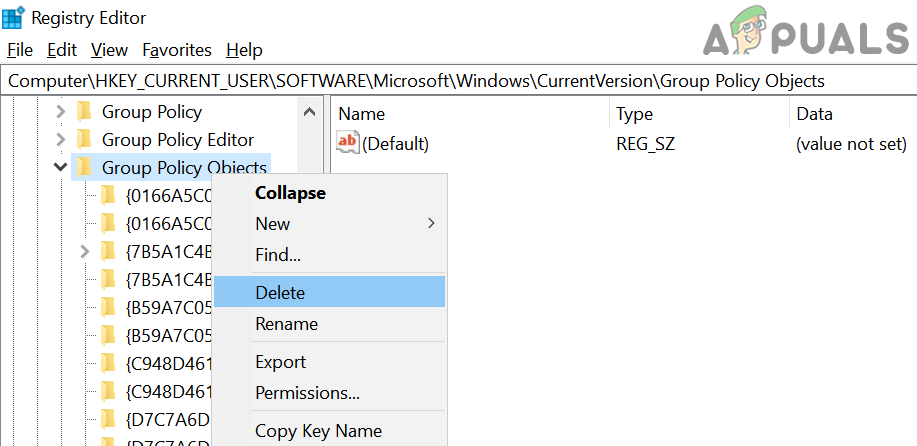
Delete the Group Policy Objects Key - Now, delete the Policies key at the following path:
HKEY_CURRENT_USER\Software\Microsoft\Windows\CurrentVersion\Policies
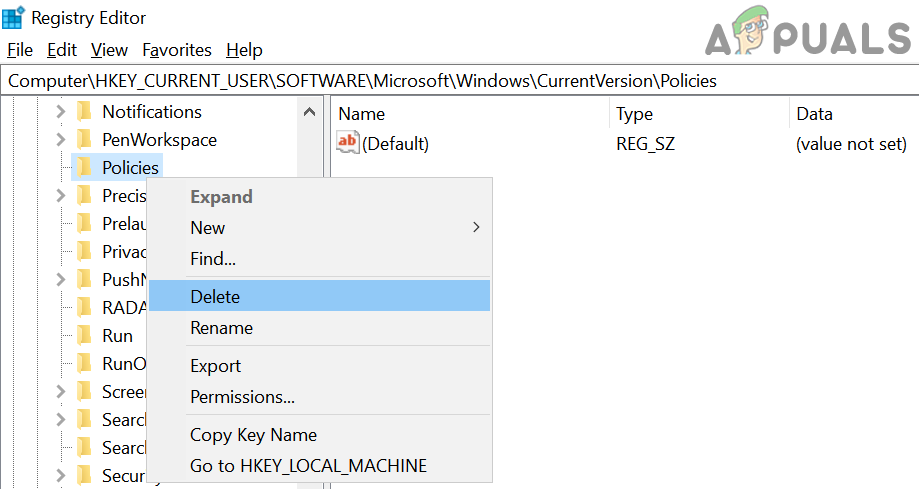
Delete the Policies Key - Upon reboot, check if the log-in issue is resolved.
If the issue is still there, either revert the system to an older version of Windows 10 or perform a system restore. If that is not the option, then you may have to create (on another PC) a Windows 10 installation media disk/USB (if already not available). Then boot the system with this disk/USB & use the Repair Your Computer (near the bottom left of the screen) to repair the system.