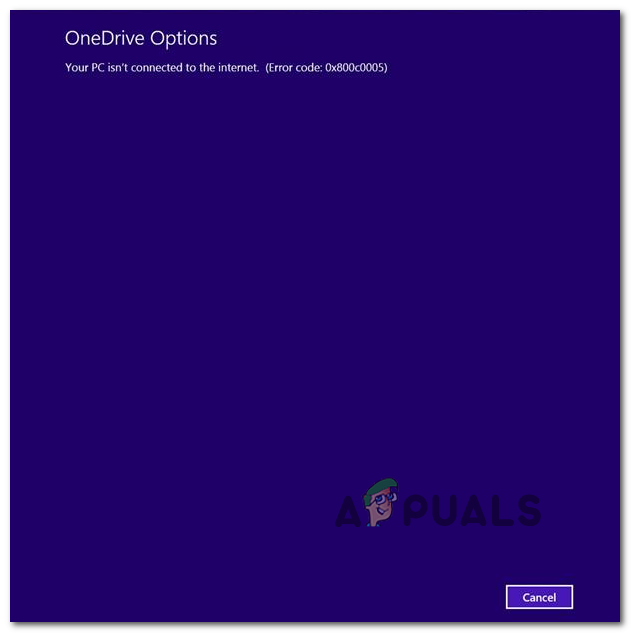
How to Fix “Error Code: 0x800c0005” on OneDrive?
The error code 0x800c0005 appears under Windows after a native or 3rd party task fails after having issues downloading files. In most cases, this problem is tied to a failure related to several Dynamic Link Library (.DDL) files. However, the same error code is also reported to occur on Xbox One.
What Causes “Error Code: 0x800c0005” on OneDrive?
As it turns out, there are several different culprits that might end up causing this error code on Windows or Xbox One:
- 3rd party firewall interference – As it turns out, this problem can very well be caused by an overprotective AV suite that ends up blocking the connection with the external server which ends up causing the error. In this case, try uninstalling the firewall and see if the error code goes away.
- Problem with the Dynamic Link Library fleet – If you’re seeing this error code while attempting to install a .NET framework version or when attempting to update the Onedrive app, chances are you’re dealing with several DDL files that aren’t correctly registered. In this case, you should be able to fix this problem by re-registering the files from an elevated CMD prompt.
- Windows Update inconsistency – If you’re seeing this error while attempting to update a native component through Windows Update, chances are you’re dealing with some kind of corruption rooted in the temp folders. In this case, you should be able to fix the issue by resetting every relevant WU service and clearing the SoftwareDistribution and CatRoot2 folders.
- Temporary file issue on Xbox One – If you’re seeing this error on Xbox One (when launching a game), chances are you are dealing with some kind of inconsistency that is rooted in a temporary file. In this case, you should perform a power-cycling procedure.
- NAT is closed – On both PC and Xbox One, this error code can appear due to the fact that the Network Address Translation (NAT) is closed. In this case, you should be able to fix the issue either by enabling UPnP from your router settings or by forwarding the required ports manually.
- DNS inconsistency – In case you are seeing this error code while attempting to create a party on Xbox One or via the Xbox App (on Windows 10), it’s likely that you’re dealing with an inconsistent DNS. If this scenario is applicable you should switch over to the Google DNS equivalent and see if this ends up fixing the problem for you.
Disable 3rd party Firewall
According to some affected users, this problem can also occur due to an overprotective AV suite that ends up blocking the connection with the external server, which ends up producing the 0x8004005 error code.
If you’re using a 3rd party suite, you should go ahead and uninstall it before trying the procedure that is currently failing and see if this ends up fixing the issue for you. Keep in mind that disabling real-time protection will likely not be enough since the same security rules will remain in place even if the main AV service is disabled.
In case this scenario is applicable and you’re using a 3rd party firewall that you suspect might be causing the issue, uninstall your security program completely along with every remnant file.
After you do this, restart your computer and see if the problem is fixed at the next computer startup.
If the same problem is still occurring, move down to the next potential fix below.
Re-registering the .DLL files
If you’re seeing the 0x800C0005 error while trying to install .NET Framework 4 or when trying to install a pending Windows Update, it’s likely that you’re seeing this problem due to several Dynamic Link Library files (Softpub.dll, Wintrust.dll, and Initpki.dll) that are not correctly registered, so your operating system is not able to make use of them properly.
In case this scenario is applicable, you will be able to fix the issue by using an elevated Command Prompt to re-register the 3 Dynamic Link Library files. Several affected users have confirmed that operation finally allowed them to complete the task without seeing the 0x800C0005 error.
Here’s a quick guide on re-registering the problematic .DLL files:
- Press Windows key + R to open up a Run dialog box. Inside the text box, type ‘cmd’ inside the text box, then press Ctrl + Shift + Enter to open up an elevated Command Prompt. When prompted by the UAC (User Account Control), click Yes to grant administrative privileges.
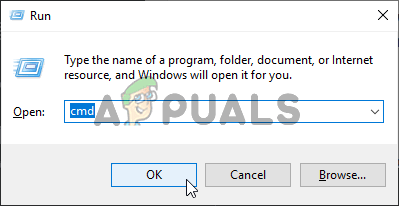
Running Command Prompt - Once you’re inside the elevated Command Prompt, type the following commands in whichever order and press Enter after each one to re-register the problematic Dynamic Link Library files:
regsvr32 Softpub.dll
regsvr32 Wintrust.dll
regsvr32 Initpki.dll
- Once the operation is completed, close the elevated Command Prompt and restart your computer.
- After the next startup is complete, repeat the action that was previously causing the 0x8004005 error and see if the problem is now fixed.
Resetting the Windows Update Error
If you’re seeing this error while attempting to install a pending Windows Update, it’s likely that you’re dealing with some kind of corruption that ends up affecting files and dependencies associated with Windows Update.
If this scenario is applicable, you should be able to fix the issue by resetting the Windows Update component with the tools available for end-users. Several affected users have confirmed that they finally managed to fix the issue by resetting Windows Update and every associated dependency.
In case you want to apply the same type of fix, follow the instructions below in an attempt to fix the 0x800c0005 error code:
- Press Windows key + R to open up a Run dialog box. Next, type ‘cmd’ and press Ctrl + Shift + Enter to open up an elevated Command Prompt. At the User Account Control, click Yes to grant administrative privileges.
Running Command Prompt - Once you’re inside the elevated Command Prompt, type the following commands and press Enter to stop the main Windows Update service and the associated dependencies:
net stop bits
net stop wuauserv
net stop appidsvc
net stop cryptsvc
Note: These commands will effectively stop the BITS service, the Windows Update service, and the Cryptographic service.
- Once you manage to run each of the commands above successfully, paste the following commands to rename the SoftwareDistribution and the CatRoot2 folders:
Ren %systemroot%\SoftwareDistribution SoftwareDistribution.bak
Ren %systemroot%\system32\catroot2 catroot2.bak
Note: These two commands will force your operating system to create new folders for software distribution which will eliminate the effects of any corrupted files that are stored in the current folders.
- Next, paste the commands below and press Enter after each one to restart the services that you previously disabled at step 2:
net start bits
net start wuauserv
net start appidsvc
net start cryptsvc
- Restart your computer and see if the problem is fixed at the next computer startup.
In case this fix is not applicable and you’re seeing this error on Xbox One, move down to the next potential fix below.
Power-cycling the Console (Xbox One Only)
If you see the 0x800c0005 error code while attempting to download a game update or when trying to start a party, it’s possible that you’re dealing with some kind of network inconsistency facilitated by some type of files that are stored locally.
In this case, you should be able to fix the problem by performing a power cycling procedure on your Xbox One console. To do this, follow the instructions below to perform a power-cycle and drain the power capacitors. This operation will eliminate the majority of issues caused by temporary files and leftover firmware files.
- With your Xbox One console fully turned on, press the Xbox button (on your console) and keep it pressed until you see the front LEDs turning off on your console.

Power-cycling Xbox One console - Once your console is fully turned off, go ahead and unplug the power cable from the power outlet and wait for 30 seconds or more to ensure that the power capacitors are completely drained. This operation will ensure that there isn’t any cross-startup data that might still cause this behavior.
- Connect the power cable once again and boot up your console conventionally. While the console starts up, look for the initial startup animation. If you see the longer animation (the one about 5 seconds log), it means that the operation was a success.

Xbox One long starting animation - Once your console boots back up, repeat the action that was previously causing the 0x800c0005 error code and see if the problem is now fixed.
In case the same problem is still occurring, move down to the next potential fix below.
Enabling UPnP or Forwarding the Required ports Manually
If none of the potential fixes have worked for you, there’s a high chance that you are seeing this error code due to a NAT (Network Address Translation) issue. If your console determines that your NAT is closed, you might be prevented from performing certain actions on your console.
In this case, you should be able to fix the problem swiftly by enabling Universal Plug and Play if your router supports it. This will ensure that your NAT is opened by automatically forwarding every port that is required by your console OS or by a game or application that you’re currently playing.
However, if you’re using a router that doesn’t support UPnP, you will need to forward the required ports manually to ensure that the NAT is opened.
In case this scenario is not applicable, move down to the next potential fix below.
Switching to Google’s DNS
If none of the potential fixes above have worked for you, it’s likely that you are dealing with a DNS (Domain Name System) issue. This problem was reported to occur on both PC and Xbox One.
Several affected users facing the same problem have confirmed that they managed to resolve the problem by making the switch to the default DNS provided by Google. This will fix the majority of issues facilitated by inconsistent DNS.
But keep in mind that depending on the platform where you end up seeing the 0x800c0005 (PC or Xbox One), the instructions of making the switch to Google’s DNS will be different. Because of this, we’ve created 2 different sub-guides, so follow the one applicable to your current scenario.
A. Switching to Google DNS on Xbox One
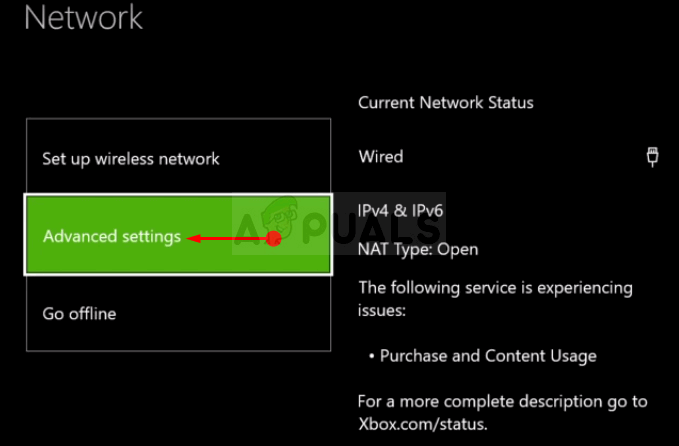
- From the main Xbox One dashboard, press the Guide menu on your controller, then go to Settings > Network and access the Advanced Settings menu.
- Next, from the Advanced Settings menu, click on DNS settings, then choose Manual from the sub-menu.
Xbox One Advanced Network Settings - Once you’re inside the DNS settings, go ahead and set 8.8.8.8 as the Primary DNS and 8.8.4.4 as the Secondary DNS.
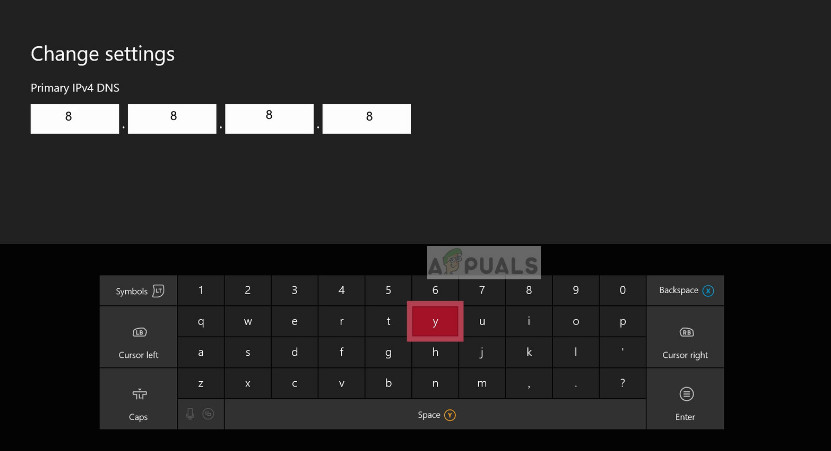
Changing DNS in Xbox Note: In case you want to use the Google DNS for IPV6, use the following values instead:
Primary DNS - 208.67.222.222
Secondary DNS - 208.67.220.220
- Save the changes, then restart your console and see if the problem is now fixed.
B. Switching to Google DNS on Windows
- Press Windows key + R to open up a Run dialog box. Next, type ‘ncpa.cpl’ and press Enter to open up the Network Connections menu.
- Once you’re inside the Network Connections menu, right-click on the network that you’re currently connected to. If you’re using a wireless network, right-click on Wi-Fi (Wireless Network Connection), then click on Properties from the context menu.
Note: If you’re connected via an ethernet cable, right-click on Ethernet (Local Area Connection). - Inside the Properties screen, select the Networking tab from the horizontal menu at the top. next, go to the module under This connection uses the following items, select Internet Protocol Version 4 (TCP / IPv4) and click on the Properties button below.
- At the next screen, select the General tab, select the toggle associated with Use the following DNS server address and replace Prefference DNS server and Alternate DNS server with the following values:
8.8.8.8
8.8.4.4
- Once you manage to adjust the values accordingly, follow step 3 and step 4 again to change the Internet Protocol Version 6 (TCP / IPv6) to Google DNS:
2001:4860:4860::8888
2001:4860:4860::8844
- Save the changes that you’ve just implemented, then restart your PC and repeat the action that was previously causing the 0x800C0005 error code.